3.1 Viewing the Output
After starting your job and verifying that it is outputting events, let it run for a while and then we can look to see where the output is stored.
- Go to your Twitter Stream Blob Storage > CONTAINERS > Click on your container e.g. “mainblob”
- You’ll see your files. Now you need a way to access and view them.

- There are a number of ways to view your files. Here are two that I had success with:
- Azure Explorer
- Power BI
3.2 Azure Explorer
You can download the Azure Explorer from here: http://www.red-gate.com/products/azure-development/azure-explorer/.
Here are some instructions to set it up:
- Click the large “Download Free” button to download “setup.exe”.
- Run “setup.exe” and click “Install”
- It will take a little while to install fully.
- After installing, the program should automatically run.
- Right click “Azure Storage Accounts” and select “Add Connection to Azure Storage…”
- Choose “Connect to Azure with a Storage Account Name and an Access Key”
- You can find the keys by navigating to your Twitter Stream Storage in the Azure Portal.
- Make sure you are on the dashboard page and select “Manage Access Keys” at the bottom.
- There, you’ll find your Storage Account Name and Primary Access Key. Use these to grant access to the Azure Explorer.
Now you have access to your storage account. You can navigate to where your data is stored and view it locally on your computer.
3.3 Power BI

This is a much more powerful tool than the Azure Explorer. Not only can we view the data, this tool allows it to be organized in a useful visual manner. It allows the user to create reports based on data to report the trends in that data. You can download it here: https://powerbi.microsoft.com/en-us/get-started/
- Click “Download”.
- Run the “PBIDesktop(…).msi” to install Power BI.
- Follow the prompts to install the program.
- After the program opens Click “Get Data” > “Azure” > “Microsoft Azure Blob Storage” >
- Use the same information we used for the Azure Explorer in points 7 through 9.
- If you have trouble connecting to Azure Storage (I did), use the Azure Explorer to download the data and simply examine it locally (You can also download the data directly from the Azure portal).
3.4 Introduction to Power BI
Let’s take a look at how exactly you use Power BI to interpret the data. It is a rather intimidating tool.
- First, we need to get our data. I downloaded the data and deal with it locally because that was the easiest way for me. Click either of two places to retrieve the data.

- Select your data format (I used CSV and instructed you to do the same) and import it into the program.
- Before you click Load click Edit so we can edit our data and make it easier to work with.
- Now you should have a Query editor. We’ll use this tool to delete data entries that don’t correlate to a topic of “Azure”, “Microsoft”, “Seattle”, “Skype”, or “XBox”.
- Click on the arrow next to the “topic” column to view the filtering tools. Make sure to click “Load More” at the bottom of the pop-up to make sure the tool encompasses all of the data. After that, deselect all of the topics that don’t belong to the previously named topics.

- Now we have data that excludes topics that are unknown. So, click OK then click Close and Apply in the top left corner.
- Now you are presented with a blank screen that will soon be filled with wonderful graphs.
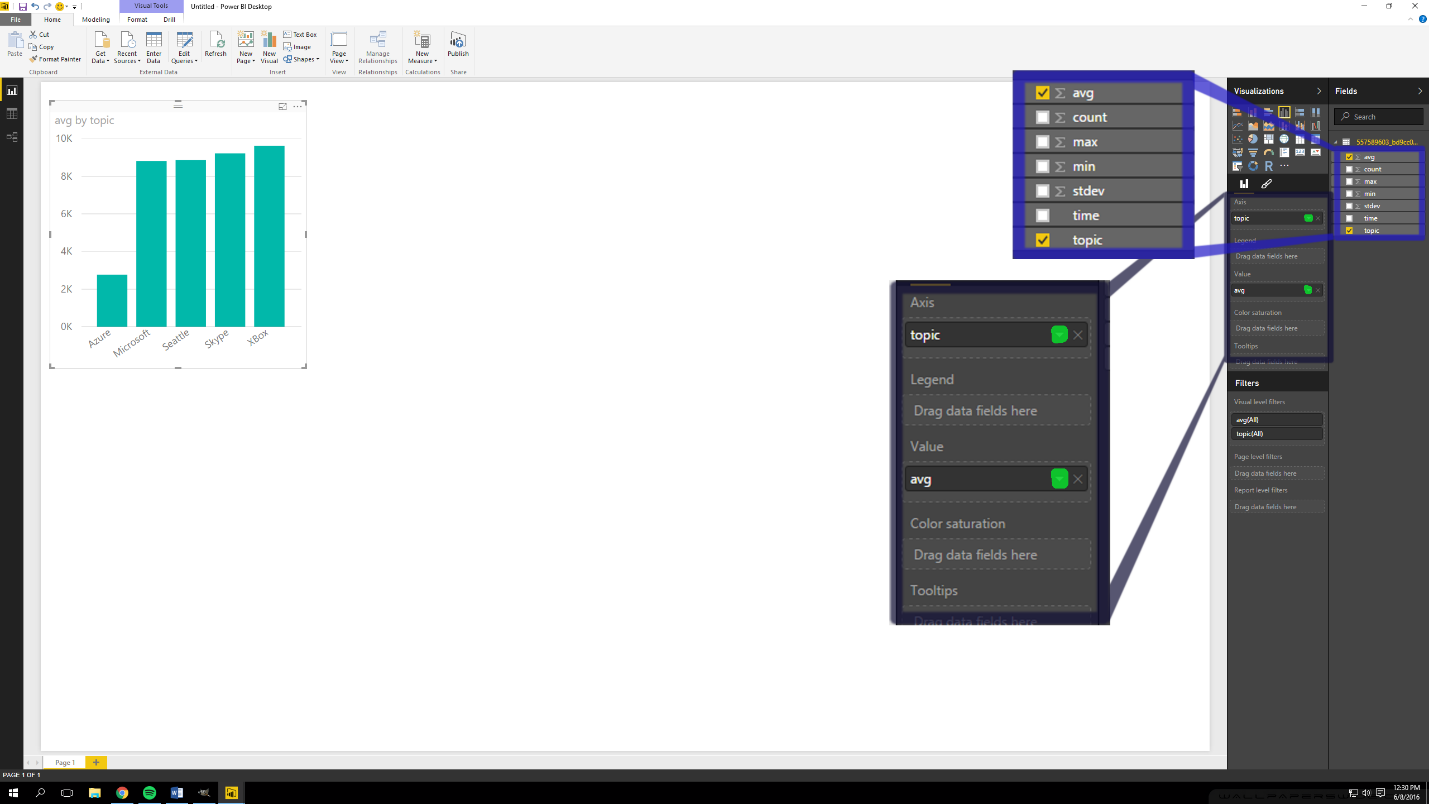
- Power BI is now very user friendly. Just click the little graphs on the right and the program will create one. Then click on the checkboxes for the data on the right and it will automatically populate the graphs with data like this:

- A summation of the avg values is not what we want. So, we click the little arrows next to the value (highlighted in green) and change it to Then, we can see how the average sentiment of each topic really stacks up.
- Add more data to the graphs and maybe a couple more types of graphs and you can end up with a more complete picture like this.
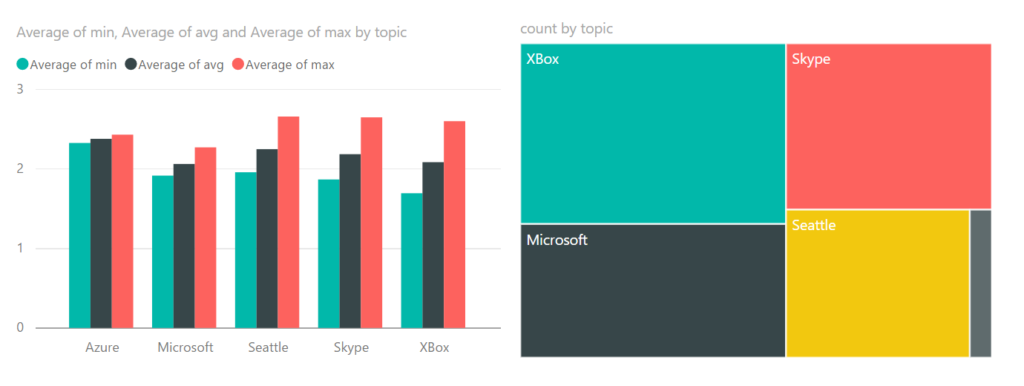


Power BI is a very useful tool. This presentation quickly and easily shows how the sentiment score of different topics differ. It also shows how often different topics are talked about on Twitter. I was surprised to see that Skype was talked about more than Seattle!
3.5 More Activities
- Create a chart that shows the amount of tweets being processed over time by topic. It should look like this:

- Find another way to show a trend in the data.
