Category Archives: Tech Tips

Tech Tip: Check the size of a folder in Box

By: Ryan Johnson

With the Box to OneDrive migration, you can easily determine the size of individual files in Box.

You may not know that you can also determine the size of the folder as well. The size can be determined in the details side panel in a folder in Box.

If you click on the Details name next to Share, you’ll see the sidebar with all the relevant info of the folder you have clicked in including the size at the bottom. Selecting the subfolders will provide the same information as well.

Check out this screenshot below:

Folder size screen shot for tech tip


Tech Tip: Basic SPAM/phishing items to look out for

By: Ryan Johnson

Below are some basic items to keep in mind to help keep your machine safe:

phishing

  1. Do not open or respond to emails that look suspicious or unusual, are from someone you don’t know, or that ask you to take an action, such as making a payment or giving information or credit card details. If the email claims to be from a genuine company but originated from a free web-based email service, it is likely spam.
  2. When using email be wary of phishing and emails that contain the following:
    • Spelling and bad grammar: Phishing emails are commonly plagued with spelling and grammatical errors.
    • Links in emails: Links in emails may appear as though they are taking you to a legitimate website however, they can be disguised. Hover over (DO NOT CLICK) links and see if you are being re-routed to some other page.
    • Threats: Some emails contain threats to include legal action, time sensitive materials, etc. These are designed to convince you to make a hasty decision and click a malicious link or open an unsafe attachment.
    • Spoofing a legitimate website or company: Some emails will appear to come from a legitimate company. However that is far from the case. Again, attackers will try to make everything appear to be legitimate but things such as suspicious URL’s (pages with names not associated with the website or company), or outdated information can be tell-tale signs something is not right.
  1. Do not open an attachment you weren’t expecting, especially if you don’t know the sender. Often malicious code masquerades as zip files or Word documents or some other file type. Scammers can easily change the .EXE extension of a malicious file to .DOC.
  2. Just as you should not open attachments, do not click on a link in an email unless you are 100 percent sure it is safe to do so. It is easy to interject an infected hyperlink into the body copy of an email. If in doubt, delete it, or check with the sender or the Helpdesk.
  3. Don’t be fooled by phishing attempts. Someone, somewhere, will try to get personal information from you. Never give out personal details over email or fill in a form that pops up when you open up an email. May times throughout the year, you may receive an email that threatens to shut down your email account unless you provide your Penn State password. Penn State will NEVER ask for your password.
  4. On the phishing front, you shouldn’t open or interact with messages from businesses to which you haven’t given your address and be wary of messages from companies that already have your address. A popular tool among spammers is to act as if they were from your bank, for instance, suggesting you need to change your password. In cases such as these, it is best to check the banks’ website for details or call the banks’ helpdesk to ensure your account is in order — better safe than sorry! Banks and other organizations should not be contacting you via email for security purposes.
  5. Never rely solely on received e-mail when asked to perform financial or other sensitive transactions. Email is not a reliable assurance of sender’s identity. If you are the recipient of a sensitive email request, insist on conducting secondary out-of-band verification via phone call or in person. As in the case of this incident, the “from” address of an email may be fake – or a sender’s account could be compromised and in the hands of a malicious actor.
  6. When using Two Factor authentication, don’t accept a request for 2FA unless you initiated it.  Someone may have your WebAccess credentials and trying to access your data.
  7. When working remotely, use your work machine for work business and for work business only.  For all other personal browsing and transactions, please use a home or personal device.

If you believe you have been sent a phishing scam, forward the original phish as an attachment in a new message addressed to phishing@psu.edu

Tech Tip: Start preparing for the Box migration in January

By: Ryan Johnson

Box Migration to OndeDrive graphic

To prepare for our upcoming migration of data from Box to Microsoft Office 365 in January, Enterprise IT encourages you to begin cleaning your Box environment as soon as possible by deleting unused files, removing unnecessary shares, and updating the formatting of files and folders as needed. These steps will ensure a speedier, more seamless migration and make accessing your data and working with collaborators easier post-migration.

Several how-to articles have been added to the Knowledge Base to assist you with these tasks. Please review the articles, along with the Migration Checklist, Frequently Asked Questions, and Resources and Training page available on the Box Migration tab on the Box at Penn State website.

Additional information and resources for familiarizing yourself with The Box Migration are available at Box Migration website.

Tech Tip: Zoom update required

By: Ryan Johnson

Zoom is now requiring all users to be using version 5.3 or higher.  If your computer is not updated, you will get the following error:

Tech Tip Zoom update

Please continue to use Self-Service to update Zoom and other applications your University Libraries machines.

For Corona laptops and Personal Computers feel free to download and install the newest version here:

Windows: https://psu.box.com/v/psulibrarieszoom
Mac: https://psu.box.com/v/psulibrarieszoommac

If you have any questions or need assistance, please feel free to contact the Libraries Helpdesk.


Tech Tip: End of support for Duo (2FA) Mobile app iOS 11 and Android 7

By: Ryan Johnson

DUO logo

Effective Dec. 1, Duo Security will end support of their Duo Mobile application for older operating systems iOS 11 and Android 7. Duo Security is recommending users upgrade to the latest iOS or Android versions because updated systems will better maintain a mobile device’s security and provide access to the latest features and improvements made to Duo Mobile and all other applications.

To read more this announcement, check out the recent Penn State News Article about this change.

Why is this Happening?
iOS 11 and Android 7 devices are no longer supported and may pose security risks.  Penn State IT and the Office of Information Security highly recommended you update your iOS and/or Android versions if possible.  Newer devices should already be running updated operating systems.

How do I check what version I’m running on my device?
To determine which software version is on your device, visit the iOS or Android support sites.

Will I be able to use these devices running older versions with Duo?
Yes.  Users who have already downloaded the Duo Mobile app on iOS 11 or Android 7 on older devices will continue to be able to authenticate using the app.  However, the Duo App will no longer be able to be downloaded from the Apple and Google App Stores moving forward.

Can I still get SMS passcodes or Calls to authenticate on older devices?
SMS-delivered passcodes and phone callback authentication are not affected by this change as these methods do not rely on Duo Mobile.

What if I have an older device and can no longer download the Duo App?
You can still get calls and text codes to authenticate.  If you have a landline phone, including a home phone, please add to your list of available devices on the 2FA device management page.  If none of these options are available, please contact Library Strategic Technologies for recommendations.

If you have any questions or need assistance, please feel free to contact the Libraries Helpdesk.

Tech Tip: Outlook Sticky Notes in your email on the web

By: Ryan Johnson

Have you ever used Sticky Notes in Window or in the outlook desktop client?  Now you can use Sticky Notes in Outlook for the web.

That means you will not only be able to view your Sticky Notes, but you will also be able to create and edit these notes. And because Sticky Notes now supports online sync, these notes will sync across all your other devices, too.

Creating a Sticky Note in Outlook

To use this feature, sign into your Penn State Outlook on the web account.

Go to the Notes folder, and then click or tap New Note to create a new sticky note.

These notes can be edited, deleted, changed color, and formatted all within your email interface.  Sticky Notes also support pictures as well.

Tech Tip: Windows updates on University Libraries machines

By: Ryan Johnson

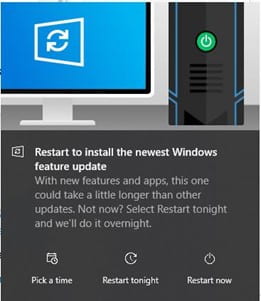
Windows restart screenshot for tech tip

Library Strategic Technologies has been getting recent questions about Windows updates and what to do. The reason you are getting more requests to restart for updates is because EIT changed the way in which the Libraries receive Windows updates. Normally, Strat-Tech would run these patches on a weekend when no one is working. Now the patches will try to run as soon as Microsoft releases them.  The ‘pending’ updates are ones that most likely are waiting on a restart or another update to install first.  Please keep your machine update-to-date and install the patches if prompted, but please feel free to schedule them when its best for you if you have that option.  Also, please keep in mind that borrowed laptops will also receive these updates.

Tech Tip: Tips to maximize Zoom performance at home

By Ryan Johnson

Home office desk and computer

Internet speed issues can be quite common when joining or leading Zoom sessions from home.  Here are some tips to mitigate performance issues:

  1. Zoom clients: It is strongly recommended to run the Zoom desktop program instead of the running Zoom through a web browser. Also make sure you download the latest version of Zoom. If you are working at home with a University Libraries machine, download the latest version of Zoom from Self-Service.   If you are using a Corona laptops, feel free to download and install the newest version here: https://psu.box.com/v/psulibrarieszoom
  2. Close other applications: Other equipment such as gaming or video streaming services used by other users in the home can compete for internet bandwidth.
  3. Turn off video entirely:  A virtual background or HD video is typically not as critical as audio. To turn off HD video in your Zoom desktop client:
      • Click on Settings (the gear icon).
      • Click Video in the left-hand menu.
      • In the My Video section, uncheck the box beside Enable HD if it is checked.
  4. Using your phone to join Zoom: If your available cellular internet is better than your internet/Wi-Fi at home, consider joining your Zoom session from your cellular device’s Zoom client. While this is not optimal for content sharing, it may provide an overall better video experience. Cellular data rates may apply. Use a landline or cellular phone for audio. Close the “audio conferencing” options window when it appears to avoid audio feedback.
  5. Connect on campus: If you need to share content from your device for a critical meeting, consider going on campus. The University Enterprise Network provides robust connectivity. A co-host who has a better connection or is on-campus can also assist in screen sharing.
  6. Use online collaborative documents: Certain services, like Microsoft Office Online Documents and Teams, Box Notes, and Google Apps allow multiple people to open and edit files in real time.
  7. Consider your VPN use: There are some instances when VPN use is necessary such as when you’re trying to share content from an asset only accessible from within the University Enterprise Network.
  8. Test your bandwidth via http://speedtest.psu.edu, including if you are using a VPN.  You should have at least between 1 and 3 Mbps of upload speed (depending on video format) for a reliable Zoom videoconferencing experience. Check out Zoom’s bandwidth requirements for full details.


Tech Tip: Adding an In Folder column to your Outlook Inbox

By: Ryan Johnson

Here’s a tip that was given to me concerning the Outlook Desktop client.

Adding columns to your mail inbox can be a helpful way to help sort your email when searching.  To add a column such as the “In Folder” column, follow the instructions below:

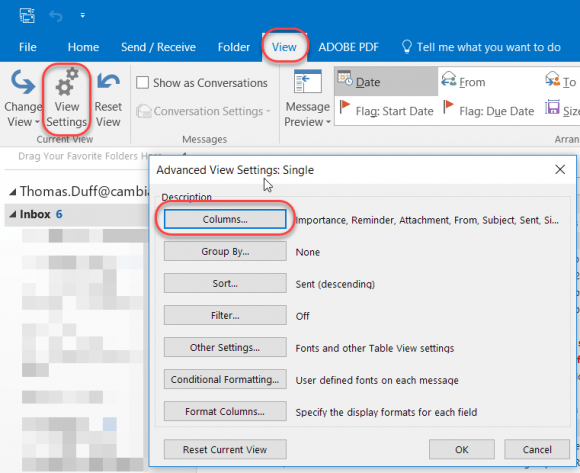
While in your Inbox, go to View > View Settings > Columns:

adding columns screenshot

Change the Select available columns from field to All Mail Fields, select In Folder, and click Add ->:

The In Folder column will now appear in the Show these columns list. I clicked the In Folder column and clicked Move Up to place it before the Categories field, and then clicked OK to save that selection:

show columns screenshot

Now when you do a search, you will get your my results along with information about which folder you can find the document in.

Tech Tip: Microsoft 365 now supports Plus Addressing

By: Ryan Johnson

Microsoft logo - tech tip

Microsoft now allows you to create custom (or disposable) email addresses based off your standard email address with Plus Addressing. This will allow you to add “tags” to your email address when signing up for newsletters, contact forms, and other online forms. You can use xyz5000+tagname@psu.edu and the email will still be delivered to your personal mailbox. This also works with subdomains of psu.edu.

This is basically a way to create disposable email addresses that would link to your main email, and make it easier to sort through emails because you would have different “plus addresses” that you would add by putting in a plus sign and a suffix to your regular one, and you can assign different addresses for different tasks.

For example, ryanjohnson@psu.edu can use the Plus Addressing feature when signing up for Starbucks rewards as ryanjohnson+starbucks@psu.edu. If a spam email arrives from ryanjohnson@psu.edu, I know Starbucks shared my email address. Or a rule can be created when a message is received from ryanjohnson+starbucks@psu.edu for special processing.

You don’t need to do anything with your Microsoft account to start using this feature. Simply add a “+tag” after your username (can be first.last, alias) and before the “@” sign & emails will arrive in your inbox with the unique address.

Tech Tip: New to Zoom — Live Transcription

By: Ryan Johnson

Penn State Zoom Service now includes a feature that uses automatic transcription that enables speech to text transcription in Zoom Meetings and Zoom Webinars. This feature is enabled by the host of the meeting or webinar once it begins. Participants will not see the Live Transcript option unless the host enables it.

Zoom screenshot for tech tip

Users must first enable the setting within their Penn State Zoom profile in order to use it within their meeting.  Closed captioning is on by default; however users must check the sub setting below to activate live transcriptions within their meetings.

  1. Navigate to psu.zoom.us
  2. Click Sign-in, and sign in using your PSUID and password (if necessary).
  3. Click the Settings tab in the upper left corner.
  4. Search for Closed captioning found in the In Meeting (Advanced) section.
  5. Check the sub setting: Enable live transcription service to show transcript on the side panel in-meeting.

To learn more about this new feature and how to use it, please visit the new Staff Site training page: Zoom Live Transcription

Tech Tip: Designate an alternative host in Zoom

By: Ryan Johnson

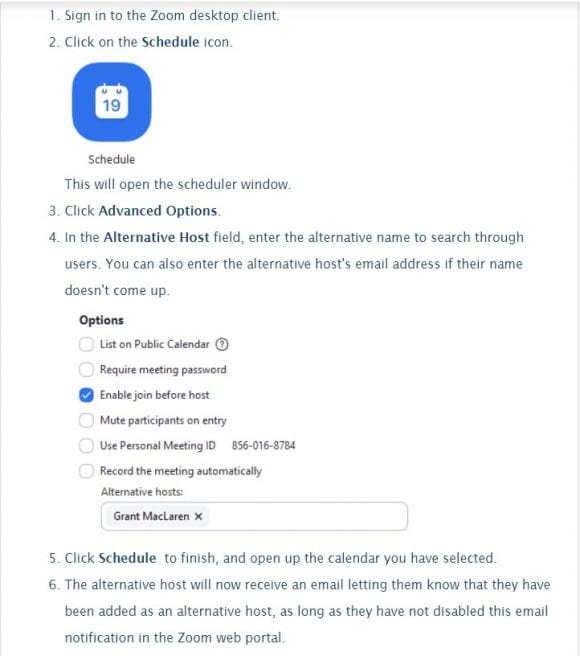
When scheduling a meeting, the host can designate another Licensed user on the same account to be the alternative host. The alternative host can start the meeting on the host’s behalf. When you designate an alternative host, that user or departmental account will receive an email notifying them that they’ve been added as an alternative host, with a link to start the meeting or webinar.

 Alternative host vs. Co-host

Alternative host is a more powerful role than cohost.

Alternative hosts can be designated in advance, whereas cohosts must be assigned during the meeting.

Alternative hosts have full host privileges until the host account joins the meeting and automatically becomes the host.

Co-hosts have some additional privileges in a meeting beyond a participant, but they don’t have full host powers. A co-host cannot start breakout rooms or end the meeting, for example.

How to Designate an Alternative Host

Zoom screen shot for tech tip

Tech Tip: Using recent files on your Mac

By: Ryan Johnson

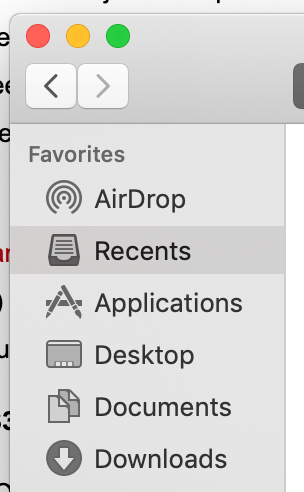
This tip is for those of you who use the Recents item in the Finder sidebar to keep track of your files.

tech tip screenshot

Recents is not a real location on your Mac. The Finder creates and updates it dynamically. In essence, this is just a collection of shortcuts to files you have recently used.

What you should remember is, whatever you do to the item in Finder’s Recents is actually applied to the original file.  If you rename a recents file, it will rename the original file. If you delete a recents file, it will delete the original.

Tech Tip: Keeping your home computer safe

By: Ryan Johnson

home office photo

One of the questions I get asked the most is how to keep our home computers safe, especially if we are using them more during the current covid-19 pandemic.

Note: The information below is NOT for Library owned computers, just your personal computers

  • The first thing you can do is to make sure your windows computer is set to automatically update windows. This will also keep your Microsoft Office products (Word, Excel) up-to-date as well.

Here is an article on how to check to see if Windows Updates are turned on with simple step-by-step instructions:

https://support.microsoft.com/en-us/office/update-office-with-microsoft-update-f59d3f9d-bd5d-4d3b-a08e-1dd659cf5282

  • The next thing you should do is making sure you have a virus protection software running.

Penn State is also asking that users who have installed Symantec from downloads.its.psu.edu on any personal computers uninstall it as well by 8/22/20. On Windows 10 computers, the built-in Windows Defender is the recommended replacement for Symantec. Windows Defender. There are several free anti-virus options available for personal Macs as well. Please visit https://security.psu.edu/education-training/anti-virus/ for more information

The good thing is Microsoft Defender should be set to run automatically.  You can verify this but doing the following

Turn Windows Security real-time protection on or off

  • Select the Startbutton, then select Settings  Update & Security > Windows Security > Virus & threat protection.
  • In the current version of Windows 10: Under Virus & threat protection settings, select Manage settings, and then switch the Real-time protection setting to Onor Off.
  • In previous versions of Windows 10: Select Virus & threat protection settings, and then switch the Real-time protection setting to Onor Off.

Tech Tip: Guidelines for computer equipment provided to employees

By: Ryan Johnson

computer equipment photo

Library Strategic Technologies has added a new webpage that details the computer equipment provided to employees.  This document gives more complete details about the options available during our unique work from home situations during Fall 2020.  Please submit a Service Now ticket to request any changes or to inform us that you are taking equipment home.

Guidelines for Computer Equipment Provided to Employee

Tech Tip: Embed media with the Share tab in Kaltura

By: Ryan Johnson

Along with uploading and managing media, Penn State’s MediaSpace also allows users to share media files by embedding them in web pages, blogs, or social media. Embedding content means adding to the source code of your page, and making that content a part of your web page. For example, a video page on YouTube has the video embedded within the HTML code of the page itself so it displays correctly to the public.

Embed a Video Using the Share Tab

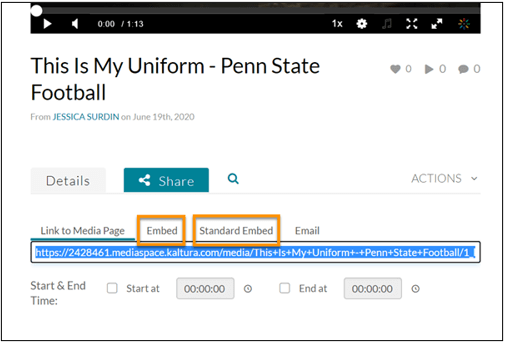
There are two types of embed codes in Kaltura; Embed (secure) and Standard Embed (not as secure). By default, Embed codes in Kaltura are secure. Secure embed codes enforce the permissions on that piece of media that are defined in MediaSpace.

With Standard Embed codes, the entire Internet has access to the content, regardless of its set status (Private, Unlisted, Published).

NOTE: The Embed (secure) option is not available for Channel Playlists and Playlists in Kaltura. This means that anyone can access a Playlist’s content once embedded.

To embed content:

  1. Navigate to MediaSpace and log in to WebAccess with your credentials.
  2. Locate the media file you wish to embed and click on its thumbnail or its title.
  3. Click the Share tab below the media file.
  4. Click the Embed tab, or the Standard Embed tab if you have permission.

"This is my uniform" screenshot

  1. (Optional) Select the checkboxes for Start & End Time to select a clip rather than the entire video.
  2. (Optional) If your media file has an uploaded transcript you want attached to the embedded file, select the lower radio button or Embed with transcript option under Player Skin.

If you have an transcript but don’t want it attached to your media file, then leave the top radio button (Embed – no transcript option) selected.

"This is my Uniform" screenshot for Tech Tip

  1. Select which Player Size (screen) you want your media to play in: 640×640 (large), 560×590 (medium), 320×460 (small). The default size is 560×590.
  2. Select the option for Responsive sizing. This lets the video fit the size of various device screens while maintaining its ratio.
  3. Select the entire block of code shown in the field and copy it to your clipboard. This text contains the HTML code needed to embed your media file.
  4. Paste the copied code in the appropriate area of your webpage, blog or social media post.

NOTE: Do not modify the code. Modifying the code may cause the file to display incorrectly or not at all.

Tech Tip: Create strong passwords

By: Ryan Johnson

Using strong passwords is one of the most important ways to keep personal and Penn State information secure. While it might seem daunting to create a password without using easy-to-remember information, relying on a series of words and using memory techniques can help you remember even the most complex passwords.

The following guidelines can help you create strong passwords:

  • Choose a phrase that’s unique and familiar just to you.
  • Make new passwords different from your other passwords.
  • Don’t use words found in the dictionary or personal information like dates, names, and addresses.
  • Combine the first part of each word in a phrase, mixing at least 15 numbers, characters, and letters.
  • For example, “I love to play badminton” could become ILuv2PlayB@dm1nt()n.


Here are some things to avoid when creating passwords:

  • Your name, family names, initials
  • Significant dates/numbers
  • Pets
  • Birthdays
  • Hometown
  • Scholl name/mascot

Tech Tip: How to delay or schedule sending mail in Outlook on the web

By: Ryan Johnson

A feature previously only available in Outlook desktop client (PC only) is now available on the web version of outlook.

  1. After composing your message, select the dropdown menu next to the Send button.

2. Select Send later:

'send later' screenshot

3. Select the date and time you’d like the email to be delivered and click Send.

Outlook for Windows

  1. In the message, click the Options tab.
  2. In the More Options group, click Delay Delivery.
  3. Under Delivery options, check the box for Do not deliver before, and select a date and time.
  4. After you click Send, the message remains in the Outbox folder until the delivery time.