

The list of supplies and basic protocols for Biotyper can be found at the end of this post. In addition, the Biotyper manual in pdf format is available upon request. The Facility does not provide any of the supplies on this list and can only accept MS-ready target plates. For a demo on preparing the target plates, contact Tatiana.
To expedite your analysis, please fill out the Excel Sample ID Template with your sample names exactly as shown. All missing or incorrectly filled sample names will be replaced by the analysis date and your initials. You are responsible for keeping a record of your sample positions. The Excel file with the sample IDs must be emailed to Tatiana. Please attach any other information as separate files or documents.
It is very important to exactly follow the procedure and use only the fresh, specified-grade reagents and solutions. MALDI is a competitive ionization process and is very sensitive to contaminants commonly present in histology-grade solvents and low-purity chemicals.
More is not better. A correct ratio of matrix to analyte is critical and achieved by following the procedure exactly.
Tube extraction (formic acid extraction) procedure requires extra few minutes of the prep time but yields much better results than the direct transfer procedure. Direct transfer procedure requires practice and is only applicable to non-spore-forming microorganisms. We recommend following the tube extraction procedure for all samples.
If you have any questions or suggestions or would like to discuss your project details, please email or call Tatiana.
Plates can be shipped overnight on wet ice packs. To protect the sample spots, place the target plate facing down into its original box. You can tape it, so it does not get dislodged during shipping.
Every sample is different in terms of purity and structural and compositional complexity. The MS detection sensitivity of a routine analysis is in a range of 0.1 to 10 pmol of protein. Some peptides ionize and/or fragment more efficiently and will produce good spectra at 0.1 pmol per injection while other peptides may be completely ‘invisible’ even at 100 pmol per injection. Keep in mind that it is always easier and faster to dilute a sample than to concentrate it.
For routine analyses, a 1-microliter injection is usually made unless the protein concentration is known and requires a larger-volume injection. The injection volume cannot exceed 6 microliters.
For simple mixtures (in-solution digested purified or enriched proteins and in-gel digested protein bands), 3 to 10 microliters of sample must be submitted because smaller volumes tend to dry out. This is only true of expertly prepared samples that do not require purification and/or filtration.
If you are planning to analyze a complex mixture, please contact Tatiana.
To continue our detergent theme, here’s an affinity-based detergent removal method that is faster than the gel-assisted proteolysis but removes only the detergents, leaving the salts and chaotropic agents for you to deal with later. Unlike the gel-assisted method, it works for both proteins and peptides. The gel-assisted method is best suited for proteins, because the small, more soluble peptides are likely to elute out of the gel matrix during the washing.
I use Pierce detergent removal spin columns (0.125 mL format) in my lab, but there are other options available such as Bio-Beads or HyperD, each with its own pros and cons in the business of detergent removal. Pierce also sells a so-called HiPPR detergent removal resin (high protein and peptide recovery) for low-protein-concentration samples. The initial % detergent in such samples must also be low (ca. 1%).
The Pierce resin removes common ionic, nonionic, and zwitterionic detergents from protein and peptide solutions. This oligosaccharide-based affinity resin has a small hydrophobic cavity which creates a microenvironment for a detergent’s nonpolar moiety to enter and form an inclusion complex.
The workflow is simple: (1) centrifuge the column to remove storage buffer, (2) wash 3 times with your favorite buffer (pH 5-10), discarding the buffer each time, (3) add protein or peptide solution and let the resin do its magic for 2-5 min at room temperature, (4) centrifuge to collect your >95% detergent-free sample, i.e. don’t discard the flow-through this time!
Antharavally and co-workers from Thermo Scientific Pierce Protein Research published a study examining the detergent removal efficiency and protein recovery using their resin under several conditions (doi:10.1016/j.ab.2011.05.013). A table from this reference gives you some idea of the detergent concentrations removable with the Pierce resin.
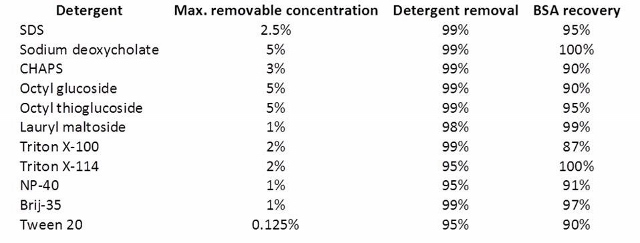
Samples (0.1 ml containing 0.100 mg BSA + detergent at maximum concentration) were processed through 0.5 ml of Pierce detergent removal resin, and the residual detergent was measured as described in Materials and Methods. Protein concentration was determined by BCA protein assay (Pierce).
As promised, here’s a straightforward way to remove detergents, urea, and other LC-MS incompatible nasties from small-volume samples. The literature calls it ‘gel-assisted’ proteolysis. The idea is to entrap the protein solution in a polyacrylamide gel matrix, wash out detergents, salts, and chaotropic agents, and perform in-gel digestion. This technique works great for membrane proteins which are notoriously difficult to dissolve, and it is quite useful for any protein sample clean-up.

For my little demo, I used a 1 mg/mL BSA solution in 2% SDS. The disulfides were reduced with TCEP and alkylated with IAA, after which the protein solution was very thoroughly mixed with a 30% T acrylamide monomer solution. I quickly added 10% APS and TEMED and immediately vortexed and centrifuged this mixture so that the liquid is collected at the bottom of the tube. The polymerization time is very short, a minute or two! I left it to completely polymerize for another 20 min.
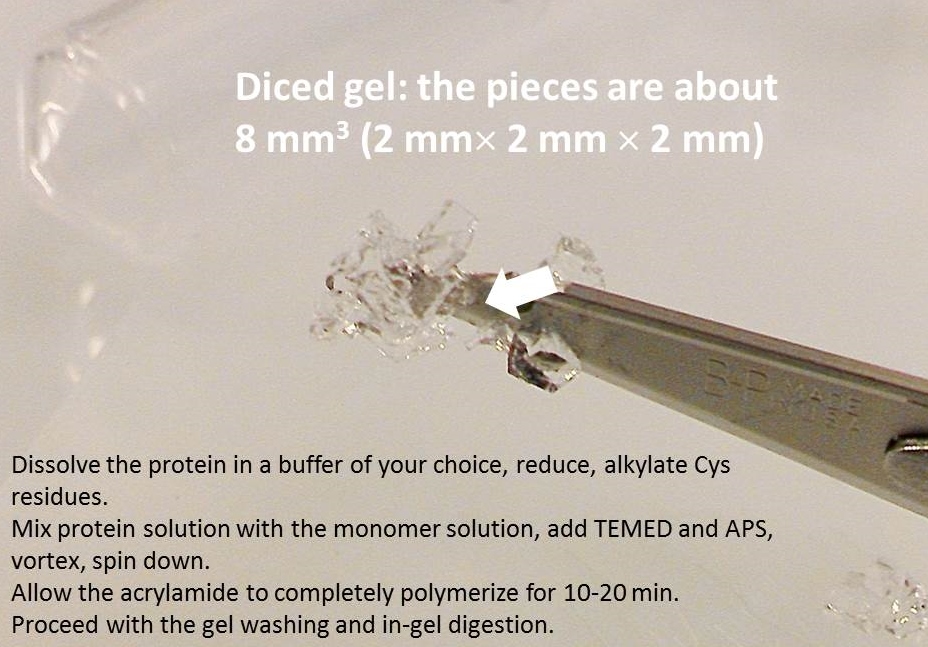
Using scalpel I removed the gel plug from the tube and diced it into small pieces. After 6 washes with 8 mg/mL ammonium bicarbonate in 50% acetonitrile, I dried the gel pieces in neat acetonitrile, removed the acetonitrile and added trypsin (see the in-gel digestion tutorial for details).
Fast forward to the MS analysis: Since the original BSA solution was very concentrated, I dissolved the peptides in 540 uL of mobile phase and injected 1 uL of this solution (55 ng total protein on column or approximately 1 pmol).

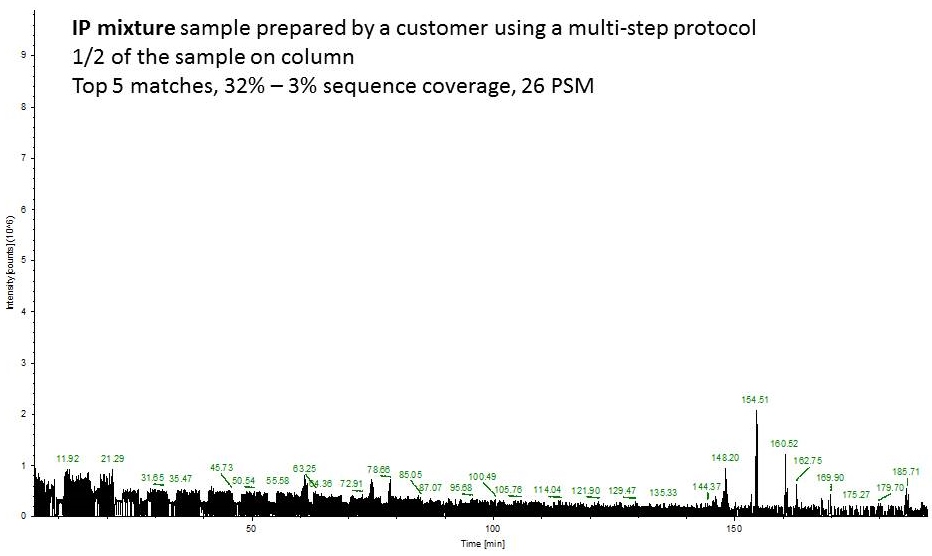
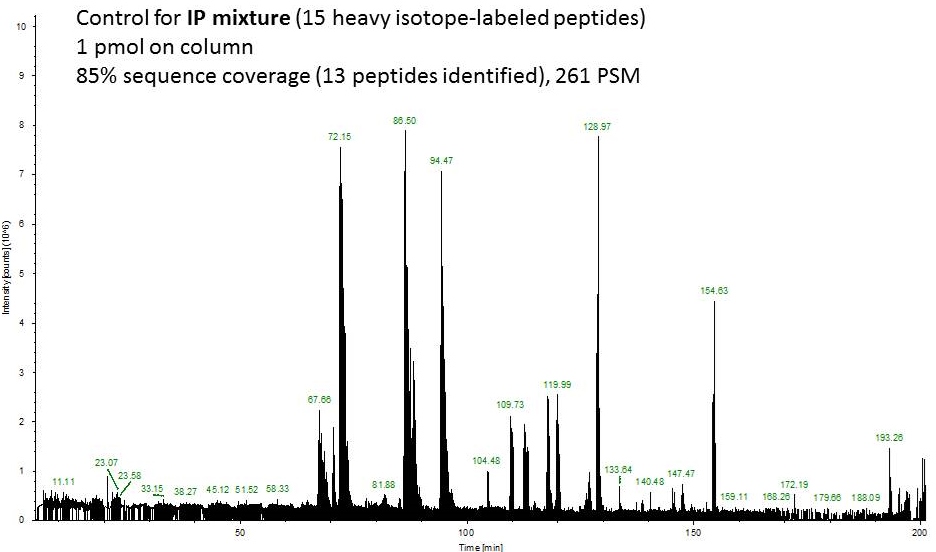
Second example shows an ion chromatogram from a 10-uL IP eluent containing 2% detergent which I cleaned up and digested using this technique.

As always, let me know if you have questions!
References:
doi: 10.1074/mcp.M500138-MCP200
doi: 10.1074/mcp.M800068-MCP200
They do exist! They are compatible with the reverse-phase chromatography! They solubilize stubborn proteins and improve proteolysis! Here are their names:
Acid-labile surfactants are hydrolyzed at low pH, and the hydrolysis products are compatible with reversed-phase separations and MS. These include RapiGest SF and PPS Silent Surfactant.
Invitrosol is a homogeneous surfactant whose elution profile does not overlap with the proteolytic peptides elution profiles.
ProteaseMAX is a surfactant that degrades during proteolysis, and its degradation products do not interfere with LC-MS.
All other detergents are not compatible with LC-MS and must be removed from the samples prior to analysis. These detergents include SDS (sodium dodecyl sulfate) and LDS (Lithium dodecyl sulfate), NP-40, Triton, Octyl glucoside and octyl thioglucoside, CHAPS, sodium deoxycholate, lauryl maltoside, Brij-35, etc. There are several ways to remove detergents, which is a topic for another blog post!
First, let’s define ‘large’. The Proteome Discoverer sets the upper limit for a precursor ion at 10,000 Da. This means anything bigger than 10 kDa will not be considered even if it’s present in the MS data, and a different software package ($$) will be required to analyze the high MW data. Clearly, proteolytic peptides with MW > 10 kDa will not be very useful for protein identification. I suggest using a different enzyme or a combination of enzymes. I have seen tryptic peptides up to 7 kDa in some in-gel digested samples, so apparently some large peptides do come out of gel.
Next, a large peptide’s physico-chemical properties (e.g. hydrophobicity, pI, hydrodynamic radius) must be considered as they will affect the extraction efficiency. If the peptide’s properties are known, the extraction solvent composition and pH can be adjusted to improve the peptide’s solubility.
Finally, let’s consider the gel from which the large peptides need to come out. Obviously, it will be easier to get the large peptides out of a 4 %T gel than out of a 20 %T one. Soaking a gel piece in deionized water and then freezing it should crash enough pores in the gel to improve the extraction of large peptides (water expands as it freezes). Additionally, the gel could be ‘squeezed out’ a few times by changing extraction solvent from neat acetonitrile to an aqueous mixture. The gel piece will shrink in acetonitrile expelling the peptide solution. Re-hydrating the gel and then shrinking it again in acetonitrile will ‘squeeze out’ more of the digest.
Using elevated temperature (50 C), vortex mixer, and/or ultrasonic bath should all improve the extraction. Use common sense: 50C and a high pH buffer is not a good idea for the phosphopeptide extraction. Another word of caution: don’t get carried away. Three extraction steps should be enough. If you end up with a large volume (e.g. more than 0.5 mL), the benefits of a thorough extraction might become negated by the losses due to dilution. Peptides and proteins tend to adhere to the polypropylene tubes. A large volume of a dilute peptide solution presents a large surface area for the peptides to adsorb.
What to do if this doesn’t work? You can try in-solution digestion. If the mixture is too complex and a PAGE step is necessary, you can try electroeluting the protein(s). Intact proteins electroeluted from gel bands can be buffer-exchanged using small-volume 3,000 Da MWCO spin columns and proteolyzed in solution.
If you have never done in-gel protein digestion, this tutorial is for you! The protocol is really simple and does not require any specialized equipment. Even if your gel has been sitting in the fridge for a month or two, it should still work, but no mold, please! First order of business is to choose a band and cut it out. You will need a clean blade, a clean surface (a clean glass plate or a clean transparency sheet), a clean microcentrifuge tube, and a pair of clean gloves. Everything should be clean: the goal is to minimize contamination of interesting proteins by uninteresting keratins.
1. Place the gel on a glass plate, blot excess water with a clean paper tissue. Select a band and cut out only the stained portion of the gel. Avoid unstained area: it will sponge up a protease solution, giving nothing interesting in return.
2. Dice the band into 1-mm (1/16”) sections; this will help the protease reach more protein inside the gel.
3. Place the gel cubes in a clean microcentrifuge tube, cover with water to prevent them from drying out, and label the tube with no more than 5 characters. For example, use your initials and numbers.
4. Include a positive control! There is no charge for analyzing a control! Cut out a known protein band following steps 1, 2, and 3.

The in-gel digestion protocol can be found on Thermo website along with the product numbers for all necessary reagents.
You will need 50% acetonitrile (ACN) solution containing 8 mg/mL ammonium bicarbonate (wash solution). Add 0.05 – 0.1 mL of this solution per gel band, enough to completely cover the gel. Incubate at 37 C for 15-20 min, discard the solution. Repeat two more times. At this point, all or most of the blue color should be gone. If you are destaining SYPRO, there is no easy way to tell whether it is all gone, of course.
You will need
Cover the gel slices with 5 mM TCEP and incubate 10 min at 60 C. Remove the TCEP solution and cover the gel with 100 mM IAA solution. Incubate at 37 C for 15 min with occasional shaking, preferably protected from light. Room temperature will also work, but give it extra 10-15 min. Discard the IAA solution and wash the gel with the wash solution three times to remove IAA and TCEP. (In the Pierce protocol, you might notice that 100 mM IAA requires 9.3 mg in 1 mL, while MW of IAA is 184.9. It is a typo. Either way: 50 mM, 9.3 mg/mL or 100 mM, 18 mg/mL, will work as there will be a large molar excess of IAA compared to Cys. Shrink the gel by covering it with ACN and incubating at r.t. for 15 min or until the gel turns white and brittle. Remove ACN and allow the gel to air dry for 15 min at 37 C (or longer at room temperature).
Make 1 mg/mL trypsin stock solution in 50 mM acetic acid or 1 mM hydrochloric acid. This solution can be aliquoted and stored in a freezer for months. Dilute trypsin to 0.01 mg/ml (1:100 dilution) with 8 mg/mL ammonium bicarbonate. Add 50 uL of this solution per gel band and incubate at 37 C 8-24 hours. If you are working with a large piece of gel or several bands combined in one tube, make sure that after the gel re-hydrates in the enzyme solution, it is completely covered. Add more enzyme solution if necessary.
You will need 50% ACN solution containing 0.1% formic acid (FA). If you don’t have formic acid in your lab, let me know – we will share ours with you. Transfer the digest solution to a new tube. Extract each gel band with 50 uL of 50% ACN/0.1% FA (more, if working with a large volume of gel) by incubating at 37 C for 15 min. Transfer this solution to the new tube with the digest solution. Repeat 2 more times. Evaporate the combined extracts in a vacuum concentrator (e.g. Speedvac). Please note, if you are extracting large peptides (>5000 Da), using a sonic bath may be a better option than incubation. Also, in addition to the three 50% ACN extractions, you can use 100% acetonitrile for the final extraction. Submit your dried samples along with a picture of the gel so that I can estimate how much of each sample to use for analysis, and don’t forget to fill out the Protein ID Request form
As always, let me know if you have any questions!