

Page Content
Modern versions of Microsoft Office allow you add image ALT text to inserted images. If these files are converted to HTML or tagged PDF, the ALT text is generally preserved.
Listed below are the steps to add image ALT text for different versions of Microsoft office.
ALT Text Style
Description vs. Title
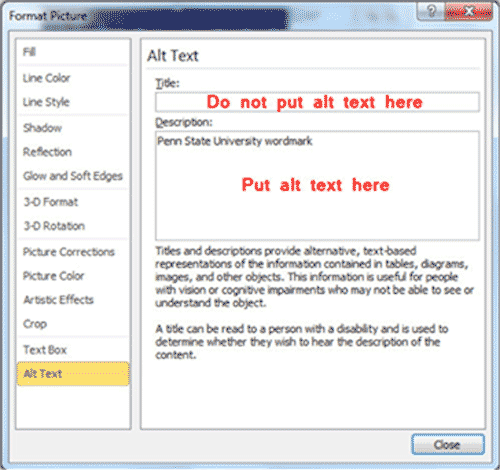
As of Office 2010, the Microsoft Office ALT text tool includes both a Title and Description field. Due to various interface issues, it is generally recommended that the main ALT text should be put into the Description field. The Title field can be optionally used, but offers few benefits at this time.
This ALT Text in Word blog post by Terrill Thompson explains in detail why using just the Description field is recommended.
Empty ALT Text
If an image is used merely to emphasize the mood, then an empty ALT text can be inserted. This hides the image from the screen reader. Examples might include repetitive use of a logo or decorative toolbar or shape.
To insert empty ALT text, type a space character into the Description area.
Caption
When creating ALT text, it’s important to remember that it should describe the image. It should NOT include information about copyright or any extra information that would be relevant to a seeing audience. That information should be in a caption below the image. See the Image ALT Text Basics for an example.
Background Images
If you use PowerPoint slides or Word documents with background images, watermarks or images in a footer and header, they should all contain empty ALT Text. You can access these images in the Slide Master (PowerPoint), background formatting or header/footer as needed.
Avoid Text Box
In both Word and PowerPoint, the method of insertion affects whether the ALT Text is read out.
- Word – images should be inserted outside of any text boxes. Text in text boxes are NOT read aloud. It is also recommended that images are aligned In Line with Text whenever possible. This ensures that the ALT text is read in context of the surrounding content and not apart from it.
- PowerPoint – images should be embedded in a Master Slide container and not dragged onto a slide. You can customize a new Master Slide template as needed to accommodate extra images.
Microsoft Office 2013
NOTE: In Microsoft Office 2007, the ALT Text tool is under the Picture Size options. In Office 2003, it is under the Format Picture options. Microsoft Office 2010 is discussed below.
- Open any Microsoft Office software and select an image so that the square anchors are visible.
- Right-click the mouse and select Format Picture.
- In the Format Picture window, select the Size & Properties tab on the right and select ALT TEXT

- Then insert the ALT Text into the Description field, NOT the Title field. Click the Close icon to finalize the ALT text.
NOTE: If the ALT Text tab is not available, make sure you have not selected the Format Picture.

Microsoft Office 2010
Note: In Microsoft Office 2007, the ALT Text tool is under the Picture Size options.
- Open any Microsoft Office software and select an image so that the square anchors are visible.
- Right-click the mouse and select Format Picture.
- In the Format Picture window, select the ALT Text tab on the right, then insert the alt text into the Description field.
Click the Close icon to finalize the alt text.NOTE: If the ALT Text tab is not available, make sure you have not selected the Format Picture.
Microsoft Office 2016 (Mac)
- Open any Microsoft Office software and select an image so that square anchors are visible.
- Right click the mouse and select Format Picture.
- In the pane to the right, select the Size & Properties (Square with arrows icon) tab on the right and select the Alt Text option.
- Insert the alt text into the Description field as needed.

Microsoft Office 2011 (Mac)
NOTE: This tool is not available in Office 2004 or Office 2008 for Mac.
- Open any Microsoft Office software and select an image so that square anchors are visible.
- Right click the mouse and select Format Picture.
- In the Format Picture window, select the ALT Text tab.
- Insert the alt text into the Description field as needed.
- Click OK to close.
