

Page Content
Windows Office 2013
- Windows Office 2013: Adding a Custom Layout to the Theme
- Placing a Picture in the Master Theme Slide (Windows Office 2013)
Mac Office 2016/2011
Summary
A Slide Master slide is a slide that is the master of all slides in look and feel. This look and feel may include a custom presentation of font, colors, contrast, effects, backgrounds, pictures or logos, placeholders, footers, titles, page numbers and more.
Adding custom slide layouts through the slide master is critical for screen reader accessibility because ONLY text fields added in a slide master are read out in a screen reader. Manually inserted text fields may be skipped by a screen reader. Slide masters also allow for consistent formatting between slides.
Detailed information on working with PowerPoint for Microsoft (PC) or PowerPoint for Mac can be found at Lynda.com (http://lynda.psu.edu).
Windows Office 2013: Adding a Custom Layout to the Theme
This procedure allows you to customize the layout and number of text fields on a slide. These text fields will be read out by a screen reader.
- From the Master View screen, go to the side bar with all the sample slides. Scroll down and select in the empty space after the last slide. A blinking black line will appear below the last slide. This is where a new slide will appear.

- Next, in the top Menu bar, select the Slide Master tab.
- Select the Insert Layout to add to the existing set of slides. Be sure to select the new blank slide.

- Select Insert Placeholder for a list of placeholders.
- Select and use the Content. A screen reader will read and understand all items place in this holder. The other Placeholder selections may not be accessible to some screen readers.

- Draw the Insert Placeholder in your power point slide.
- Repeat this step for the slide to arrange the content to your desired format.
Note: The order with which you Content Placeholders, is the order with which the content will be read. Use the Arrange Tool to reorder elements to check and correct the reading order. - When done, select the Close Master View button on the Slide Master tab.

Insert Slides
Note: The slides you have created will be available from the Home tab, click the New Slide button and under the Office Theme gallery.

Placing a Picture in the Master Theme Slide (Windows Office 2013)
This procedure allows you to add a background image to multiple slides without needing to add ALT text to each image.
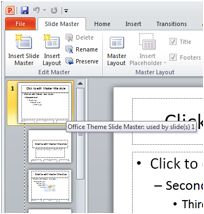
- In PowerPoint, go to the Menu bar. Select View.
- Select Slide Master.

- This brings you to the Master View screen.

- The first slide highlighted is the “Office Theme Slide Master”. Changes made to this slide will be repeated to all the other slides below. This is the time saver, when placing a picture or logo, repeated resource information or other custom alterations, such as fonts, background colors, etc. to your slides.
- To Insert a picture or logo that repeats on every slide, go to the Insert tab in the menu bar and select Picture.

- Select the image file you desire (if your photo is stored on your hard drive). Locate the picture from you computer. The picture will appear in the center of the slide. In our example we use a logo, but any picture that you would like to appear on every slide may be selected and used.

- It may need to be resized and moved. To adjust the size, press and hold Command + Shift and drag the corner in or out.
- Hover your cursor over the green point at the top of the picture.
A circle of arrows will appear and allow you to rotate the picture.


- Proceed to place the picture in any position you would like.
- The picture will populate through all the slides below the Office Theme Master Slide. This is the creation of a Custom Theme.


Note: This newly added picture in your Office Theme Master Slide would be read last, so be sure to add your Image Alt text when placing this content into your new theme.
Logos and ALT Text
If your master slide includes a logo containing the name of a unit or some other piece of critical information. Make sure the information is repeated elsewhere in the title slide, either as regular text or an invisible pixel image with the correct ALT text. For all other slides, the empty ALT text should be used to avoid repetitive information being read on every slide.
Mac Office 2016/2011: Adding a Custom Layout to the Theme
This procedure allows you to customize the layout and number of text fields on a slide such that each text field will be recognized by a screen reader.
- From the Master View screen, go to the side bar with all the sample slides. Scroll down and select in the empty space after the last slide. An orange line will appear below the last slide. This is where a new slide will appear.

- Next, in the top menu bar, select the Slide Master tab. For Mac Office 2016, first select View, and then click on the Slide Master tab.

- Select the Insert Layout to add to the existing set of slides. Be sure this new blank slide is selected.

- Select Insert Placeholder for a list of placeholders.
- Select and use the Content placeholder. A screen reader will read and understand all items place in this holder. The other Placeholder selections may not be accessible to some screen readers.

- Draw the Content placeholder in your power point slide.
- Repeat this step for the slide to arrange the content to your desired format.
Note: The order with which you Content Placeholders, is the order with which the content will be read. Use the Arrange Tool to reorder elements to check and correct the reading order. - Lastly, select the Close Master View button.

Insert New Slide
Note: The slides you have created will be available from the Home tab, click the New Slide button and under the Office Theme gallery. Furthermore, every slide in the gallery has been formatted with the picture you inserted. You are able to select the slide with the appropriate Layout or the layout with the content placeholders you placed.

Placing a Picture in the Master Theme Slide (Mac Office 2016/2011)
This procedure allows you to add a background image to multiple slides without needing to add ALT text to each image.
- In PowerPoint, go to the Menu bar. Select View.
- Select Master, then Slide Master.

- This brings you to the Master View screen.

- The first slide highlighted is the “Office Theme Slide Master”. Changes made to this slide will be repeated to all the other slides below. This is the time saver, when placing a picture or logo, repeated resource information or other custom alterations, such as fonts, background colors, etc. to your slides.

- To Insert a picture or logo that repeats on every slide, go to Insert in the menu bar and select Photo.
- Select Picture from File (if you photo is stored on your hard drive). In our example we use a logo, but any picture that you would like to appear on every slide may be selected and used.

- Locate the picture from you computer. The picture will appear in the center of the slide.

- It may need to be resized and moved. To adjust the size, press and hold Command + Shift and drag the corner in or out. Hover your cursor over the green point at the top of the picture. A circle with an arrow will appear and allow you to rotate the picture.

- Proceed to place the picture in any position you would like.
- The picture will populate through all the slides below the Office Theme Master Slide.

Note: This newly added picture to your Office Theme Master Slide would be read last, so be sure to add your empty Image Alt text when placing this content into your new theme.
Logos and ALT Text
If your master slide includes a logo containing the name of a unit or some other piece of critical information. Make sure the information is repeated elsewhere in the title slide, either as regular text or an invisible pixel image with the correct ALT text. For all other slides, the empty ALT text should be used to avoid repetitive information being read on every slide.