Disclaimer: This one’s a long one.
iPhone photography is taking over the world:
Since the invention of the iPhone (and other smartphones), photography has been more accessible to everyone – it’s not exclusive anymore to those who can afford fancy SLRs. iPhone photography has certainly become a field of its own when you think about apps like Instagram and VSCO. Even though these apps provide so many filters and options to make the photos look “artsy”, it’s really good to know how to take a naturally well-framed and visually interesting photo before the filters. Hate to burst this bubble, but just slapping a filter on a bad photo doesn’t make it any better.
Digital art, including photography, is probably also the type of art I am best at. I’m primarily here to help those of you who want it to take better photos on your iPhones. Unfortunately, I really don’t have any experience taking photos on other smartphones so I can’t help much with specifics, but I will direct Android/Windows users to the bottom of this post, where I have listed some helpful links. A lot of the stuff I talk about though will be relevant for you guys as well.
Light is so annoyingly important:
Photography, first and foremost, is all about light. It’s that way for huge fancy digital cameras, and it’s that way for phones as well. It’s important to have the right amount of light coming into the lens. Having too much light (overexposure) will result in a loss of detail, and not enough light (underexposure) will produce a dark photo.

It’s better to have an underexposed photo than an overexposed one because you can lighten the photo after the fact without losing the detail. In order to take a photo with a better chance of having the right exposure, tap the little orange box that you see in the camera app on a mid-tone of the photo, light-wise, so that the exposure is based on that point. This would probably be used mostly for a landscape or wide-angle shot. If there’s one main subject, like a person, tap that so that part is exposed correctly. If it’s a situation where the subject is backlit but the background is important too, it may be a good idea to tap the background and use your flash so that both parts are exposed correctly. The flash on the iPhone can be a little funky sometimes, but it might help. You can also lighten dark areas and darken light ones using the “highlights” and “shadows” bars in the editing section of the photos app.


Light is also annoyingly colorful:
Having the right temperature of light also makes a good photo. Sometimes photos will have a tint, usually either yellowish or bluish, due to the lighting of that situation. This is really hard to control while taking the photo (unless you change your setting) so it has to be edited after the fact using the “cast” bar under the “color” section in the photos app.
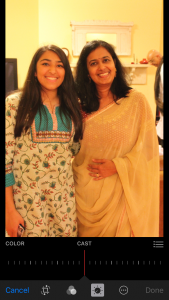
You can gauge how the cast of the photo before edits will be based on the type of light. Incandescent and tungsten bulbs will make photos yellower, while fluorescent bulbs, clouds, and shade will sometimes make subjects look washed out or bluish. Regular sunlight is probably the best for taking photos of people, so shoot in that setting if possible.
Composing your photos:
Composition and angles are really important to the making of a good photo but can’t really be edited much after the fact. There’s a couple of tips I can give, but if I tried to list all the interesting ways of composing a photo, it would honestly never end.
Rule of Thirds: If you’ve ever had even a single art class that involved photography, you’ve probably heard this before. This involves the concept that an interesting photo doesn’t usually place the subject (like a person or a flower) right in the center, but rather on or near a point within the grid shown below. You can place this grid over the camera by going to Settings, then Photos & Camera and then turning on the “Grid”. You can also just eyeball it. However, this doesn’t mean that an interesting photo never has the subject in the middle!


Horizons: If you’re taking a landscape shot, having a horizon line that’s right in the center of the photo isn’t that interesting either. Moving the camera up or down to show more sky or earth can create a more dramatic photo. Also, unless it’s purposefully diagonal, a straight horizon line (one that’s generally parallel to the top and bottom of the photo) is ideal. So if your photo comes out slightly slanted, rotate it in the app.

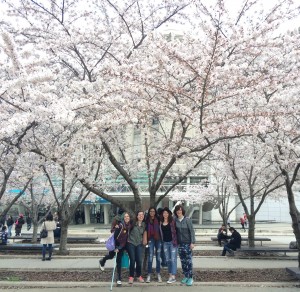
Movement: Good photos, like any other art form, should move the viewer’s eye through the piece to a specific point. It’s not good when a photo leads the eye completely off the piece, and this can be fixed either with a different angle while taking the photo or with a purposeful crop. It’s hard to explain this in words, so here are some examples:


Get close: One of my art teachers used to say, “Get uncomfortably close. And then get closer.” This essentially means that having a really close-up view of the subject can make a super cool photo.

It’s finally selfie time:
Combining many of the concepts I discussed previously, I’m going to tell you how to take the perfect selfie (as if I have the most authority). First, make sure that your phone is slightly above you, angled downwards. This is the most flattering way to display one’s face. Try to take the photo in sunlight, or with a bright light facing you at the same angle that the camera is. Expose your photo well with the orange box, and then edit it afterward if the cast or exposure is still messed up. The issue with the camera on the iPhone is that it flips photos that are front-facing, so if you don’t want that, you can take the photo in a different app that doesn’t do that, like Snapchat, and then download and edit it using the photos app. And there you go! Go forth and take beautiful and artsy photos. May you receive so many Instagram likes.

Android:
http://www.digitaltrends.com/photography/how-to-take-better-pictures-with-android/2/
https://www.androidpit.com/tips-tricks-smartphone-photography
Windows:
http://www.windowscentral.com/understanding-your-windows-phone-camera
I will use your advice to get all of the Instagram followers. @____laurenb (4 underscores)
Holy cow I think it’s cool to see that for all the stuff I can rattle off about jazz you have equal amounts, but for so many different art types. However I think that people who are really into photography will always choose a real camera, simply because you can’t fit the tech of an SLR into a phone.