The Garden Guide: Part 7- Saving Seeds

Saving Seeds

The Ultimate Seed Saving Guide: 17 Tips - GroCycle

Image 1

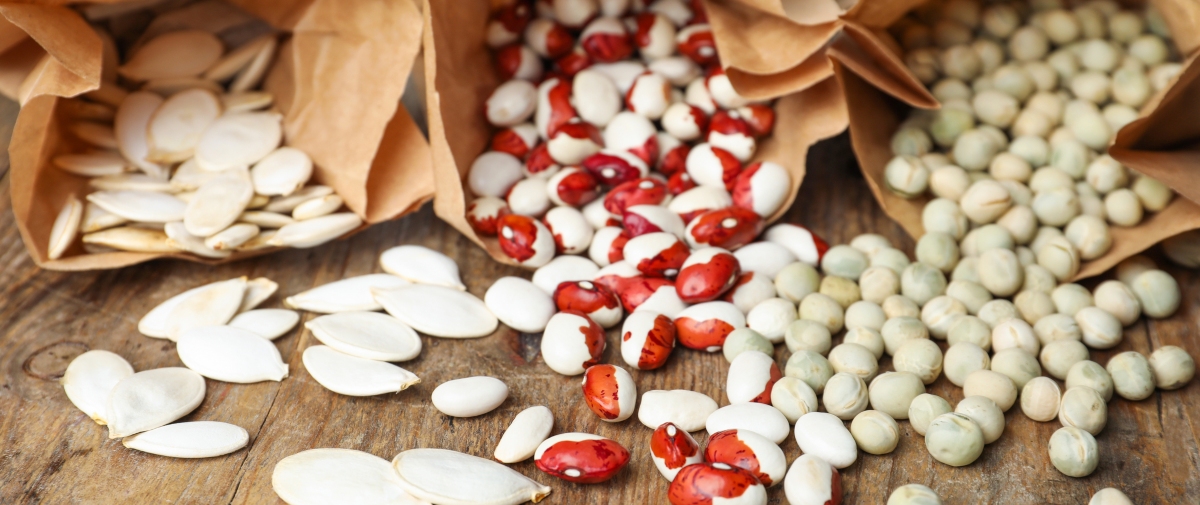
Over the course of the season, you’ll have the opportunity to observe all of the different varieties you selected using the guidance of my post on seed selection. When you plant multiple varieties of the same type of plant, you’ll notice which ones produce well, resist disease, and taste the best. If any of your varieties stand out for any reason, you may be wondering if its possible to save seeds from these plants to grow again next year. The answer is “it depends…”

“Depends on what?” you may ask. Well, remember that there are two types of seeds you could’ve chosen from back in the spring when you were buying them: hybrid (F1) and open pollinated.  In that guide on seed selection I mentioned that you could only effectively save seeds from open pollinated varieties. If any of the varieties you want to save seeds from are open pollinated, keep reading, if you only planted hybrids: you’re out of luck. (Don’t remember what you planted? Check the back of the seed packet.)

Annual vs Biannual

Within normal crop species, there are two variations of concern when it comes to seed saving:

Annual: Plants which complete their whole life cycle (seed to seed) in a single year. These are easiest to save seeds from because you don’t need to keep them alive through the winter. Some common annual crops are:

      • Beans
      • Tomatoes
      • Peppers
      • Lettuce
      • Spinach
      • Broccoli
      • Radishes
      • Eggplant
      • Okra
      • Squash
      • Cucumbers
      • Peas
      • Watermelon

Biannual: Plants which complete their life cycle in two years, requiring a winter before seed production can begin. Because of this, these plants are more complicated to save seeds from and most people don’t bother and therefore we won’t be covering them in this post. Some common biannual crops are:

      • Cabbage
      • Carrots
      • Parsnips
      • Brussel Sprouts
      • Kale
      • Swiss Chard
      • Beets
      • Collards
      • Onions

When in doubt, a quick google search or look to the back of the seed packet will let you know what a particular plant is.

Steps to Save Seeds

Regardless of the plant species, the general process of collecting and saving the seeds is pretty much the same: extract, process, store.

Extract:

      • When to harvest
        • Some plants have seeds which mature around when the crop is usually harvested. In this case simply pull/cut out the seeds before you eat the rest:
          • Dry beans/peas
          • Peppers
          • Tomatoes
          • Watermelon
          • Sunflowers
          • Winter Squash
        • Other plants seeds don’t mature at the same time as the crop is normally harvested. Each of these will require its own process to acquire mature seeds, so each crop will be linked to a page specifically for that crop

Process:

    • For most plants:
      • Rinse debris off the seeds in a strainer
      • Lay them out in a single layer in a warm dry place out of direct sunlight for about 2 weeks
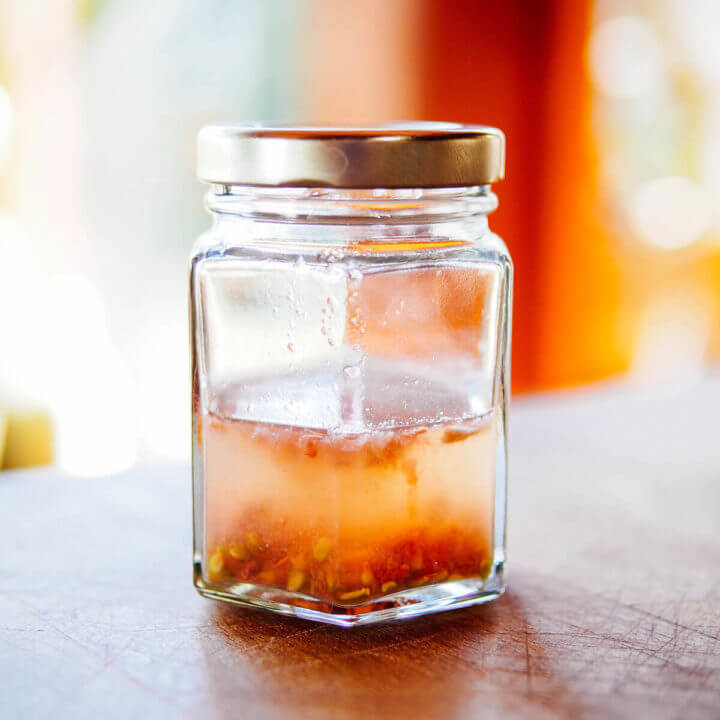
    • Tomato seeds are covered with a gel-like substance which contains enzymes that prevent germination (To prevent them from sprouting inside the fruit). Because of this they require addition steps:
      • Remove seeds and gel from the fruit and place in jar
      • Add enough water to the jar to suspend the gel/seed mixture
      • The Power of Fermenting and Saving Tomato Seeds – Garden Betty
      • Image 2
      • Allow the mixture to sit for 3-5 days
        • This ferments the seeds and breaks down the gel coating
      • Rinse seeds and proceed as normal
      • *This isn’t entirely necessary, but will improve germination rates of the saved seeds.

Store:

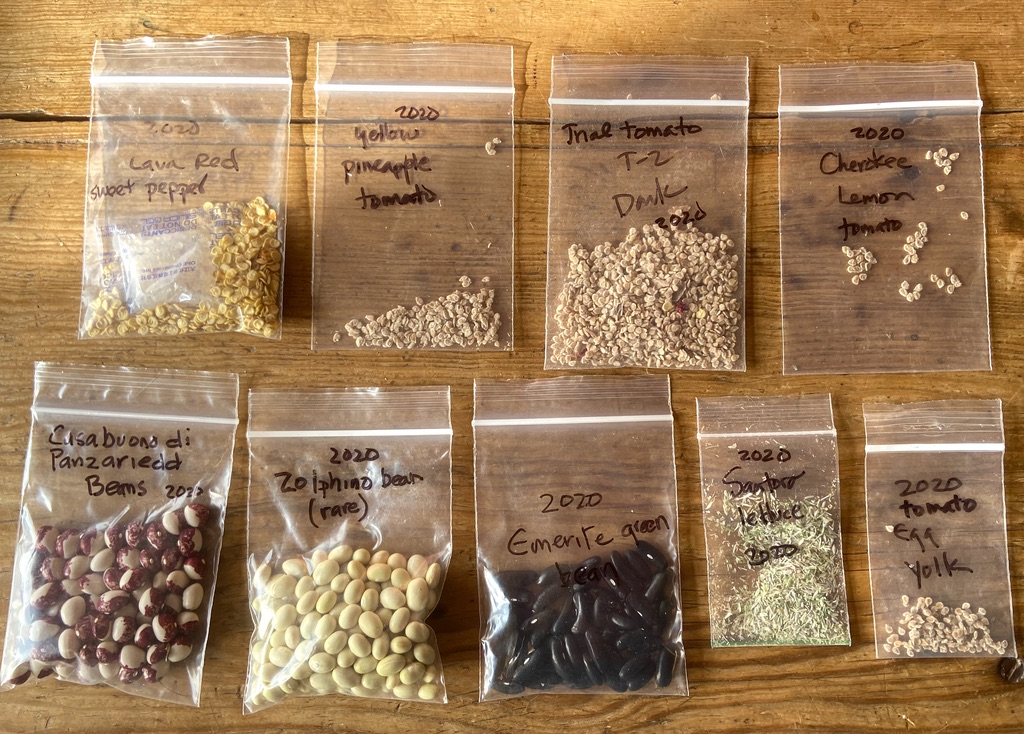
The Importance of Seed Saving | giantveggiegardener

Image 3

    • Once seeds have been fully dried, they should be hard and brittle, not soft or flexible (Still soft? Dry for another week)
    • Seeds should then be transferred into storage bags. These can be paper envelopes or little plastic Ziplock’s.
    • Label seeds with type, variety, date collected, and any other notes you would like to make. (good flavor, high yields, large fruit, etc.)
    • Once inside bags, seeds can be stored at room temperature for a few years (exact time depends on particular conditions and seed type)
    • For long term storage, seeds can be frozen in dry and airtight containers.
      • Frozen seeds last nearly indefinitely if you keep them frozen and dry.
        • An international seed bank exists in Norway that uses the cold temperatures to preserve seed varieties from around the world

That’s it! Saving seeds is really that simple. The next and final blog post in this series will be discussing wrapping up the season in preparation for winter.

The Garden Guide: Part 6- Preserve the Harvest

So you’ve picked your varieties, sown the seeds, defended your plants from pests and disease and now all your efforts are finally starting to pay off; your crops are producing a bountiful harvest, but now you’re faced with a new problem: What to do with all of that produce? In this blog post we will be discussing the various ways you can preserve your hard earned harvest.

Drying/Dehydrating

One of the simplest ways to preserve a variety of fruits, vegetables, and herbs is by drying them out. This can be achieved with a couple methods:

    • Food Dehydrator:
    • Elite Gourmet 5 Tier Food Dehydrator [EFD319] – Shop Elite Gourmet - Small Kitchen Appliances
    • Image 1
    • Custom made for drying things out, dehydrators are probably the fastest and easiest way to dry out most things. They consist of a heating element and an fan that blows warm dry air up through layers of produce. The two concerns with these are that they take up a lot of space in your cabinet and they cost a bit more than some of the other options, but if you’re planning on dehydrating things frequently, then they’re definitely worth it.
    • Note: Don’t actually pack the dehydrator like shown above as overlapping slices will not dry fully. Make sure to leave a little space between each piece.
  • Conventional Oven
    • With a little ingenuity, one can turn their traditional oven into a makeshift dehydrator by propping the door open about 1.5″ and setting the temperature at about 140-160F. This tends to be a little slower than a real dehydrator, but certainly works in a pinch.
  • Air Drying
    • If you live in a relatively warm and dry climate you can successfully dry many herbs and some other produce (like thin-walled hot peppers) simply by hanging them from a string out of direct sunlight in a warm and well ventilated space. Be careful what you hang however, because certain crops like apples or tomatoes are simply too wet to hang dry and will rot away if you try this strategy.
  • Smoker
    • Fresh peppers smoked counterparts : r/spicy
    • Image 2
    • Another unique way to dry produce is using a smoker. Many traditional ingredients in Latin American cooking are made from peppers that have been smoked and dried (Chipotle peppers are smoked jalapenos). Just run the smoker at a low temperature until the moisture is totally gone from whatever you’re drying.

Canning:

    • The Brief History of Canning Food
    • Image 3
    • Another great method for preserving basically any fruit or vegetable is through canning. This works for everything from beans to jams and jellies to even pickles and hot sauce. Although it may seem like a complicated procedure, the basic process goes something like this: Pack whatever you’re canning into sterile glass canning jars, cover with lids, then submerge those jars into boiling water or a sealed pressure canner for a set amount of time, then remove and store on the shelf indefinitely.
    • Because the full process is actually a little more complicated than that, (and because I don’t want to be responsible for you getting botulism and dying if you mess up) I am going to direct you to two more comprehensive guides below:
      • Water bath canning (High acid foods like pickles, tomato sauce, hot sauce, jams and jellies)
      • Pressure canning (Low Acid foods like corn, beans and pumpkin, as well as meat and eggs)

Freezing:

Freezing is another easy method to quickly save produce. There is not much to it besides sealing the produce in an airtight bag and letting it freeze. Everything from the garden can be frozen, but it is important to remember that frozen then thawed produce tends to be rather mushy and should only be used in cooked dishes. Because of this, freezing things that are only really eaten fresh, like salad greens, is not recommended.

Foods that store on their own:

Some foods have remarkably good shelf life without any extra preservation:

    • Winter Squash
      • Garden planning (how long squash can be stored)
      • Image 4
      • Simply leaving most winter squash in a warm dry area for ~2 weeks can prepare them to sit in storage at room temperature for 6 months or more (depending on variety)
    • Garlic
      • Garlic that has been dried after harvesting can be stored in bags or baskets in a well ventilated space for at least 6 months
    • Potatoes
      • Harvested potatoes will keep for several months in bins in a cool moist environment like a basement, provided they are kept dark.

One final consideration is that most food banks will accept donations of fresh produce, so if you find yourself totally overwhelmed with more vegetables than you can handle, they will be more than happy to take them and give them to families in need. That’s all for this post, make sure to check out the linked resources for more information on each method.

The Garden Guide: Part 5- Disease

In the last post in this series I discussed some common insect pests that could affect your garden. You might have come away from that post thinking “wow there’s a lot of things to worry about when trying to grow a garden”. Unfortunately, I have some bad news for you: Insects are often only half the issues you’ll face, and some of the most devasting problems will arise from pathogens you can’t even see. Just like people, plants can get sick too, so today we’ll be going over some of the common plant diseases and ways to prevent them.

Categories of Plant Disease

There are three main types of pathogens that can cause disease in plants: bacteria, funguses and viruses. Because of this, we we’ll be discussing each group separately below

Bacterial Diseases:

  • Bacterial Soft Rot
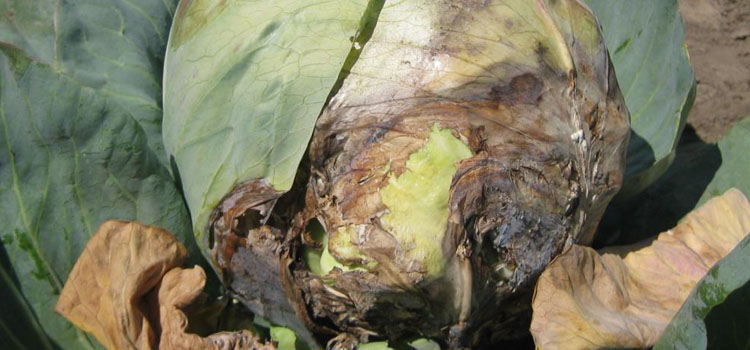
    • Cabbage Soft Rot Guide
    • Image 1
    • One of my personal least favorite diseases, bacterial soft rot is found mainly in brassicas (cabbage, kale, broccoli, etc.) but can also sometimes affect lettuce and other crops. Soil borne bacteria make their way into openings in the plant stem, usually the cuts left when harvesting.
      • Controlling this disease is very difficult once it gets established, so removing and burning the crop as soon as it is noticed is often the best option. Under no circumstances should a home gardener compost a plant with this disease, because the bacteria will persist in the compost.
      • Not growing cabbage crops in the same location each year will also help to control this disease. This is known as crop rotation and is generally good practice for a number of reasons. If you often deal with this disease, certain varieties are more resistant to it, and growing them in early spring and late fall can also improve your odds since the bacteria is most active in warm weather.
  • Bacterial Leaf Spot
    • Tattered appearance on the affected pepper plant leaves due to bacterial leaf spot.
    • Image 2
      • A common threat to solanaceous (pepper/tomato family) crops in the eastern US is bacterial leaf spot
      • This bacteria survives on plant debris and seed material and thrives in warm and wet conditions. Left untreated it can be very detrimental to the crop, defoliating plants and deforming fruit.
      • Best prevention practices include buying certified disease-free seeds, watering in the early morning so the leaves don’t stay wet, and never saving seeds from infected plants
      • Infected material can be composted as long as the compost is left to age until the plant material is entirely broken down, because the bacteria will be broken down by soil microorganisms once its host material is gone.
      • Copper sprays can be effective treatment methods if the disease is caught in early stages

Fungal Diseases:

  • Powdery Mildew
    • Powdery Mildew: How to Identify, Treat, and Prevent Powdery Mildew | The Old Farmer's Almanac
  • Image 3
    • Perhaps the most common disease for plants in the squash family (cucumbers, pumpkins, zucchini, etc.) is powdery mildew
    • This fungal disease appears as white spots of powder on the leaves of the plants. Left untreated it will slow down the plants growth and production and eventually kill them
    • Trimming diseased leaves, not touching diseased plants before healthy plants, and crop rotation are all good methods to prevent this disease
    • Copper sprays are also useful for controlling the disease once it (inevitably) arrives
  • Late Blight
  • Late blight detected locally in New York and Pa. | Morning Ag Clips
  • Image 4
  • The fungal disease known as late blight is actual the same disease which caused the infamous Irish Potato Famine. Much like the other diseases, it can be carried in plant material, but is particularly difficult to control because it can also be soil borne or even airborne. It is mostly known for its effect on potatoes and tomatoes
  • Late blight causes lesions on the stem and leaves of plants, as well as rotting the fruit or tubers.

Viral Diseases:

  • Tobacco Mosaic Virus
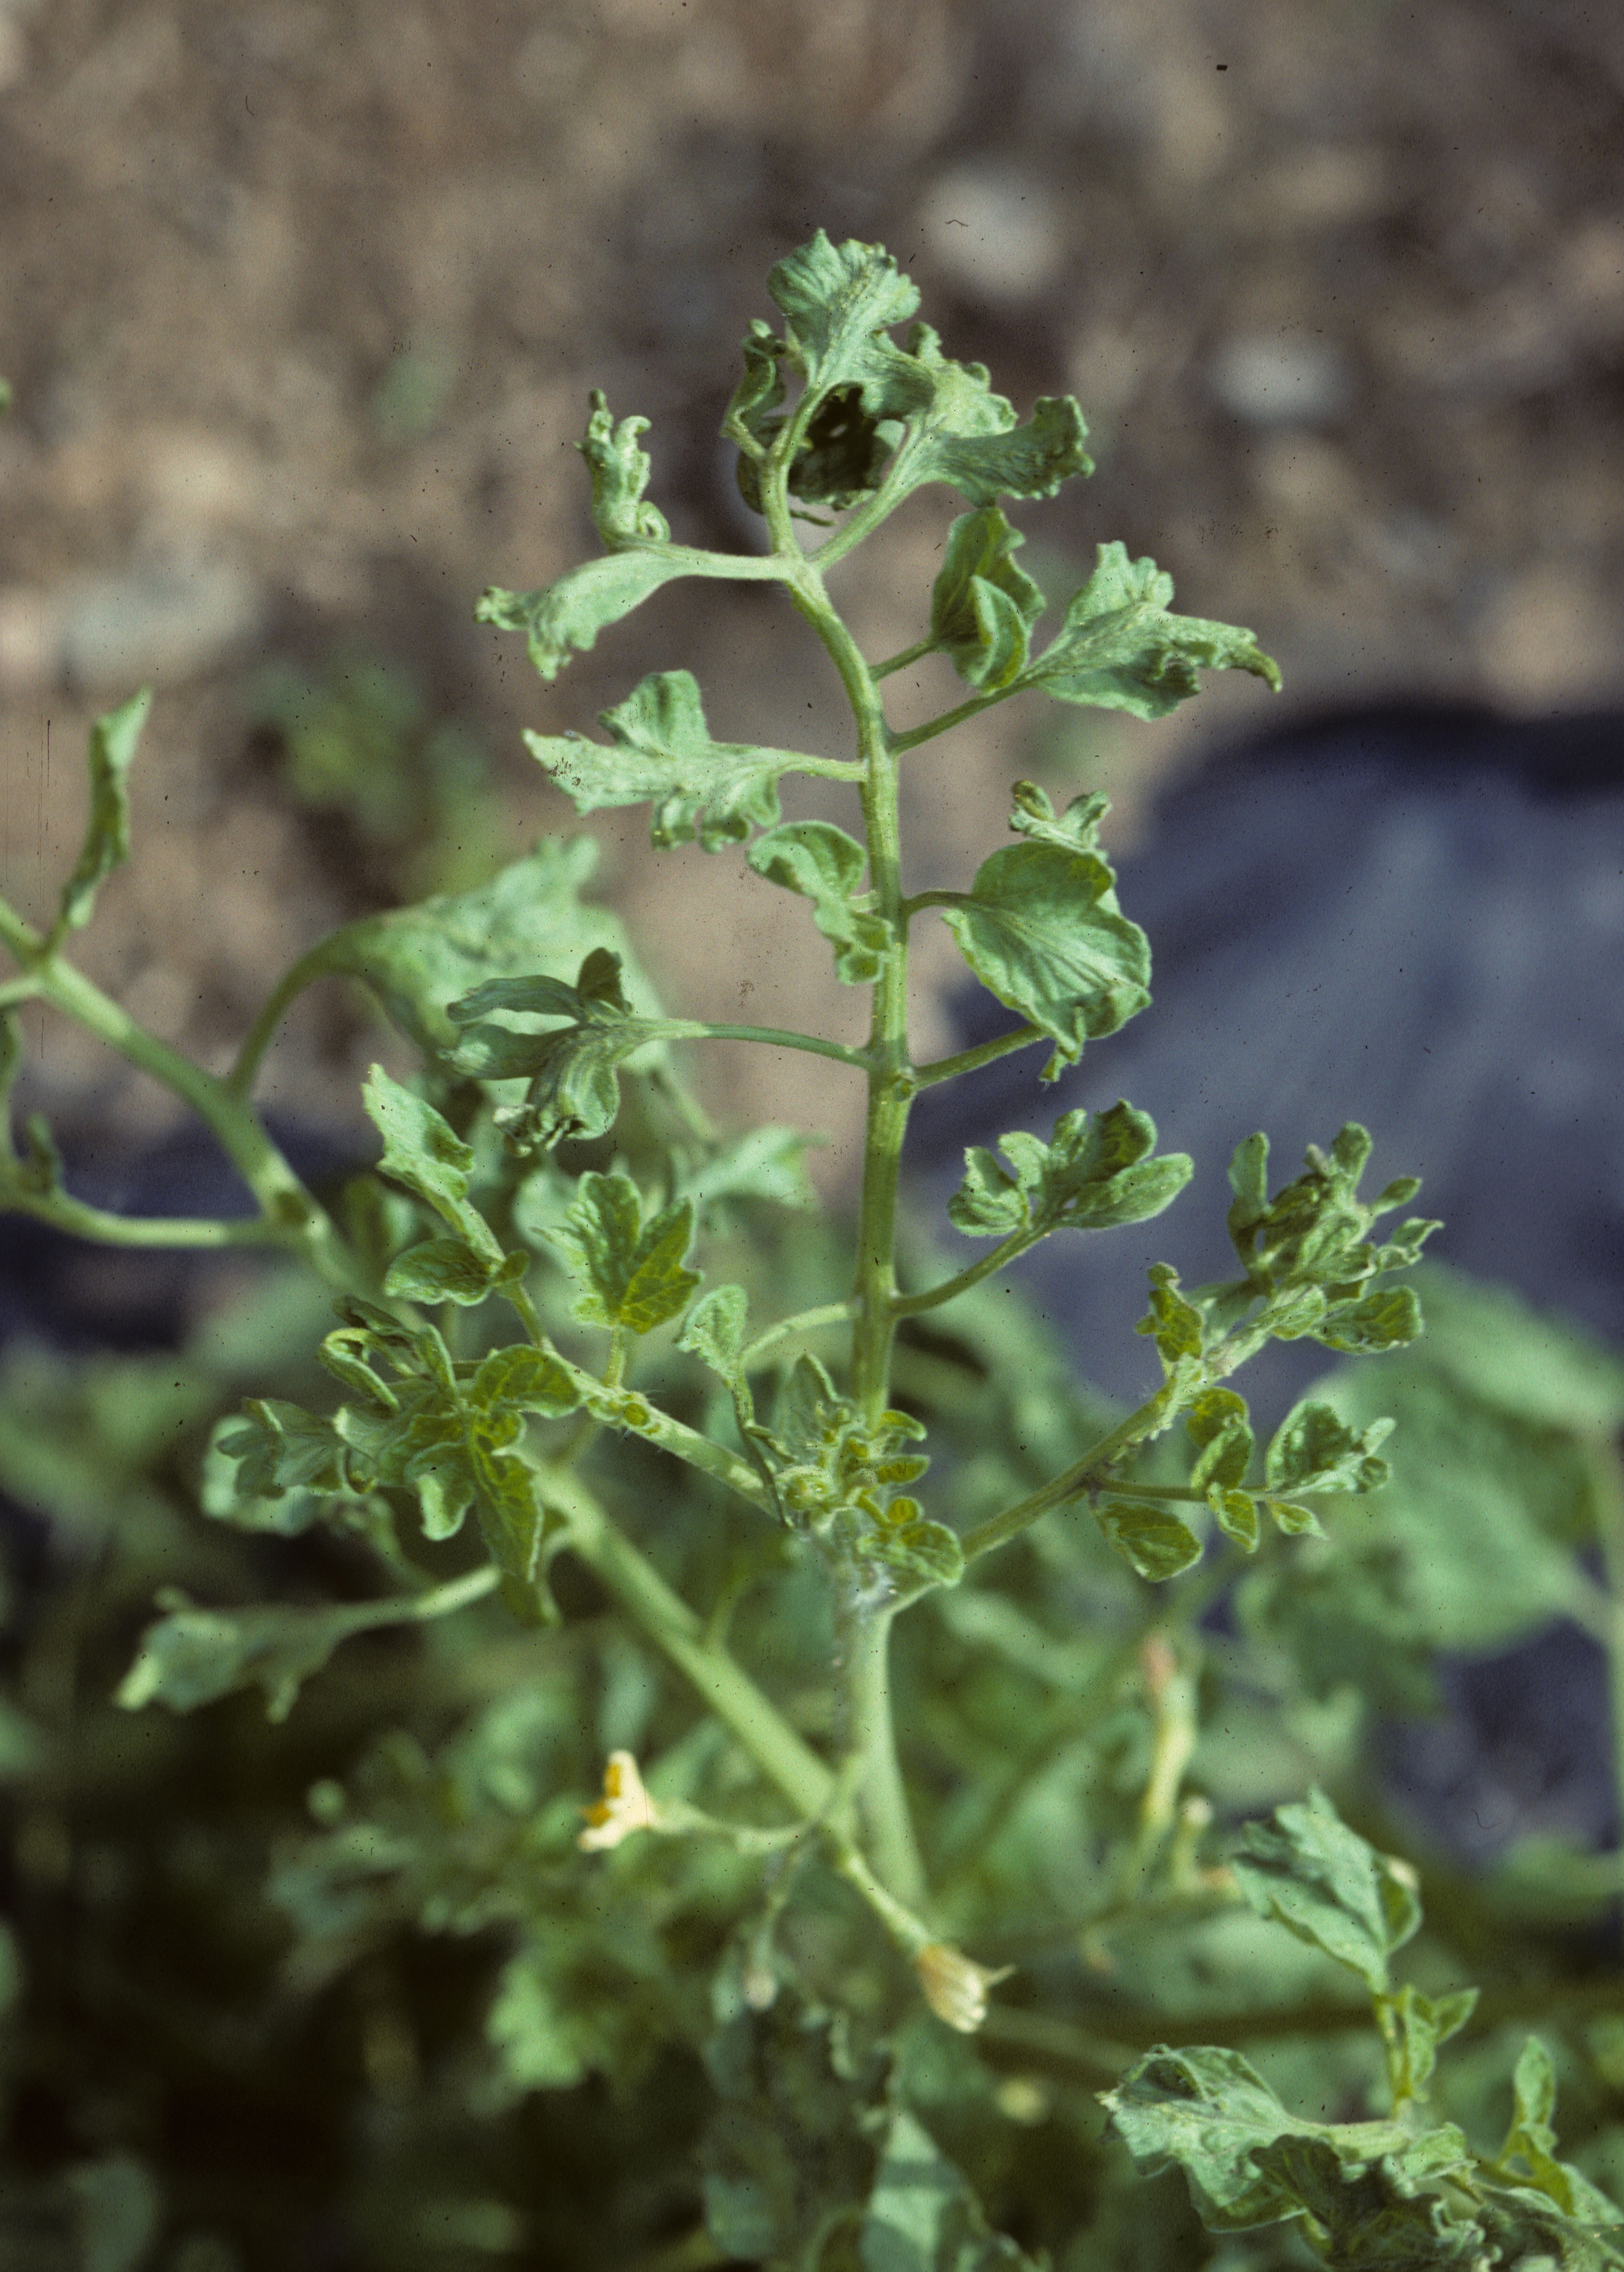
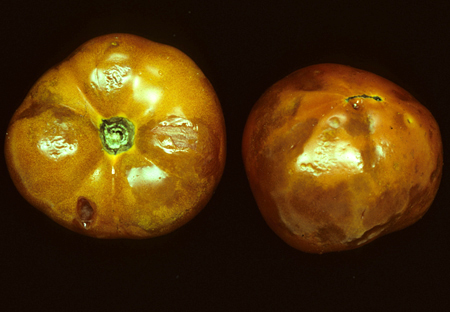
  • Foliar symptoms of TMV in tomato. Photo: R. L. WickTMV infected tomato fruit. Photo: R. L. Wick
  • Image 5/6
    • Tobacco Mosaic Virus or TMV is one of the most common and persistent viral diseases. It’s spread through sap transmission between plants (usually contaminated tools) and is known for its effects on tomato, eggplant, pepper and potato crops.
    • It causes light green mottling patterns on foliage (mosaic) and lesions and rot on the fruit
    • The best method of control for this disease is prevention through crop rotation, frequently disinfecting harvesting equipment and immediately destroying infected plants
    • Once a plant is infected with this disease, it cannot be saved as there are no sprays or treatments that can stop TMV.

As always, consulting local extension offices is the best path for identifying the disease you’re dealing with, but as a general rule of thumb, destroying diseased material at the end of the season, practicing crop rotation, and maintaining clean equipment are all good ways to prevent most crop diseases in general.

The Garden Guide: Part 4- What’s Buggin’ You?

Even if you do everything right, buy the right seeds, plant them correctly at the right time in the right place and care for them properly, it is still very possible that one day you will go out to find that your precious planting has been ravaged by some mysterious force. In this post, we’ll talk about some of those “mysterious forces” (bugs), how you can avoid them, and what to do when they inevitably show up anyway.

Bugs

So many different insects (and non insects like slugs and mites) can cause problems in a garden. Luckily, if you can figure out which one is the issue in your garden, they’re usually not too hard to deal with.

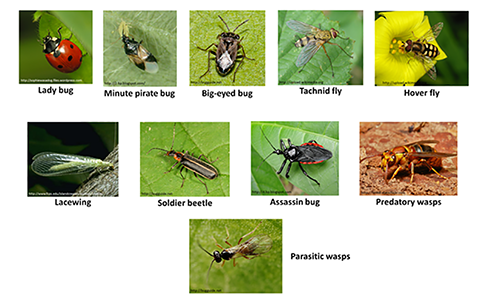
Now, you might not be a fan of any bugs at all, and you’re probably wondering why you should bother identifying your pests in the first place? Why not just go nuclear with the strongest pesticide you can find? The reason for this is that some bugs are actually beneficial to your garden and the environment. Bees, wasps, butterflies and moths are all excellent and very environmentally important pollinator species, while other wasps, flies, mantises, beetles and spiders are all predators of the species which plague your crops. Unintentionally killing these species off with general insecticides could pose more problems to your garden and local environment than doing nothing at all.

Increasing beneficial insects for enhanced pollination and biological control using insectary plants // Missouri Produce Growers Bulletin // Integrated Pest Management, University of Missouri

Beneficial Insects: Image 1

In some cases, these bugs are so desirable that you can even buy them in large quantities online and introduce them into your garden. Unfortunately, not every bug in the garden is going to work with you as well as these guys, and if you want to get the harvest you’ve been working for, you may have to take things into your own hands. Here are some of the common pests you’ll encounter and how to handle them:

* Note that my recommendations for how to handle the pests will usually be based on organic methods, since I worked on an organic farm and follow these methods in my own garden, meaning I have more experience with these vs conventional methods.
  • Aphids
    • Some Aphid Babies Are Born Already Pregnant | HowStuffWorks
    • Image 2
    • Tiny soft bodied insects that feed on sap of the plant. Usually red, green, pink, black or brown but come in many colors. One of the most common garden pests, attacking nearly any plant species.
      • Infestations will show distorted growth on the new shoots of plants, leaves may curl and plants appear stunted. Colonies can be seen on the underside of leaves
        • Easily treatable by crushing the aphids with fingers, knocking off the plants with a spray from a hose, introduction of ladybugs (the larvae eat many aphids every day) or by spraying with neem oil or spinosad (Organic pesticides)
  • Flea Beetles
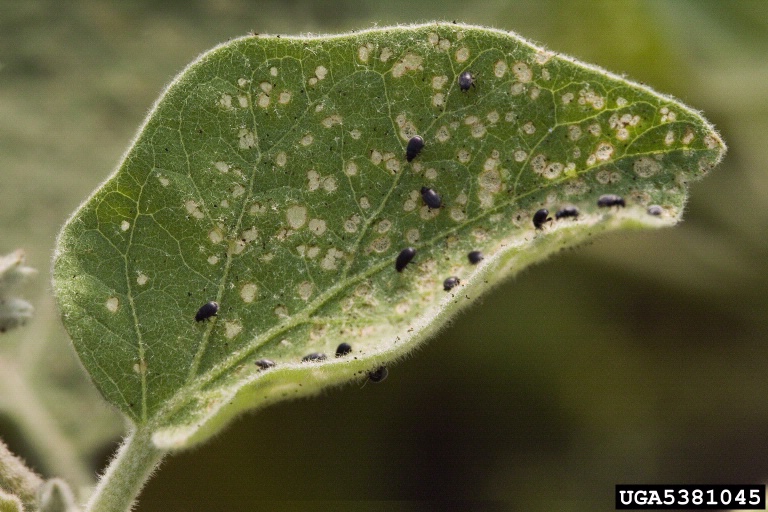
      • Backyard Gardener - Flea Beetles in the Garden - June 7, 2017
      • Image 3
      • Tiny black hard bodied beetles which jump away (like fleas) when you get close. Affects most plant species, but are of particular concern for seedlings and eggplant
        • Leave tiny holes in the leaves which make it appear as if the plant was shot with super tiny birdshot
        • Can be controlled with diatomaceous earth (DE) or through fine mesh insect netting
  • Cabbage worms/Cabbage Loopers/Cabbage moth
    • Cabbage, Broccoli & Other Cole Crop Insect Pests | Home & Garden Information Center
    • Image 4
    • Small green or green and black caterpillars which eat the leaves of brassica (cabbage family) crops. The larvae form of the cabbage white butterfly (the little white moth things that fly around all summer)
      • Easily controlled through manual removal or use of bt (organic bacterial-based pesticide)
  • Slugs/snails
    • 9 Natural Ways To Deter Slugs
    • Image 5
    • Long slender and slimy creatures which sometimes have shells (snails) that come in a variety of shapes and sizes. Usually more of an issue with seedlings and plants in very cool and wet conditions. These pests will take bites from leaves and fruit and in large quantities can decimate a garden overnight.
      • Can be hand picked (best done at night), deterred with DE, or captured in “beer traps”
  • Japanese beetles
    • Japanese beetles emerging as next insect nuisance for eastern U.S.
    • Image 6
    • These invasive beetles will feed on most crops but are of particular concern to flowers, fruit trees and beans.
      • Hand picking, DE, and pheromone traps are effective methods of control
  • Allium Leaf Miner
    • Field Scouting Guide: Allium Leafminer - Growing Produce
    • Image 7
    • A very new pest to PA, this small fly came over from turkey just a couple years ago. The fly lays eggs on plants in the onion family (leeks and garlic included) which then hatch into small maggot like worms that burrow into the stem and cause it to rot. Because the flies are tiny and the maggots live inside the plant, the easiest way to detect this pest is through inspection of the leaf tips for the small white circles that come as a result of the adults feeding.
      • Very fine mesh insect netting over the plants during the flies breeding season (usually March-June and late August-October) is the best control method
  • Tomato Hornworm
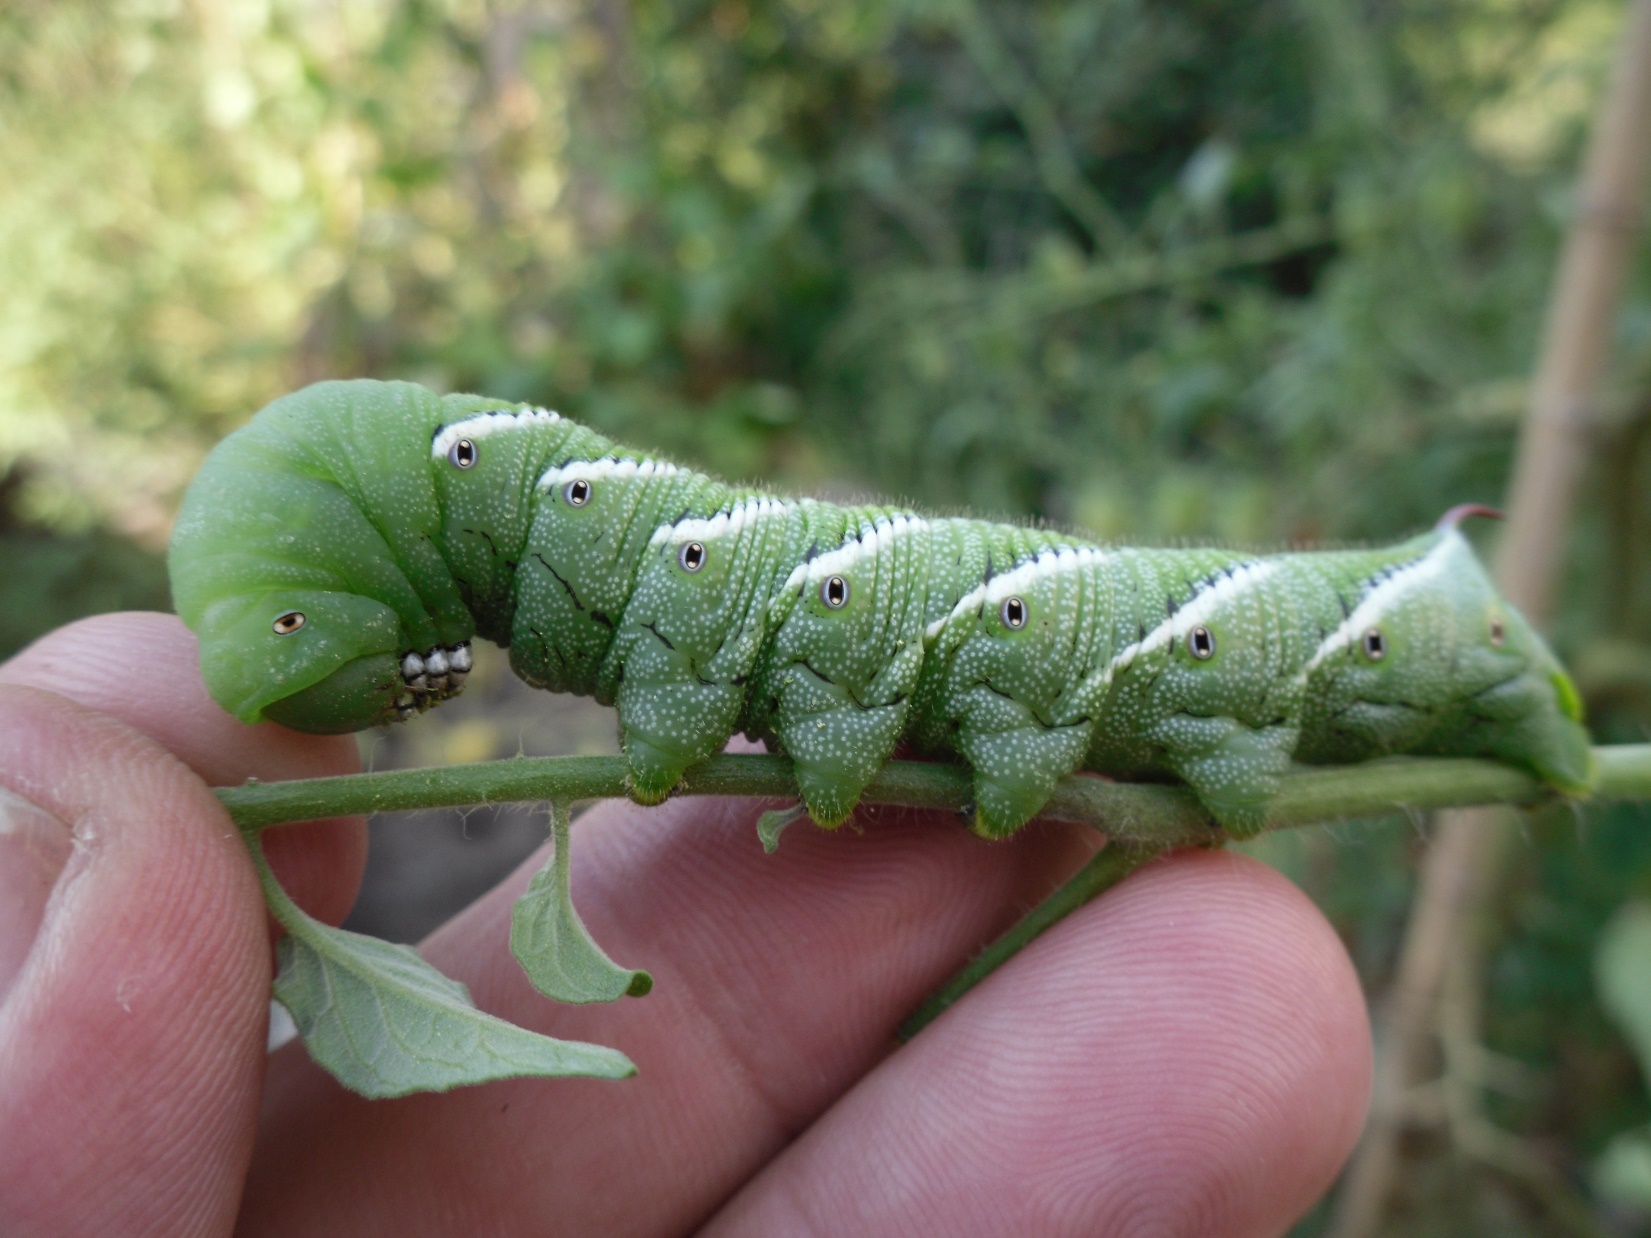
  • Hornworms on the Tomatoes | Home & Garden Information Center
  • Image 8
    • Large green and white caterpillar with pronounced spike on rear. Larval stage of hawkmoth. Eats the leaves of mainly tomatoes but sometimes also related plants such as peppers and tomatillos.
      • Best controlled through hand removal (they glow under black light so they’re easy to find at night using one) or through applications of Bt
      • Untreated infestations will quickly result in near total defoliation of the plants
  • Whiteflies
    • How to Control Whiteflies | Planet Natural
    • Image 9
    • Much like aphids but having small white wings, the aptly named whitefly feeds on the sap of of plants, usually from the underside of leaves.
      • Left unattended, the population will quickly get out of control and the small pests will stunt plant growth as well as coating the leaves with their sticky excrements, making them nearly unusable
      • Treatments include neem oil and spinosad

Obviously this is not a fully comprehensive guide of the foes you may encounter, just a brief overview of some of the more common ones that can affect a wide range of crops. For any other unidentified pest issues, consulting your local county extensions website is always a good place to start.  The next post in this series will be similar to this one, but focusing on some common plant disease issues instead.