Welcome back to the indoor garden guide. Today’s subject is going to be the various pots/container options you have for growing indoors and some basic guidelines regarding their use.
Indoor plants are usually grown in one of two types of pots: ceramic/terracotta pots or plastic pots. Each has their own advantages and disadvantages but either can be made to work for just about any plant. Before we talk about the actual pots though, we need to have a quick note on the importance of drainage.
As discussed in the last post about potting media, one of the most important things to think about with houseplants is getting the drainage right. Too little drainage will end up rotting almost any plant, and too much drainage (although less common of an issue) will result in plants that constantly need water because they dry out very fast. With this in mind, it is important to always choose to grow the plant in a pot with drainage holes.

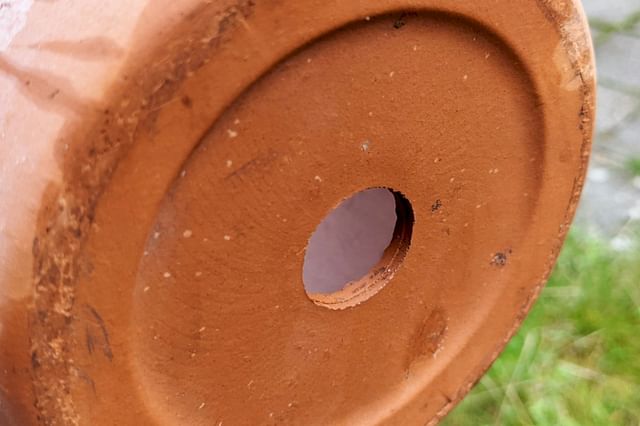
Drainage holes are the little holes on the underside of the pot which allow excess water to drain out of the pot. As mentioned earlier, this flow of water is important to prevent the roots from soaking and then rotting in a puddle at the bottom of the pot.
You will sometimes see pots sold without drainage holes for one of two reasons. Reason number one is that they were simply not designed with the health of the plant in mind, they were just designed to either look good or be cheap to produce. This is usually the case with those little succulent arrangements you often see at big box stores:

These collections are actually a bit of a pet peeve of mine because they set people up for failure, particularly with succulents which are extremely dependent on good drainage, which leads to people killing their plants and thinking that they don’t have a green thumb when in reality even an experienced grower would struggle with the same set up. (And they’re usually way overpriced)
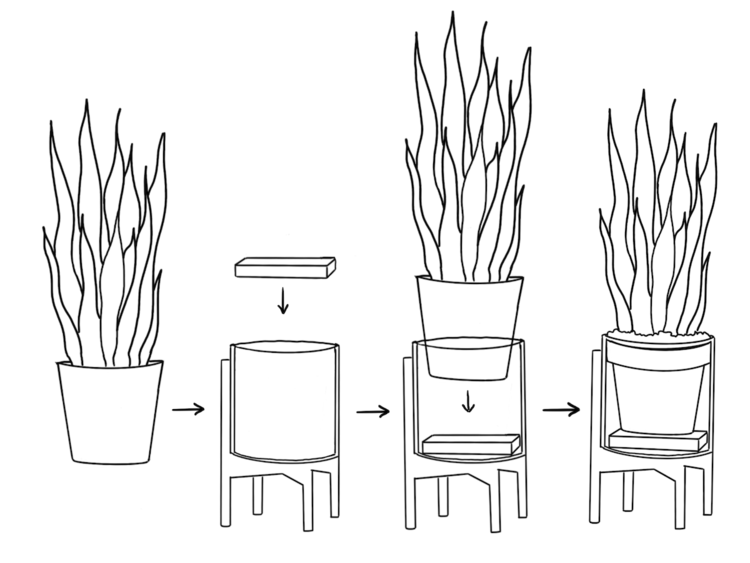
The other reason you might find a pot without a drainage hole is that it is intended to be a decorative cachepot, which is a pot you use to look good and contain any mess from a houseplant, but the plant is actually planted inside a different pot (usually a plastic nursery pot with drainage holes) and then the whole thing set inside the cache pot.

This is a totally viable option and a great way to have a good looking potted plant that doesn’t make a mess on your floor/windowsill. The only issue is when people mistake one of these decorative cachepot as a grow pot (what the plant should actually be in) and plant directly into the cachepot.
A common misconception is that you can use a pot without drainage holes if you put a layer of gravel at the bottom below the soil. The idea is that the water can drain out of the soil and sit below the plant roots in the gravel, eliminating the need for an actual drainage hole. However, this is actually not the case due to a phenomenon called the perching effect. The science behind it is explained in more detail in the link, but the general idea is that water doesn’t like to flow between layers of soil with different particle sizes (like potting soil to gravel) and therefore the gravel in the pot actually raises the water table in the pot and doesn’t help with drainage at all.
Terracotta/Ceramic Pots
Terracotta pots and ceramic pots are both made out of clay that has been shaped into a pot and then hardened in a kiln. The difference is that ceramic pots are usually painted/glazed while a plain terracotta pot is just the raw clay.

The only difference this brings in regard to their use is that terracotta itself is porous, which means a plain terracotta pot will dry out faster than a glazed ceramic pot (even with the same drainage holes). This can be advantageous if you have a tendency to be a little heavy handed with the watering can, or are growing plants that like to dry out fast (like cacti and succulents). At the same time however, it can also be annoying if you live in an already dry climate and the extra evaporation makes you need to water more often.
Pros of Terracotta/Ceramic Pots:
-
-
-
- Often visually appealing and come in a wide range of colors, shapes and sizes
- Extra evaporation from terracotta (can be pro or con)
- With proper care can last a very long time
- Widely available
-
-
Cons of Terracotta/Ceramic Pots:
-
-
-
- Heavier than plastic
- This isn’t a big deal for a small plant on the windowsill, but for a large pot (think 20+ inches across) it can make it hard to move
- Can break/shatter
- Hard to drill drainage holes
- Can be done with special drill bits
- Usually more expensive
- Harder to take plants out to repot
- Heavier than plastic
-
-
Plastic Pots
Plastic pots can also come in a wide range of shapes and sizes, but the most common are either decorative plastic pots (top) or the standard black/green nursery pots (bottom)


Pros of Plastic Pots:
-
-
-
- Lightweight
- Cheap
- Flexible/Doesn’t shatter
- Huge range of colors/shapes
- Easy to take plant out to repot
-
-
Cons of Plastic Pots:
-
-
-
- Will eventually become brittle over time
- Some people don’t like the look
- Some are extremely flimsy
-
-
Pot Sizes/Up-Potting
As plants grow aboveground, their roots grow below ground as well. At some point, your plants will need to be moved to bigger pots because a plant left in a pot too small will eventually become rootbound like this:

This will lead to problems in the long run, including issues with drainage and soil compaction. To avoid this, plants must occasionally be moved into bigger pots.
When to Up-Pot?
Signs that a plant is in need of a repotting include numerous roots coming out of the drainage holes and large amounts of roots visible on the surface. Slow water infiltration can also be a sign but isn’t always caused by this. To check, remove the plant from the pot (either by squeezing and pulling on a plastic pot, or by running a butterknife or some other object around the inside edge of a ceramic pot) and look to see if the roots are visible/circling the pot. If the roots have begun to circle, it is likely a good time to repot that plant. Simply remove the plant from its old pot and place it in a new pot that is about 2-4″ larger across than the previous pot*. Then backfill with soil, making sure to bury the plant no deeper than it was in the old pot. If the roots are super tightly wrapped in the old pot, you can loosen them a bit with your fingers or make a couple small cuts in them with a knife to encourage new growth once they’re in the new pot.
*You may be tempted to just put a plant directly in a much larger pot to prevent the need to repot again in the near future, however this is a bad idea. A plant in a pot that is too big will not be able to absorb all the water contained in the excess soil after a watering, and thus will be prone to root rot. Only increase pot size by about 2″ or a little more each time.
That’s all for this post. The next post will talk about plants that can thrive in places with less than optimal lighting (Like a dorm room…).


