The Indoor Garden Guide: Part 6- Propagation

Welcome back to the final post of this series. Hopefully over the past couple months you’ve gained some insight into keeping houseplants alive (and maybe even thriving). For this final post in the series, we’ll be talking about propagation of common indoor plants, specifically the different types of vegetative propagation.

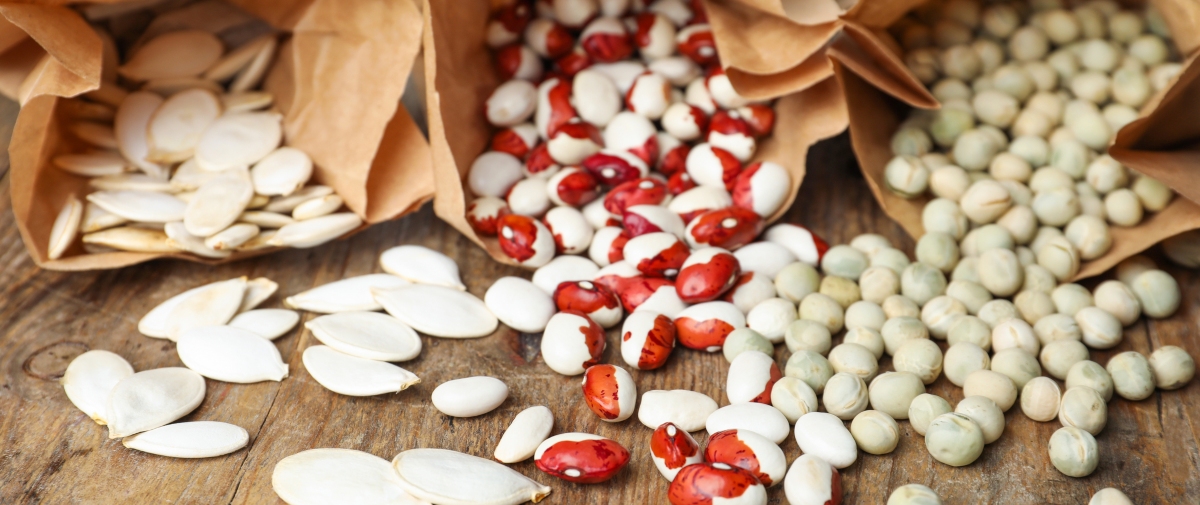
When most people think of growing new/more plants, their minds go to seeds. However, for many common houseplants, there is a simpler and also significantly faster way: Vegetative propagation.

5-Plants propagated from seeds may look different from their parents and their siblings because they contain a mixture of the genetic characteristics of each parent. Conversely, vegetative cutting propagation produces exact duplicates of the parent plant ("clones").

Source

Vegetative propagation is a type of asexual reproduction for plants in which a piece of plant material (such as a leaf, root, or stem) is separated from the mother plant and grown into a whole new plant of its own. Compared to seed propagation, vegetative propagation can be significantly faster (plants are already larger when they start growing) and sometimes also easier (no need for specific germination requirements like scarification/stratification etc.). Additionally, there is the added benefit that all plants propagated vegetatively are genetically identical (clones) to the original plant, which means the new plant will be exactly the same as well.*

*There are some very specific instances in which traits result from chimeras (some cells have mutation but others do not) and during propagation the mutated cells are lost which results in the clone having a slightly different phenotype than the original plant. This is the case with some variegated snake plant cuttings reverting back to a non variegated form.

Stem Cuttings

How to Grow Plants From Cuttings

Source

Probably the most common type of vegetative propagation is through stem cuttings. A cutting is simply a piece of plant you cut off the original for the purpose of creating a whole new plant (and a stem cutting is a piece cut specifically from the stem of the original plant). The way this works is that plants have certain cells in their roots and shoots which can change type and create roots on stem tissue or shoots on root tissue.

In order for this to work, the plant needs to stay alive long enough for the new roots/leaves to grow. However, a piece of stem or leaf without roots is very limited in its ability to take up water, so it is important that these cuttings be kept moist to prevent them from drying out.

For most vining houseplants (pothos, ivy, philodendron, monstera, etc.) the easiest way to take a cutting is to cut off a section of the stem with at least 1 or 2 nodes (where a leaf meets the stem)What are the parts of a stem? – lovethatleaf

Source

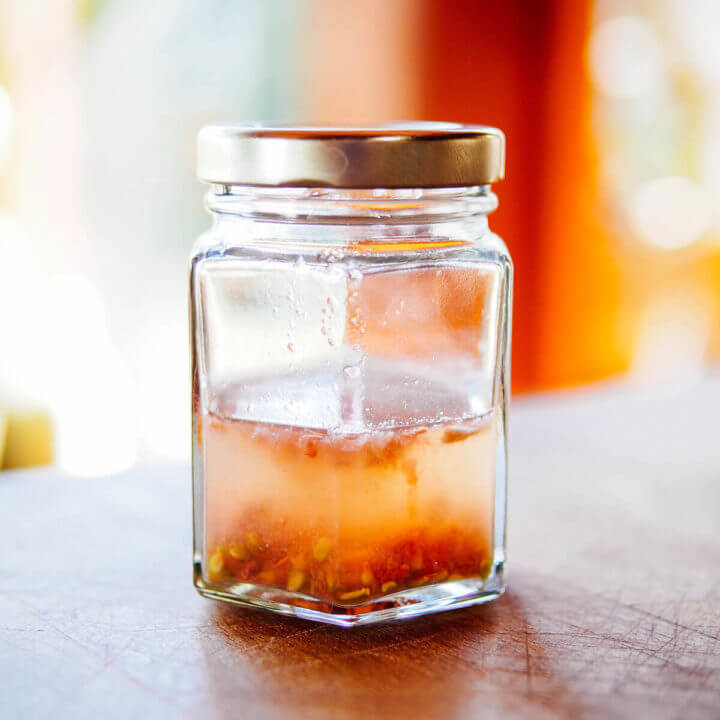
It is important to include a node on the cutting (for most plants) because the cells which have the potential to develop into roots are only found on the nodes. Strip the leaves from the lowest node and simply place the cutting in either moist soil or a glass of water (ensure the node is below soil/water line). Placing in soil is a little easier for more experienced people, because you won’t have to transfer the cutting from water to soil later on, but many people like to start their cuttings in a glass of water because they can see the roots developing. If placing in soil, make sure to keep the soil moist (but not soaking wet) at all times, to prevent the cutting from drying out*. In water, just make sure to change out the water for fresh water every couple days. Keep developing cuttings in a bright area but out of direct sunlight (direct sun dries them out too fast, but some light is still needed to allow photosynthesis to create energy to grow new roots).

*Propagating cacti or succulents is a little different. Because these plants store so much water in their tissues, they don’t need to be placed in moist soil and should actually be kept dry (even letting the cut stems sit out for a couple days is encouraged to let the wounds callous over). Watering these cuttings usually just leads them to rotting.

How to Propagate Plants | Propagation for Beginners | The Sill

Source

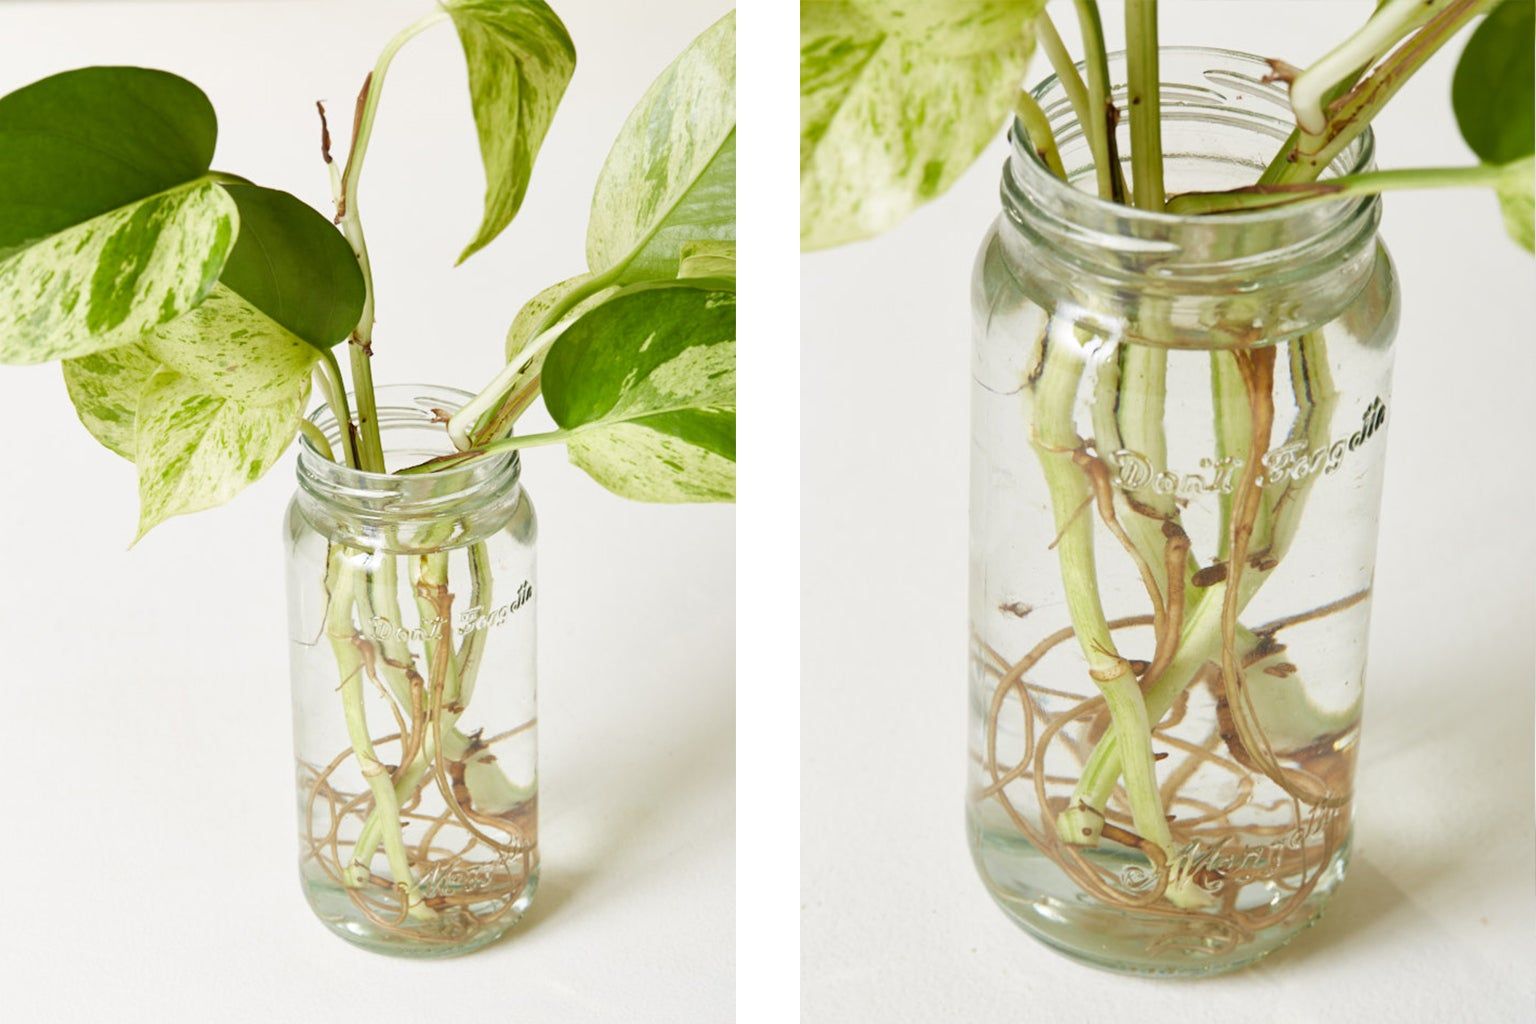
After a couple weeks, you’ll start to see roots developing like above. If you’ve got your cuttings in water, you can now move them to soil. Be sure to keep the soil a little more moist than usual for the first week or so after transferring from water to allow the roots to adjust. If you started the cuttings directly in soil, you can simply start to wean off the watering until the cutting is being watered like a normal plant.

Some plants can also be propagated from just leaves instead of stem cuttings. This includes most succulents and things like snake plants. To read more about leaf cuttings and succulents, click here. I also mentioned root cuttings as a way to propagate plants. This technique isn’t common for houseplants, but if you’re interested here is some further reading on it. The on

Some people/websites suggest using rooting hormone to help increase the root growth on cuttings. In my experience this isn’t necessary for houseplants but its beneficial for some woody plants (like trees/woody herbs). Regardless, if you’re interested you can purchase it on Amazon.

And that concludes the Indoor Garden Guide. Hopefully you learned enough that you feel comfortable taking a shot at growing some plants yourself. Goodluck, and enjoy this warm spring weather!

The Indoor Garden Guide: Part 5- Cacti and Succulents

Some of the most common houseplants people try to keep are cacti and succulents. Although often sold as “low maintenance” these plants can actually be a little tricky for some people because they require some special conditions. In this post we’re going to be taking a look at cactus and succulents, what makes them unique, and how to grow them yourself.

Also a quick note that all cacti are technically types of succulents, but since most people think of them separately, I’ll continue to address them that way.

The common characteristic of most cacti and succulents is that they originate from very dry (usually hot and bright too) climates. In order to live in these areas, they have developed several strategies to survive under harsh conditions. The first and most obvious (especially with succulents) is that these plants store lots of water inside themselves. In deserts, it can often be weeks without rain, and because plants need water to survive and photosynthesize, these plants have adapted to store large amounts of water within their leaves and stems that they can draw from during dry periods. This is why you see many succulents with very thick, fleshy leaves because they are full of water. Additionally, most cactus have some sort sharp spines that allow them to protect their inner water reserves from thirsty animals.

Pin on Sedum

Source

These plants also have some other special adaptations such as a modified version of photosynthesis called CAM photosynthesis to reduce water loss (This isn’t a plant science class, but if you’re interested you can read more about CAM plants here). Many of these plants also have an extra thick layer of wax (called the cuticle) over their leaves, again to prevent water loss.

Now you’re probably saying “Ok… I really don’t care about the evolution of succulent plants I just need to know how not to kill them”, but this background information is actually important because it all leads to the same conclusion: Succulents and cacti come from desert conditions.

Why Are Cactuses Spiky? | Vermont Public

Source

Desert conditions are usually bright and they’re usually dry, so the best way to care for your cactus or succulent is to replicate those conditions. You’ll want the brightest spot you can find in your house (Ideally a south facing window) or perhaps a grow light. Placing your succulent or cactus in a place without enough light will at best slow the growth and usually lead to the plant getting super thin, pale, and weak (a process called etiolation-see below image) before it finally succumbs and leaves you wondering what you did wrong.

Etiolated Succulents (Leggy) – How to Prevent and Fix - Desert Succulents

Source

The other part of that desert condition replication is usually what people mess up: Keeping it dry.

When a succulent is watered, it takes up large amounts of water and stores it in its leaves. Then it uses that water for its natural processes until the leaves start to get depleted. So while the plant still has plump leaves that are full of water, it doesn’t need you to water its roots. However, they are still living things, so when those leaves run out of water, its best to give the plant a nice soaking to allow it to rehydrate itself. This means you may not need to water for weeks at a time if the leaves are still firm and plump. Too frequent of watering can lead to the roots of the plant rotting off and eventually kill it.

The other thing that goes hand in hand with watering is the soil. Again, think about a desert, the soil isn’t rich and moist, its dry and full of coarse sand and rocks. This means that when it does rain, the soil doesn’t stay wet for long, as the water can drain right through. For best luck with your succulents or cactus, you should try to replicate this. Avoid cheap commercial potting mixes as they will hold too much moisture and drown your plants. You can read my post about potting mixes here in which I talk about how to mix your own and things to consider for specialty plant species like cacti and succulents. The main thing to remember though is that a good succulent mix is course and drains well. It would probably look something like this:

Desert Cactus Gritty Potting Soil Mix for Lophophora, Ariocarpus, Tric –  Scenic Hill Farm Nursery

Source

A final tip is that many people find terracotta pots to be more forgiving when growing these types of plants because the terracotta is porous and allows water to evaporate out the sides which can help prevent the dreaded root rot. That being said, any pot can work as long as it has adequate drainage.

So in summary (or for those who didn’t read this and just skipped to the end), to grow happy healthy succulents and cactus you’ll want to keep these things in mind:

        • Give them as much light as you can. If possible, add a grow light.
        • Use a coarse, well draining potting mix made specifically for cacti or succulents.
        • Use at minimum a pot with drainage holes
        • Water deeply only when the soil is totally dry and the plant has begun to get a little soft and wrinkly.

None of these things are particularly difficult, and overall these plants are really easy to care for if you can just meet a few basic conditions. Despite this, many people struggle with these plants, and its usually because they’re forgetting these plants come from deserts and aren’t doing a good job at simulating those conditions.


The Indoor Garden Guide: Part 4- Grow Lights

Welcome back to The Indoor Garden Guide. The last post discussed low light plants which could be grown in darker rooms or those without windows. The low light plants I talked about can certainly make excellent houseplants, but sometimes you just want to grow something a little different. Unfortunately, most of us don’t have the natural light required to grow some things like cactus. Not to worry though, if your heart is set on a certain plant with higher light needs, or you’re just looking to improve you plants growth rates, there is an easy way to do it. That’s right, today we’re talking about grow lights.

I think grow lights get a bad rap from people associating the term with giant marijuana grow operations. Luckily for you, if you just want a couple houseplants, there is no need to make your basement look like this:

N.H. Okays First Grow Site for Medical Marijuana | New Hampshire Public  Radio

Image

There are a couple types of grow lights available to home growers, including florescent bulbs and high pressure solidum halide bulbs, but right now the best choice for anyone growing at home is an LED grow light.

LED grow lights are optimal for hobbyists and home gardeners because they’re cheap, lightweight, and far more energy efficient than the other options. They also don’t get nearly as hot so you don’t need to figure out additional ventilation or worry about burning your plants.

LED Lights

There are two main types of LED grow lights available: Red/Blue (sometimes called “blurple” because of their purplish appearance) and the white/full spectrum lights.

Spider Farmer SF-1000 LED Grow Light Full Spectrum Plants Lights Home Veg  Lamp | eBay

Image

The reason for the purple coloration is that plants mainly absorb light for photosynthesis in two different wavelengths which appear as the red and blue colors of visible light, while they absorb very little green light.

Why Are Grow Lights Purple? (And Are "Blurple" LEDs Effective?)

Image

The peaks of red and blue are showing how those wavelengths are absorbed by the chlorophyll for photosynthesis, while the green wavelength is not absorbed as much. This results in the green light reflecting off the leaf, making plants appear green to us. The reason for the purple grow lights therefore, is that they are only supplying the red and blue wavelengths of light, which are the main wavelengths used for photosynthesis. The full spectrum “white” lights also emit these wavelengths, but they are mixed in with other colors, which makes the lights slightly less energy efficient. However, LEDs in general are so efficient that for a hobbyist having just a couple lights, the efficiency gains from having the purple lights are minimal.

Because of this, I would actually recommend the “white” colored lights, because they make your plants much better to look at and don’t wash out the color like the purple lights do. After all, if you’re growing a plant for its ornamental value, doesn’t it make sense to want to see it well? That being said, if you want the purple lights or the color makes no difference to you, there’s also nothing wrong with using them.

Where to get grow lights?

There are a lot of places you can buy grow lights, from specialty hydroponics stores and greenhouse suppliers, to random listings on Amazon. Many people will say that the lights on Amazon are generally lower quality compared to the professional lights, which is a valid argument. However, as long as you’re getting a “decent” light, you don’t need a professional quality one to just grow a couple succulents.

What is a “good” grow light?

I haven’t personally tried too many different types of grow lights, so I can’t provide a comprehensive review on this aspect, but I can tell you a couple things to look for.

        • Wattage: Look for an LED light of at least 20W for a smaller/medium sized light, and more for a larger one.
          • Beware of the “100W equivalent” marketing gimmick where they tell you how much power the light would use if it weren’t LED, you want to find out what the “true wattage” is.
        • Look for decent reviews and a more name brand company.
          • Amazon has a lot of crappy lights, most of them look similar to the good brands, but the seller description should give you a bit of a hint. If the name sounds legitimate (aka not from “SUNBLASTINGLIGHTS.COM” or similar) and the product gets decent reviews, then its worth looking into more
            • Its also helpful to google the company name and see what comes up. Be wary of brand new sellers with barely any information online about them
        • Avoid these things (They usually suck):
        • Grow Lights for Indoor Plants - WEDCOL Red Blue Spectrum Plant Grow Light  Adjustable Gooseneck 135 LEDImage
Where to put grow lights?

Because you’re not spending $100s or $1000s of dollars on grow lights, the light you end up with will likely not be strong enough to help the plant if they’re far away. Try to keep the lights within 12″ of the leaves when possible. Much farther away, and you’ll lose most of the benefits of having the grow lights in the first place.

That’s all I’ve got for you this week. Next post we’ll take a look at some sun loving plants that you might want to use those grow lights for (succulents and cacti)


The Indoor Garden Guide: Part 3- Low Light Plants

Welcome back to The Indoor Garden Guide. Today’s post will be discussing low light houseplants

Many people want to grow houseplants, but then at some point come to the abrupt realization that plants require light, and their room is not very bright. This may seem discouraging, but you’ll be pleased to know there are actually several different types of houseplants which can be grown in rooms that don’t get much sunlight, and even some for rooms with no natural light.

Now to be clear, even the most shade tolerant plants still require some light, there’s nothing you can put in your dark closet and expect it to do well. At the very least there should be some indirect light from a window with a northern exposure (southern exposure gets the most sun, followed by east and west, while north gets only indirect sunlight), or in a place with consistent artificial lighting (like an office). Additionally, even though these plants are quite tolerant of lower light levels, they may still grow slower than they usually would in brighter conditions.

House Plants With Variegated Leaves That Are Easy To Take Care Of

Image

A note on variegation: Some versions of certain plants are variegated, meaning they have portions of the leaves/stem which lack the normal pigments used in photosynthesis. While these plants can certainly look cool (and are usually considered desirable), they have reduced surface area available for capturing sunlight, which means they aren’t as well suited for low light conditions compared to their non variegated counterparts.

Low Light Plants:

Pothos (Epipremnum aureum)

Jade Pothos – Art Terrarium

Image

      • Potentially the most common and popular of all houseplants, pothos (aka devil’s ivy) is well suited to nearly all indoor growing conditions. It grows as a trailing plant, with vines that can reach 40 ft or more if cared for properly. It comes in several different colors and patterns, but for extremely low light situations, the plain green varieties are best.

Heartleaf Philodendron (Philodendron hederaceum)

Heartleaf philodendron care & tips for growing this classic plant!

Image

        • Very similar to pothos in many ways, the philodendron is actually a distant cousin of pothos as well. It is also a green trailing vine that can tolerate a wide range of light conditions. The “heartleaf” (seen above) and “brasil” varieties are some of the most popular

Peace Lily (Spathiphyllum)

Peace Lily Plant (Spathiphyllum) | Plants.com

Image

        • This leafy plant is native to the rainforests of South and Central America. It blooms throughout the year with attractive white flowers.  It can tolerate low light conditions very well, and actually risks burning the leaves if you put it in direct light. This plant is generally quite resilient, but it does like to stay fairly moist, and will droop significantly if it needs water.
          • It is very important to note that all parts of this plant are incredibly toxic to cats, so its best to avoid if you have any feline friends.
          • “Eating just a small amount of a leaf or flower petal, licking a few pollen grains off its fur while grooming, or drinking the water from the vase can cause your cat to develop fatal kidney failure in less than 3 days”- FDA

Chinese Evergreen (Aglaonema)

Chinese Evergreen | Beginner Indoor Plants | Planterina.com

Image

        • Native to Southeast Asia, Chinese Evergreens are commonly seen in places like shopping malls which don’t usually have the brightest natural light. They have large glossy leaves, typically with silver or gold patterns. They are also relatively easy to care for.

Snakeplant (Sansevieria)

How to Care for Snake Plants (Growing Seasons, Soil & More) | Apartment  Therapy

Image

        • These upright, succulent-like plants are another pretty common houseplant. They are tolerant of low light, mostly because they enter a state of semi-dormancy when they don’t have enough light to grow. They can normally tolerate full sun when well adjusted, so they do best in at least moderate light, but they can still survive in sub-optimal conditions.

Cast Iron Plant (Aspidistra elatior)

Amazon.com : Cast Iron Plant - Live Plant in a 10 Inch Pot - Aspidistra  Elatior - Beautiful Shade Loving Evergreen Perennial : Patio, Lawn & Garden

Image

        • Just like its name implies, this plant is as tough as cast iron. This includes temperature fluctuations and a wide range of light tolerances. They grow as a rosette of long dark green leaves and are very beginner friendly.

Corn Plant (Dracaena fragrans)

Dracaena fragrans (Corn Plant, Cornstalk Plant, Dracaena, Dragon Tree,  Janet Craig Plant, Ribbon Plant, Striped Dracaena, Striped Dragon Palm,  Warneckei Dracaena, Warneckii) | North Carolina Extension Gardener Plant  Toolbox

Image

        • This plant grows into upright stalks of long green leaves which resemble those of a cornstalk. They are common in office buildings and libraries (there are a bunch in Paterno Library here at PSU) because they can survive in lower light rooms.

This is not an exhaustive list, there are certainly many more types of plants out there that can do well in limited light. These are just some of the more common and easy to care for types that you’ll be likely to find at your local nursery/garden center. If none of these peaked your interest however, make sure to come back next week as we’ll be talking about grow lights and how you can use them to grow nearly any type of plant indoors, regardless of your natural lighting situation.

The Indoor Garden Guide: Part 2- Pots

Welcome back to the indoor garden guide. Today’s subject is going to be the various pots/container options you have for growing indoors and some basic guidelines regarding their use.

Indoor plants are usually grown in one of two types of pots: ceramic/terracotta pots or plastic pots. Each has their own advantages and disadvantages but either can be made to work for just about any plant. Before we talk about the actual pots though, we need to have a quick note on the importance of drainage.

As discussed in the last post about potting media, one of the most important things to think about with houseplants is getting the drainage right. Too little drainage will end up rotting almost any plant, and too much drainage (although less common of an issue) will result in plants that constantly need water because they dry out very fast. With this in mind, it is important to always choose to grow the plant in a pot with drainage holes.

Everything you should know about drainage holes in plant pots - Plant care  for Beginners

Image

Drainage holes are the little holes on the underside of the pot which allow excess water to drain out of the pot. As mentioned earlier, this flow of water is important to prevent the roots from soaking and then rotting in a puddle at the bottom of the pot.

You will sometimes see pots sold without drainage holes for one of two reasons. Reason number one is that they were simply not designed with the health of the plant in mind, they were just designed to either look good or be cheap to produce. This is usually the case with those little succulent arrangements you often see at big box stores:

DIY Wine Bottle Planter for Succulents | Succulents and Sunshine

Image

These collections are actually a bit of a pet peeve of mine because they set people up for failure, particularly with succulents which are extremely dependent on good drainage, which leads to people killing their plants and thinking that they don’t have a green thumb when in reality even an experienced grower would struggle with the same set up. (And they’re usually way overpriced)

The other reason you might find a pot without a drainage hole is that it is intended to be a decorative cachepot, which is a pot you use to look good and contain any mess from a houseplant, but the plant is actually planted inside a different pot (usually a plastic nursery pot with drainage holes) and then the whole thing set inside the cache pot.

3 Ways To Pot A Plant With No Drainage Hole — Plant Care Tips and More · La  Résidence

Image

This is a totally viable option and a great way to have a good looking potted plant that doesn’t make a mess on your floor/windowsill. The only issue is when people mistake one of these decorative cachepot as a grow pot (what the plant should actually be in) and plant directly into the cachepot.

A common misconception is that you can use a pot without drainage holes if you put a layer of gravel at the bottom below the soil. The idea is that the water can drain out of the soil and sit below the plant roots in the gravel, eliminating the need for an actual drainage hole. However, this is actually not the case due to a phenomenon called the perching effect. The science behind it is explained in more detail in the link, but the general idea is that water doesn’t like to flow between layers of soil with different particle sizes (like potting soil to gravel) and therefore  the gravel in the pot actually raises the water table in the pot and doesn’t help with drainage at all.

Terracotta/Ceramic Pots

Terracotta pots and ceramic pots are both made out of clay that has been shaped into a pot and then hardened in a kiln. The difference is that ceramic pots are usually painted/glazed while a plain terracotta pot is just the raw clay.

How to Choose the Best Pot for Your Plant – Art Terrarium

Image

The only difference this brings in regard to their use is that terracotta itself is porous, which means a plain terracotta pot will dry out faster than a glazed ceramic pot (even with the same drainage holes). This can be advantageous if you have a tendency to be a little heavy handed with the watering can, or are growing plants that like to dry out fast (like cacti and succulents). At the same time however, it can also be annoying if you live in an already dry climate and the extra evaporation makes you need to water more often.

Pros of Terracotta/Ceramic Pots:

        • Often visually appealing and come in a wide range of colors, shapes and sizes
        • Extra evaporation from terracotta (can be pro or con)
        • With proper care can last a very long time
        • Widely available

Cons of Terracotta/Ceramic Pots:

        • Heavier than plastic
          • This isn’t a big deal for a small plant on the windowsill, but for a large pot (think 20+ inches across) it can make it hard to move
        • Can break/shatter
        • Hard to drill drainage holes
        • Usually more expensive
        • Harder to take plants out to repot
Plastic Pots

Plastic pots can also come in a wide range of shapes and sizes, but the most common are either decorative plastic pots (top) or the standard black/green nursery pots (bottom)

5 Packs 6 inch Plastic Planters with Saucers Modern Decorative Garden plant  pots | eBay50 Pack Nursery Pots, 4 5 6 Inch Black Plants Flower Pots Durable Plastic  Planters Indoor Modern Decorative Seed Container Pots for House Plants,  Succulent, Flower (5 Inch, Black) | Walmart Canada

Images (Top) (Bottom)

Pros of Plastic Pots:

        • Lightweight
        • Cheap
        • Flexible/Doesn’t shatter
        • Huge range of colors/shapes
        • Easy to take plant out to repot

Cons of Plastic Pots:

        • Will eventually become brittle over time
        • Some people don’t like the look
        • Some are extremely flimsy
Pot Sizes/Up-Potting

As plants grow aboveground, their roots grow below ground as well. At some point, your plants will need to be moved to bigger pots because a plant left in a pot too small will eventually become rootbound like this:

Root Bound Symptoms - Help For Root Bound Plants | Spider plants, Planting  flowers, Container plants

Image

This will lead to problems in the long run, including issues with drainage and soil compaction. To avoid this, plants must occasionally be moved into bigger pots.

When to Up-Pot?

Signs that a plant is in need of a repotting include numerous roots coming out of the drainage holes and large amounts of roots visible on the surface. Slow water infiltration can also be a sign but isn’t always caused by this. To check, remove the plant from the pot (either by squeezing and pulling on a plastic pot, or by running a butterknife or some other object around the inside edge of a ceramic pot) and look to see if the roots are visible/circling the pot. If the roots have begun to circle, it is likely a good time to repot that plant. Simply remove the plant from its old pot and place it in a new pot that is about 2-4″ larger across than the previous pot*. Then backfill with soil, making sure to bury the plant no deeper than it was in the old pot. If the roots are super tightly wrapped in the old pot, you can loosen them a bit with your fingers or make a couple small cuts in them with a knife to encourage new growth once they’re in the new pot.

*You may be tempted to just put a plant directly in a much larger pot to prevent the need to repot again in the near future, however this is a bad idea. A plant in a pot that is too big will not be able to absorb all the water contained in the excess soil after a watering, and thus will be prone to root rot. Only increase pot size by about 2″ or a little more each time.

That’s all for this post. The next post will talk about plants that can thrive in places with less than optimal lighting (Like a dorm room…).

The Indoor Garden Guide: Part 1- Potting Media

Welcome back to the spring edition of this blog series. In the fall we covered outdoor gardening, mostly focusing on edible crops. This semester will still be plant related, but with a more specific focus on indoor plants (aka houseplants).

Best indoor plants 2021: Our favourite house plants and indoor foliage for your home | Expert Reviews

Image 1

Just like in the outdoor garden, the first steps to successful houseplants come with the soil you use. However, the soil used for potting houseplants is not the same as the soil you’d find outside (And its usually referred to as “potting media” rather that “soil”). Even a houseplant grown in the very best outdoor soil would struggle to survive. This is because outdoors the wind, sun, and exposure to the elements makes soil dry out faster than it would indoors. Since plants don’t usually like to sit in soil that stays soaking wet, we need to make up for the lack of these environmental factors by adding materials to the potting media in order to allow it to drain water better and dry out faster.

Materials:

How to Make Your Own Potting Soil | Planet Natural

Image 2

We break potting media materials into two categories:

Base media: Materials used to create the base of the potting media. They usually contain mostly organic material, and have a high water holding capacity. Two of the most common are peat moss and coco coir, and commercial potting mixes often have a combination of the two. They are functionally very similar, so it doesn’t particularly matter which one you use.

Drainage/Porosity: Sometimes also called mineral components, these are used to improve drainage by creating gaps through which water can move and also allows air to move through the potting mix

      • Perlite: Perlite is a naturally occurring siliceous rock that, when heated, expands from four to 20 times its original volume. These are the little white pieces you find in potting mix which resemble Styrofoam. It is extremely light and porous, and when pressed will crush down into a powder. It is the most common additive for improving drainage because it is extremely cheap and works quite well. The one downside is that it can float up to the top of the pot overtime because it floats in water.
      • Pumice: Another naturally occurring rock with tons of tiny holes that is also very lightweight and porous (Although not quite as light as perlite), it is used straight as it is mined, not heated like perlite. This is a better alternative for perlite in most cases, because it has all the benefits and will not float to the top of a potting mix even when watered frequently. However, it is more expensive than perlite and usually a little harder to find.
      • Orchid bark: This name is misleading, as the bark sold as “orchid bark” is intended to be used for orchids, but it is not from orchids. It is usually pieces of fir bark/coconut husk pieces. It makes a good additive for many tropical plants which come from soils that may have a large amount of decomposing plant material mixed in. It is not quite as porous as the above two, and holds a little water.
      • Vermiculite: another naturally occurring mineral which is expanded through heating. It appears similar to perlite, and acts much the same way except unlike perlite it absorbs water so it cannot be used as the primary drainage material for most mixes because the mix would stay too wet.

Can’t I just use a commercial bagged potting soil?

Miracle-Gro Premium Potting Mix - Shop Patio & Outdoor at H-E-B

Image 3

The answer to this is a little tricky. For some plants, a commercial mix may be good enough, but not ideal. For others, using a cheap commercial mix will almost certainly result in the eventual death of the plant. Most commercial mixes contain some perlite or other drainage material, but usually they don’t have enough of it. For this reason, it is always a good idea to use a commercial mix more like a base and add drainage material as needed.

*The exception to this would be high end specialty mixes or those made by local nurseries/greenhouses because these mixes may already be mixed correctly. But if you’re working with a bag of miracle grow (or similar) from a big box store, the above advice is important.

Recipes for soil success

The right ratios of base material and drainage for your plants will depend on the species of plants being grown, and it is always a good idea to look up a specific plant before making a soil mix for it, but here are some general guidelines:

Catci/Succulents:

        • 20-40% organic material/base mix
        • 60-80% coarse mineral/drainage (No orchid bark)

Aroids (Like monstera, philodendron, pothos, etc.):

        • 40-60% organic material/base mix
        • 20-40% perlite
        • 20-40% orchid bark

Ferns:

        • 50-70% organic material/base mix
        • 30-50% coarse mineral/drainage

Most Others:

        • ~50% organic material/base mix
        • ~50% coarse mineral/drainage

That’s about it for potting mixes, or at least to depth that we’ll be covering in this blog. As always, these are general guidelines and I suggest doing a little bit of your own research before making a specific potting mix.

The Garden Guide: Part 8- Season Wrap Up

The leaves are falling, days are getting shorter, and frost is starting to appear overnight. Unfortunately for most of your garden, these changes mark the end of the growing season. This final blog post in the Garden Guide Series is going to focus on a collection of smaller end of season chores and practices that will set you up for a successful season the following year.

Planting

Yes, I just said this was going to be about the end of the season, and yes you read that right; we’re talking about planting.

As you wrap up this season its time to plant a couple different crops. Crops grown from bulbs such as garlic, elephant garlic (technically a type of leek) as well as many flowers (daffodils, tulips, crocus, etc.) are grown from bulbs planted in the fall, a few weeks before the ground freezes.

Grow Your Own Garlic – Ritchie Feed & Seed Inc.

Source 1

Garlic and other bulbs are best planted in furrows, usually 2″ deep. It is important to ensure the bulbs are planted in the correct orientation (for garlic this is the pointed side up).  Most bulbs are planted ~6 weeks before the ground freezes, meaning you should plant ~2 weeks before the first frost date. Starting with certified seed garlic is always a good idea, much of the garlic in the grocery store is treated with chemicals to inhibit sprouting, making it less than optimal for planting.

Crop residues

Once disease, pests or frost kills your crops by the end of the season, you’ll need to dispose of the plant material. If your plants died of natural causes (like frost) and had no signs of pest or disease issues, they can be composted (this could be a whole post on its own, so I’m just going to leave a link for further reading). Fallen leaves and rotting Jack-O-Lanterns also make a great addition to compost this time of year.

How To Create A Great Fall Compost Pile - Make Compost For Next Year!

Source 2

If your crops were affected by pests or disease, it is a good idea to dispose of them in a way other than composting. At the home garden scale, most compost piles will not get hot enough to destroy these pathogens, and composting plants affected by them can just amplify your problems the following year. For these plants you have a couple options: If it’s allowed in your municipality, you can burn the plants and compost the remaining ashes because the heat destroys any eggs or spores. If burning is outlawed where you live, there is likely a composting service available or you can simply put the plant material out in the paper yard waste bags used for leaves.

Mulching

One of the worst things you can do to garden soil at any point is leave it barren. This is easy to avoid during the summer because you have plants growing, but come winter, once the crop residue has been removed, many people make the mistake of leaving the bare soil exposed to the elements. This can lead to erosion, compaction, nutrient leaching and other issues. The easiest way to fix this is by putting a protective layer on top of the soil. Where would you get this layer you might ask? Its not like it grows on trees…

Garden Mulch How To | Garden Design

Source 3

Actually, it does! One of the easiest, cheapest, and best suited mulches for garden beds over the winter are the very leaves you rake up from all around your yard. The benefits of adding a layer 4-6″ deep of leaf mulch to fallow beds cannot be overstated: It adds organic matter, adds nutrients, improves soil structure and water holding capacity; all in addition to preventing the other bad stuff I just talked about.

Well folks, that’s about all I’ve got for you in this series. Good luck and grow on!

The Garden Guide: Part 7- Saving Seeds

Saving Seeds

The Ultimate Seed Saving Guide: 17 Tips - GroCycle

Image 1

Over the course of the season, you’ll have the opportunity to observe all of the different varieties you selected using the guidance of my post on seed selection. When you plant multiple varieties of the same type of plant, you’ll notice which ones produce well, resist disease, and taste the best. If any of your varieties stand out for any reason, you may be wondering if its possible to save seeds from these plants to grow again next year. The answer is “it depends…”

“Depends on what?” you may ask. Well, remember that there are two types of seeds you could’ve chosen from back in the spring when you were buying them: hybrid (F1) and open pollinated.  In that guide on seed selection I mentioned that you could only effectively save seeds from open pollinated varieties. If any of the varieties you want to save seeds from are open pollinated, keep reading, if you only planted hybrids: you’re out of luck. (Don’t remember what you planted? Check the back of the seed packet.)

Annual vs Biannual

Within normal crop species, there are two variations of concern when it comes to seed saving:

Annual: Plants which complete their whole life cycle (seed to seed) in a single year. These are easiest to save seeds from because you don’t need to keep them alive through the winter. Some common annual crops are:

      • Beans
      • Tomatoes
      • Peppers
      • Lettuce
      • Spinach
      • Broccoli
      • Radishes
      • Eggplant
      • Okra
      • Squash
      • Cucumbers
      • Peas
      • Watermelon

Biannual: Plants which complete their life cycle in two years, requiring a winter before seed production can begin. Because of this, these plants are more complicated to save seeds from and most people don’t bother and therefore we won’t be covering them in this post. Some common biannual crops are:

      • Cabbage
      • Carrots
      • Parsnips
      • Brussel Sprouts
      • Kale
      • Swiss Chard
      • Beets
      • Collards
      • Onions

When in doubt, a quick google search or look to the back of the seed packet will let you know what a particular plant is.

Steps to Save Seeds

Regardless of the plant species, the general process of collecting and saving the seeds is pretty much the same: extract, process, store.

Extract:

      • When to harvest
        • Some plants have seeds which mature around when the crop is usually harvested. In this case simply pull/cut out the seeds before you eat the rest:
          • Dry beans/peas
          • Peppers
          • Tomatoes
          • Watermelon
          • Sunflowers
          • Winter Squash
        • Other plants seeds don’t mature at the same time as the crop is normally harvested. Each of these will require its own process to acquire mature seeds, so each crop will be linked to a page specifically for that crop

Process:

    • For most plants:
      • Rinse debris off the seeds in a strainer
      • Lay them out in a single layer in a warm dry place out of direct sunlight for about 2 weeks
    • Tomato seeds are covered with a gel-like substance which contains enzymes that prevent germination (To prevent them from sprouting inside the fruit). Because of this they require addition steps:
      • Remove seeds and gel from the fruit and place in jar
      • Add enough water to the jar to suspend the gel/seed mixture
      • The Power of Fermenting and Saving Tomato Seeds – Garden Betty
      • Image 2
      • Allow the mixture to sit for 3-5 days
        • This ferments the seeds and breaks down the gel coating
      • Rinse seeds and proceed as normal
      • *This isn’t entirely necessary, but will improve germination rates of the saved seeds.

Store:

The Importance of Seed Saving | giantveggiegardener

Image 3

    • Once seeds have been fully dried, they should be hard and brittle, not soft or flexible (Still soft? Dry for another week)
    • Seeds should then be transferred into storage bags. These can be paper envelopes or little plastic Ziplock’s.
    • Label seeds with type, variety, date collected, and any other notes you would like to make. (good flavor, high yields, large fruit, etc.)
    • Once inside bags, seeds can be stored at room temperature for a few years (exact time depends on particular conditions and seed type)
    • For long term storage, seeds can be frozen in dry and airtight containers.
      • Frozen seeds last nearly indefinitely if you keep them frozen and dry.
        • An international seed bank exists in Norway that uses the cold temperatures to preserve seed varieties from around the world

That’s it! Saving seeds is really that simple. The next and final blog post in this series will be discussing wrapping up the season in preparation for winter.

The Garden Guide: Part 6- Preserve the Harvest

So you’ve picked your varieties, sown the seeds, defended your plants from pests and disease and now all your efforts are finally starting to pay off; your crops are producing a bountiful harvest, but now you’re faced with a new problem: What to do with all of that produce? In this blog post we will be discussing the various ways you can preserve your hard earned harvest.

Drying/Dehydrating

One of the simplest ways to preserve a variety of fruits, vegetables, and herbs is by drying them out. This can be achieved with a couple methods:

    • Food Dehydrator:
    • Elite Gourmet 5 Tier Food Dehydrator [EFD319] – Shop Elite Gourmet - Small Kitchen Appliances
    • Image 1
    • Custom made for drying things out, dehydrators are probably the fastest and easiest way to dry out most things. They consist of a heating element and an fan that blows warm dry air up through layers of produce. The two concerns with these are that they take up a lot of space in your cabinet and they cost a bit more than some of the other options, but if you’re planning on dehydrating things frequently, then they’re definitely worth it.
    • Note: Don’t actually pack the dehydrator like shown above as overlapping slices will not dry fully. Make sure to leave a little space between each piece.
  • Conventional Oven
    • With a little ingenuity, one can turn their traditional oven into a makeshift dehydrator by propping the door open about 1.5″ and setting the temperature at about 140-160F. This tends to be a little slower than a real dehydrator, but certainly works in a pinch.
  • Air Drying
    • If you live in a relatively warm and dry climate you can successfully dry many herbs and some other produce (like thin-walled hot peppers) simply by hanging them from a string out of direct sunlight in a warm and well ventilated space. Be careful what you hang however, because certain crops like apples or tomatoes are simply too wet to hang dry and will rot away if you try this strategy.
  • Smoker
    • Fresh peppers smoked counterparts : r/spicy
    • Image 2
    • Another unique way to dry produce is using a smoker. Many traditional ingredients in Latin American cooking are made from peppers that have been smoked and dried (Chipotle peppers are smoked jalapenos). Just run the smoker at a low temperature until the moisture is totally gone from whatever you’re drying.

Canning:

    • The Brief History of Canning Food
    • Image 3
    • Another great method for preserving basically any fruit or vegetable is through canning. This works for everything from beans to jams and jellies to even pickles and hot sauce. Although it may seem like a complicated procedure, the basic process goes something like this: Pack whatever you’re canning into sterile glass canning jars, cover with lids, then submerge those jars into boiling water or a sealed pressure canner for a set amount of time, then remove and store on the shelf indefinitely.
    • Because the full process is actually a little more complicated than that, (and because I don’t want to be responsible for you getting botulism and dying if you mess up) I am going to direct you to two more comprehensive guides below:
      • Water bath canning (High acid foods like pickles, tomato sauce, hot sauce, jams and jellies)
      • Pressure canning (Low Acid foods like corn, beans and pumpkin, as well as meat and eggs)

Freezing:

Freezing is another easy method to quickly save produce. There is not much to it besides sealing the produce in an airtight bag and letting it freeze. Everything from the garden can be frozen, but it is important to remember that frozen then thawed produce tends to be rather mushy and should only be used in cooked dishes. Because of this, freezing things that are only really eaten fresh, like salad greens, is not recommended.

Foods that store on their own:

Some foods have remarkably good shelf life without any extra preservation:

    • Winter Squash
      • Garden planning (how long squash can be stored)
      • Image 4
      • Simply leaving most winter squash in a warm dry area for ~2 weeks can prepare them to sit in storage at room temperature for 6 months or more (depending on variety)
    • Garlic
      • Garlic that has been dried after harvesting can be stored in bags or baskets in a well ventilated space for at least 6 months
    • Potatoes
      • Harvested potatoes will keep for several months in bins in a cool moist environment like a basement, provided they are kept dark.

One final consideration is that most food banks will accept donations of fresh produce, so if you find yourself totally overwhelmed with more vegetables than you can handle, they will be more than happy to take them and give them to families in need. That’s all for this post, make sure to check out the linked resources for more information on each method.

The Garden Guide: Part 5- Disease

In the last post in this series I discussed some common insect pests that could affect your garden. You might have come away from that post thinking “wow there’s a lot of things to worry about when trying to grow a garden”. Unfortunately, I have some bad news for you: Insects are often only half the issues you’ll face, and some of the most devasting problems will arise from pathogens you can’t even see. Just like people, plants can get sick too, so today we’ll be going over some of the common plant diseases and ways to prevent them.

Categories of Plant Disease

There are three main types of pathogens that can cause disease in plants: bacteria, funguses and viruses. Because of this, we we’ll be discussing each group separately below

Bacterial Diseases:

  • Bacterial Soft Rot
    • Cabbage Soft Rot Guide
    • Image 1
    • One of my personal least favorite diseases, bacterial soft rot is found mainly in brassicas (cabbage, kale, broccoli, etc.) but can also sometimes affect lettuce and other crops. Soil borne bacteria make their way into openings in the plant stem, usually the cuts left when harvesting.
      • Controlling this disease is very difficult once it gets established, so removing and burning the crop as soon as it is noticed is often the best option. Under no circumstances should a home gardener compost a plant with this disease, because the bacteria will persist in the compost.
      • Not growing cabbage crops in the same location each year will also help to control this disease. This is known as crop rotation and is generally good practice for a number of reasons. If you often deal with this disease, certain varieties are more resistant to it, and growing them in early spring and late fall can also improve your odds since the bacteria is most active in warm weather.
  • Bacterial Leaf Spot
    • Tattered appearance on the affected pepper plant leaves due to bacterial leaf spot.
    • Image 2
      • A common threat to solanaceous (pepper/tomato family) crops in the eastern US is bacterial leaf spot
      • This bacteria survives on plant debris and seed material and thrives in warm and wet conditions. Left untreated it can be very detrimental to the crop, defoliating plants and deforming fruit.
      • Best prevention practices include buying certified disease-free seeds, watering in the early morning so the leaves don’t stay wet, and never saving seeds from infected plants
      • Infected material can be composted as long as the compost is left to age until the plant material is entirely broken down, because the bacteria will be broken down by soil microorganisms once its host material is gone.
      • Copper sprays can be effective treatment methods if the disease is caught in early stages

Fungal Diseases:

  • Powdery Mildew
    • Powdery Mildew: How to Identify, Treat, and Prevent Powdery Mildew | The Old Farmer's Almanac
  • Image 3
    • Perhaps the most common disease for plants in the squash family (cucumbers, pumpkins, zucchini, etc.) is powdery mildew
    • This fungal disease appears as white spots of powder on the leaves of the plants. Left untreated it will slow down the plants growth and production and eventually kill them
    • Trimming diseased leaves, not touching diseased plants before healthy plants, and crop rotation are all good methods to prevent this disease
    • Copper sprays are also useful for controlling the disease once it (inevitably) arrives
  • Late Blight
  • Late blight detected locally in New York and Pa. | Morning Ag Clips
  • Image 4
  • The fungal disease known as late blight is actual the same disease which caused the infamous Irish Potato Famine. Much like the other diseases, it can be carried in plant material, but is particularly difficult to control because it can also be soil borne or even airborne. It is mostly known for its effect on potatoes and tomatoes
  • Late blight causes lesions on the stem and leaves of plants, as well as rotting the fruit or tubers.

Viral Diseases:

  • Tobacco Mosaic Virus
  • Foliar symptoms of TMV in tomato. Photo: R. L. WickTMV infected tomato fruit. Photo: R. L. Wick
  • Image 5/6
    • Tobacco Mosaic Virus or TMV is one of the most common and persistent viral diseases. It’s spread through sap transmission between plants (usually contaminated tools) and is known for its effects on tomato, eggplant, pepper and potato crops.
    • It causes light green mottling patterns on foliage (mosaic) and lesions and rot on the fruit
    • The best method of control for this disease is prevention through crop rotation, frequently disinfecting harvesting equipment and immediately destroying infected plants
    • Once a plant is infected with this disease, it cannot be saved as there are no sprays or treatments that can stop TMV.

As always, consulting local extension offices is the best path for identifying the disease you’re dealing with, but as a general rule of thumb, destroying diseased material at the end of the season, practicing crop rotation, and maintaining clean equipment are all good ways to prevent most crop diseases in general.