
Opuntia ficus-indica with green cladodes and red fruit (Burgess).
Introduction
Opuntia ficus-indica, which is part of a genus of cacti known as prickly pears, is commercially the most important kind of fruit-producing cactus in the world (Estrada-Luna et al. 2008). This species of Opuntia is native to Mexico, but is so widely spread throughout the world by man that many have believed prickly pears to be Mediterranean in origin (Griffith 2004).
Prickly pears are most well known in the United States as a source of its sweet, red fruit, but its cladodes can also be cooked to be eaten as a vegetable after the spines are removed, or used as forage for livestock (Mohamed-Yasseen et al. 1995). This particular species of Opuntia provides an important food source for the working poor in areas like Cyprus, while also doubling as large, impassable flowering hedges (Hall 1878). These hedges can be important in maintaining the quality of vulnerable soils by acting as a wind-break, as a soil-stabilizer, or by helping to re-vegetate the land while also controlling wind and water erosion. These plants also make good ornamentals, owing to their unusual growth habits (Estrada-Luna et al. 2008).
Propagation
Possible methods
There are several ways to propagate prickly pears. It is possible to propagate cacti using seed, but this process is usually used only for scientific research because of slow germination, a long and slow period of juvenile growth, and genetic variability (Hartmann et al. 2011, Mohamed-Yasseen et al. 1995).

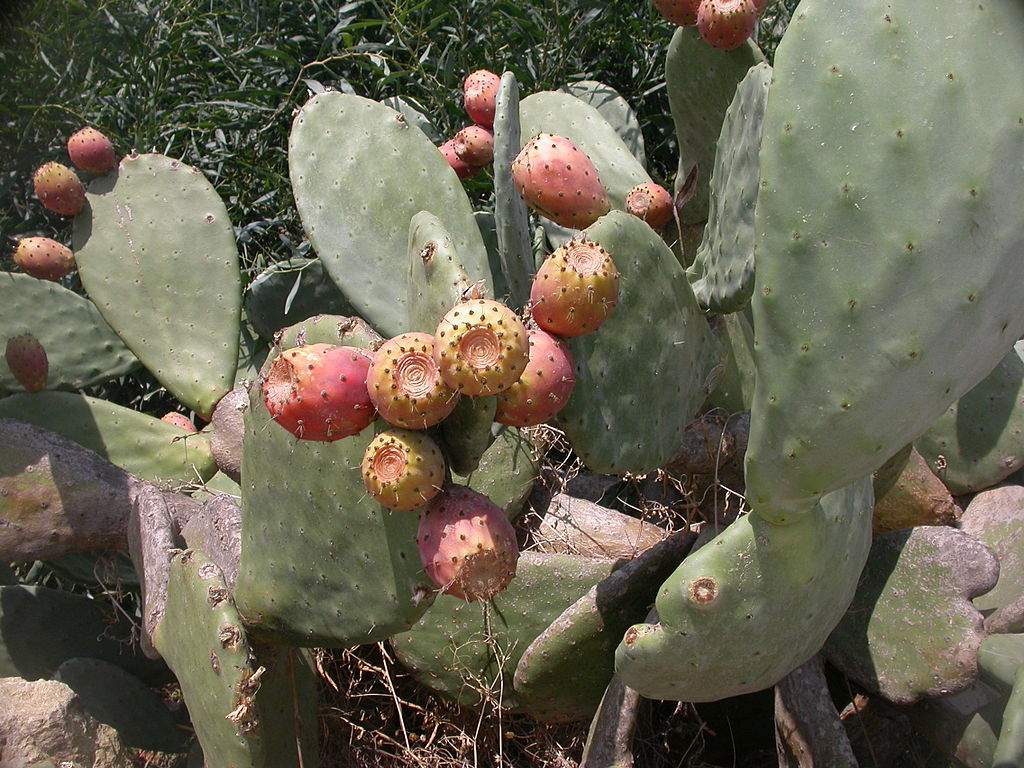
The fleshy green “pads” are the cladodes while the “bumps” are the aeroles from which emerges new plant tissue (Estrada-Luna et al. 2008, image by Hille, edited by the author)
Another more widely used propagation technique is using whole cladodes, cladode segments, or fruit for cutting propagation. This method of propagation is easier
and faster than seed propagation, but the shoot-to-cutting rate is low and large amounts of space are required (Estrada-Luna et al. 2008).
Grafting is another method used to propagate prickly pears. Grafting is used to provide rootstocks that are resistant to decay, or to create unusual growth habits (Hartmann et al. 2011). However, grafting is much more labor intensive and expensive than using seed or rooting cuttings and does not increase the propagation rate.
Micropropagation offers an alternative to the above propagation techniques. Micropropagation, although still labor-intensive, results in high levels of disease-free shoot production in a small amount of space (Hartmann et al. 2011 and Estrada-Luna et al. 2008). Microshoots produced in vitro have 100% rooting success and 100% survival after being transplanted (Estrada-Luna et al. 2008). Further research is still underway to optimize commercial micropropagation of Opuntia ficus-indica, but it remains a reliable method of prickly pear propagation.
Tissue Culture
Preparation
Before starting the actual propagation process, ensure that all materials that come in contact with the plant are sterilized. The tools to be used should be placed into a sterilizing tool, such as an autoclave or a household pressure cooker for 20 minutes at 249.8º F and 98 kPa. A sterile transfer area should also be prepared beforehand. This can be anything from a simple plastic box that is carefully disinfected before use to a laminar flow hood (Hartmann et al. 2011). Refer to this video for more information on how to prepare tissue culture media and this video for more information on sterile transfer techniques. In the micropropagation of prickly pears, 25 mL of Murashige and Skoog (MS) medium is used with varying levels of ingredients. The following remainder of this page is sourced from Mohamed-Yasseen et al. 1995 unless otherwise noted.
|
Developmental Stage |
Sucrose level (g/l) |
Agar level (g/l) |
Auxin level (μM) |
Cytokinin level (μM) |
pH |
|
Shoot development |
30 g/l |
8 g/l |
0.5 μM Auxin |
8.8 μM BA |
5.7 |
|
In-vitro rooting |
30 g/l |
8 g/l |
4.9 μM IBA |
0 μM |
5.7 |
Table 1: Opuntia ficus-indica media content levels.
Preparing the explants
Select young, healthy cladodes from branched mature plant. Gently remove the spines from the young cladodes to help with the disinfesting process (Estrada-Luna et al. 2008). Then, wash the cladodes thoroughly in water with 2% detergent, such as Alconox. Then submerge the cleaned cladodes into a 0.3% volume/volume bleach solution for 10 minutes to disinfest the explant. Remove the cladodes from the bleach solution inside of the prepared sterile transfer area and rinse them three times in sterile distilled water. Place it on a sterile work surface, such as a Petri dish. Using a scalpel, cut the cladodes into individual explants that contain one areole each and are about 10 mm3 in size.
Initial shoot development
Place the newly created explants into your container of choice. An example of a good container would be a sterilized 5.5 by 7.0 cm Gerber baby food jar, but other containers of a similar size work well, too. Seal the baby bottles with either their original lids or a material such as parafilm. This will prevent contamination inside of the jars.

Plants (not cacti) growing under controlled, aseptic conditions. Image by Daderot.
Set up a location where the temperature and the light conditions can be controlled. Place a cool white fluorescent light source over the jars and maintain the temperature at about 82.4º F. Keep the lights on for 18 hours each day and shut them off for the remainder of the day. The explants should be cultured in their initial containers under these conditions for 4 weeks.
Secondary shoot development
At this point you should see a clump of microshoots growing from the original explant. Remove the clump from the original container and place it on a sterile work surface within the transfer area. Cut the microshoots from each other and divide them lengthwise down the center. Place each secondary explant horizontally into a new container with the same shoot development media as before and grow them under the same conditions for 4 weeks.
Rooting
After 4 weeks you should see more microshoots form from each of the secondary explants. Separate the microshoots from each clump like before, but do not cut them longitudinally. Prepare new containers with the rooting media and stick the microshoots vertically into the media. Grow the plants for 4 weeks under the same conditions and roots should start to form.
Acclimatization
At this point, the individual rooted plants are ready to be transplanted to potting media. Place the rooted cuttings into the pot of desired size. Prickly pears require a well drained media such as sterilized volcanic rock fragments 2-4 mm in diameter. Cover the pots with a plastic bag for 15 days to provide an environment appropriate for acclimating, and puncture the bag on the 10th day to provide gas exchange (Estrada-Luna et al. 2008).
Conclusion

Peeled prickly pear fruit (image by Saintfevrier)
Depending on how many cultures were performed, there are probably enough cacti plants to sustain a long-term production operation. Provided that the plants do not get infected with any diseases or pathogens that can be transmitted vegetatively, it is possible to indefinitely produce explants from actively producing prickly pear plants.
References
Burgess, M. “Prickly pears on Opuntia ficus-indica Naxos, Greece 20th September 2009”. Photograph. Wikimedia Commons. Wikimedia Commons, 2 Oct 2009. Web. 21 March 2014. Distributed under the GNU Free Documentation License, Version 1.2 or any later version published by the Free Software Foundation.
Daderot. “Plant Tissue Culture Lab detail, Atlanta Botanical Garden, Atlanta, Georgia, USA.” Photograph. Wikimedia Commons. Wikimedia Commons, 13 Nov. 2007. Web. 21 March 2014. Distributed under any of all CC-BY-SA licenses.
Estrada-Luna, A.A, Martínez-Hernández, J., Torres-Torres, M.E., and Chablé-Moreno, F. 2008. In vitro micropropagation of the ornamental prickly pear cactus Opuntia lanigera
Salm–Dyck and effects of sprayed GA3 after transplantation to ex vitro conditions.
Scientia Horticulturae, 117, 378-385. doi: 10.1016/j.scienta.2008.05.042
Griffith, P.M. 2004. The origins of an important cactus crop, Opuntia ficus-indica (Cactaceae): new molecular evidence. American Journal of Botany 91(11), 1915-1921. doi: 10.3732/ajb.91.11.1915
Hall, I. H. 1878. Opuntia Ficus-Indica. Bulletin of the Torrey Botanical Club 6(38), 201-202. Retrieved from http://www.jstor.org/stable/2476832 .
Hartmann, T.H., Kester, D.E., Davies, F.T., and Geneve, R.L. 2011. Plant Propagation. Upper Saddle River, NJ: Prentice Hill.
Hille, R. “Opuntia ficus-indica”. Photograph. Wikimedia Commons. Wikimedia Commons, 6 Oct 2013. Web. 21 Mar. 2014. Used under the CC BY-SA 3.0 license.
Mohamed-Yasseen, Y., Barringer, S.A., Splittoesser, W.E., and Schnell, R.J. 1995. Rapid propagation of tuna (Opuntia ficus-indica) and plant establishment in soil. Plant Cell, Tissue and Organ Culture 42, 117-119. Retrieved from http://hortsci.ashspublications.org/content/28/5/509.1.full.pdf+html
Saintfevrier. “Opuntia ficus-indica peeled”. Photograph. Wikimedia Commons. Wikimedia Commons, 13 Nov. 2012. Web. 21 Mar. 2014. Used under the CC BY-SA 3.0 license.
Author of this propagation page: Christina Terradista (cct5090@psu.edu)