Parmesan Knots

knots


Have you ever had a recipe that you try once and then become obsessed with and make every day for two weeks straight? Ok well most of you have actually probably not done that but that happens to me all the time. I will find a really great easy recipe that my family loves and then continually make that till I either replace it with something else or my family gets tired of eating it. The great thing about the recipe below is that it was not only really easy but my family loves bread so they could consume a ton of these rolls all the time. These are so simple because they are made with premade dough. Here is the recipe!

Parmesan Knots
1/2 cup vegetable oil

1/4 cup grated Parmesan cheese

1 1/2 teaspoons dried parsley flakes

1 1/2 teaspoon dried oregano 1 teaspoon garlic powder

dash of pepper

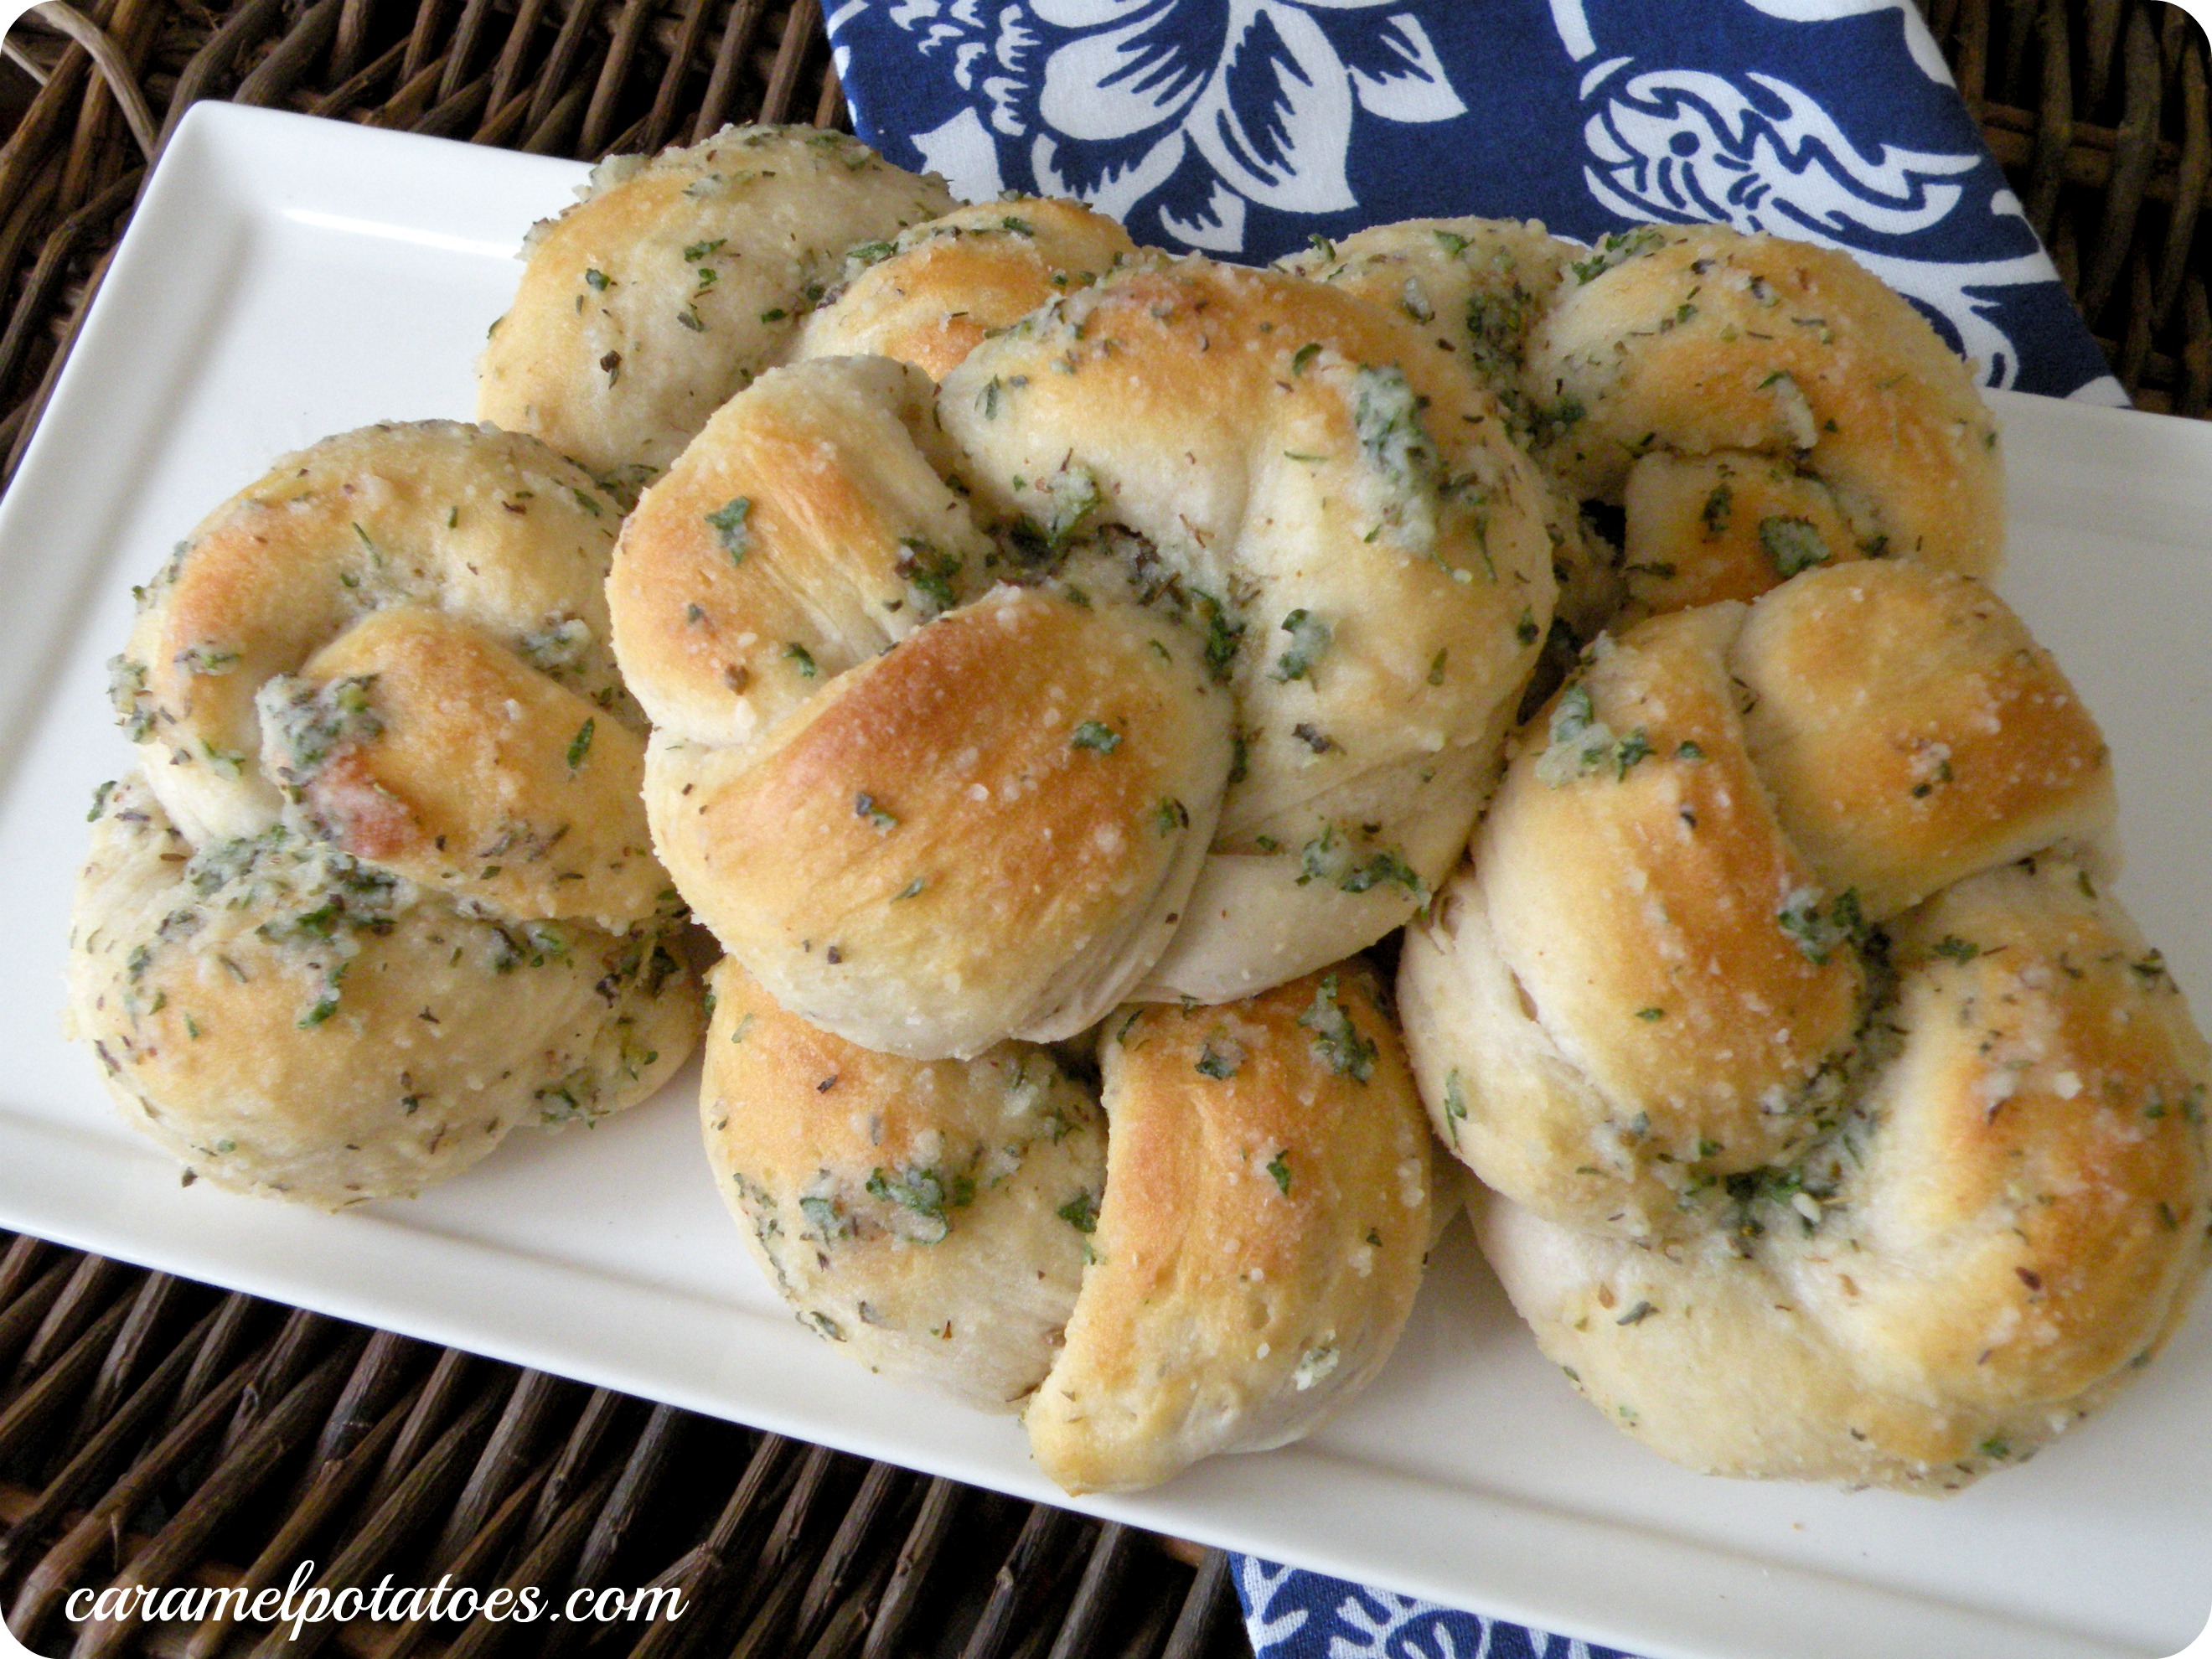
3 cans (12 oz.) refrigerated buttermilk biscuits

4107232253_2ee68e5edd

Mix together all the ingredients minus the biscuits. Cut each biscuit in half and roll them into about a 6″ rope, tie in a loose knot and place on cookie tray. Bake in oven for 6-8 minutes at 450 degrees. I found that covering them with parchment paper about half way through gives them a very nice golden brown color. Take out of the oven and brush them with Parmesan mixture.

Yields: 5 dozen

Nutritional value: These are about 100 calories each.
Taste: These were really really good and I usually have leftover rolls and mixture so I can make them again the next day. My family is always really happy about that.
Cost: They are also very low cost at about 6 dollars for the biscuits and when I make them at home my house has the rest of the ingredients.
Ease of Making: These were very easy and quick the only problem I have is getting them a nice golden color and I solve that by taking my mom’s advice and using parchment paper. Thanks Mom:)

These roll are great because they can be a before dinner snack or you can serve them with pretty much any dish. You could do a pasta dish or a meat dish and both would be delightful. Take a look at the link below for other recipes that turn making bread into a quick and painless process for busy college students or parents!


This is an easy cinnamon roll recipe with premade dough: http://allrecipes.com/recipe/cinnamon-rolls-from-frozen-bread-dough—easy/

This is an easy garlic bread recipe: http://allrecipes.com/recipe/great-garlic-bread


As Always… Enjoy!


Links to pictures:

http://www.caramelpotatoes.com/2012/04/27/simple-garlic-parmesan-knots/

http://www.caloriecount.com/calories-pillsbury-grands-biscuits-i240040

Belgium Waffles

strawberry-waffles


The way that I think I really discovered that I loved cooking and working in a kitchen was from having two brothers who loved to eat. I started by making breakfast on Sunday mornings because this was the only time we could all be together. It was usually before or after church. Then I discovered my family’s waffle iron or maybe someone got it as a present, I can’t remember which, but that was a game changer. I started making Belgium waffles and getting super into it! Here is the recipe I like to use.

Belgium Waffles

6 tablespoons butter

2 cups All-purpose flour

1 tablespoon sugar

1 tablespoon baking powder

1/4 teaspoon salt

3 large eggs

1 1/2 cups milk

Preheat waffle iron. Combine all ingredients in large bowl. Beat thoroughly. Batter will be lumpy. Pour batter into grid of waffle iron till it is 2/3 of the way full. Close lid and wait till steam has subsided. It will take close to 5 minutes depending on the waffle iron. After it is done cooking transfer onto plate for eating.

Yields 1 dozen

Nutritional value: These waffles have a lot of calories. They have 510 calories with 190 from fat.
Taste: These taste amazing. The only problem I have with them is that they don’t always turn out as fluffy as I want them to be. One way to make them fluffier is mix the dry ingredients into the wet ingredients till just incorporated. DO not over mix! Here is a link to more helpful tips on how to get the best waffles possible!

http://www.mrbreakfast.com/article.asp?articleid=29
Cost: We usually have all the ingredients already so it was very cheap. These use a lot of household ingredients. If you live in a dorm however it may become more expensive.
Ease of Making: They are fairly easy once you have gotten used to your waffle iron.

Peter-Pan-pumpkin-waffles-871x682

One thing that helps is putting the batter into a measuring cup and using that to pour it into the waffle iron.


Making breakfast for my brothers turned into making lunch for them and then dinner for my family and so on. Another thing that I love about waffles are the toppings that you can put on them! I have a great strawberry sauce that I make that can be made with any fruit that I have included below. In addition to strawberry sauce I usually like to include butter, syrup, whip cream, and powdered sugar. I know it is a lot. At the same time though it is amazing. As always… Enjoy!


Strawberry Sauce
1 bag frozen fruit (in this case strawberries)
1/2 cup water
1/4 cup sugar
Combine all ingredients in sauce pan and simmer for 10 minutes or until fruit is warm and soft.


Link to pictures:

http://www.sodahead.com/fun/belgium-waffles/question-4186451/

http://www.tablespoon.com/posts/how-to-make-waffles/04f71730-2837-41e2-b72a-beb76171eeca

Chicken Salad


chicken salad

Me breaking my no meat streak!


This is a fairly easy recipe for Chicken Salad. This recipe will forever remind me of the year I spent being a vegetarian. Whenever I was a freshman in high school I decided that I wanted to not eat meat anymore. I didn’t really eat meat that much anyways and so I decided to take on the challenge of completely cutting it out of my diet. However the one exception I made to this was when I made chicken salad for my cooking project in 4-H. One of the key components of being a good cook or baker in my opinion is tasting your work to see what you can improve on. Therefore whenever I made this chicken salad recipe for the first time three summers ago I had to try it! Here is the recipe!


Chicken Salad
3 Tbsp golden raisins
3 cups chopped chicken
2 celery stalks thinly chopped
1/2 cup diced onion
1 carrot shredded
1/2 tsp. curry powder
1/4 cup olive-oil mayonnaise

First chop and cook chicken. Soak raisins for ten minutes and drain. Put all ingredients in large bowl mix well and season with salt and pepper. Make sandwiches as you desire.
Serves: 5 people


I know that a lot of people are concerned with the nutrition facts on different recipes, especially food that is homemade because that is even harder to tell exactly how many calories are in the dish. I also added the cost and the taste rating on this recipe.

Nutritional value: This is a very healthy recipe for chicken salad with 440 calories.
Taste: It is very very good. Everyone in my family thoroughly enjoys it.
Cost: It cost about 15 dollars.
Ease of Making:  It is fairly simple to make. Cooking the chicken is a slight challenge.
Would I make it again: I would definitely make this again everyone in my family loves it.

Croissant_Chicken_Salad_Sandwich

Here is another way to eat chicken salad! On a delicious savory pastry!


I am not a huge fan of chicken or tuna salad, all the mayonnaise kind of grosses me out, but using olive oil mayonnaise is not only healthier but also offers a lighter taste. This is a link to 10 different chicken salad recipes and very unique and interesting ways to use them!


http://www.recipe4living.com/articles/10_ways_to_eat_chicken_salad.htm


Link to picture:

http://www.dvo.com/recipe_pages/ultimate/Croissant_Chicken_Salad_Sandwich.php

Chocolate Zucchini Cake


5961391971_8d2d43f680


When people ask me what I like to bake I never know the answer. As someone who loves to bake people expect the answer to be cupcakes or cake. However seeing as I am not really a big fan of eating either of those things that is never my answer. I also do not like to make cakes or cupcakes for another reason. They intimidate the hell out of me! Making a really good cupcake or cake is actually extremely challenging in my humble opinion. To get the cake to be moist and light is a struggle and what is worse the icing is even harder. Butter cream frosting is a complete nightmare to make!! Before I scare you away however, let me tell you the recipe below was nothing like other cakes I have made. It was virtually fool proof and extremely straightforward. Take a look!


Chocolate-Zucchini Cake

3 c flour
1 1/2 tsp baking powder
1 tsp baking soda
1 tsp salt
4 large eggs
3 c sugar
3 (1oz) unsweetened chocolate baking squares, melted
1 1/2 vegetable oil
3 cups grated zucchini
1 cup pecans chopped
powdered sugar

Combine first 4 ingredients.

Beat eggs and sugar until blended. Add chocolate and oil. Beat well. Gradually add flour mixture. Last fold in zucchini and pecans.

Pour batter into a well-greased and floured bunt pan. Bake on 350 for 1 hour and 15 minutes. Cool for 15 minutes.

Here is some additional information about the recipes for readers who are interested in calorie count and cost!

Nutritional value:  This is about 250 calories per serving.
Taste: I was really surprised, but this was one of my favorite recipes I have ever made. It is very good and not over powering.
Cost: This is about 11 dollars. We had the zucchini already from a friend whenever I made it last!
Ease of Making: It is easier than I thought but I burnt it a little the first time I made it. It doesn’t matter though because you flip it over.


chocolate zucchini cake

Me mixing the batter.


What I do love about this recipe too is that you would never guess it has Zucchini in it. I sometimes have a problem with zucchini sweets because even though people say you cannot taste the vegetable in your brownie…YOU CAN! I promise with this though you cannot. It is light and refreshing for a chocolate cake.

cleaning

The worst part was cleaning up afterwards!


Yet another great thing about this recipe is that you can get rid of all that zucchini that you have!! I know that gardeners tend to run into this problem a lot and end up giving zucchini away to everyone they know. This way you have a delicious and unique way to use your zucchini’s! I have also included a link below of some additional recipes that also give you creative ways to use your extra zucchinis! As always… Enjoy!

Link to additional recipes:

http://www.tasteofhome.com/recipes/ingredients/zucchini-recipes/top-10-zucchini-recipes#10


Link to Picture:

http://mannadonn.blogspot.com/2011/07/chocolate-zucchini-bundt-cake.html

Stir-Fry Beef with Orange Sauce

beef


Before you read this recipe I just want to let the readers know that this is the hardest recipe I have ever made. First I do not usually make recipes with meat in them. I do not ever really want to eat meat therefore I do not make it all that often. Second it was the first time I had created an entire meal for my family. The stakes were higher! I had to balance making this and also stir frying vegetables to go with it. I will include a link to a stir fry vegetable recipe but honestly that part is easy. Just pick the vegetables you want and cook them in a frying pan till the hardness you want. The hard part was timing all the different things I was making with each other so they were all still hot and delicious by the time I was going to serve them. I give credit to parents who do this on a daily basis! It is a high stress thing in my opinion. Take a look at the recipe!


Stir-Fry Beef with Orange Sauce

1 lb lean bottom round steak or 1 lb stir-fry beef
1 orange
2 tbsp vegetable oil
4 green onions chopped into 1 inch slices
1 garlic clove
2 tbsp apple cider vinegar
1 tbsp soy sauce
10 drops sesame oil
1 1/2 tsp orange zest
1 tbsp honey
2 tsp cornstarch dissolved into 1/4 cup water

Serves: 6 people

Cut steak into 1/4″ strips and fry with 1/4 cup of the orange juice. Cook for about two minutes till meat is browned in a tbsp of vegetable oil and remove from skillet. Add the rest of the oil and stir fry the onions for about a minute. Add garlic and stir for another minute. Add meat and orange juice to wok.  Then add the remaining ingredients. Cook about 2 minutes longer till sauce thickens.

Here are some facts about the recipe!

Nutritional value:  Around 350 calories.
Taste: It is really good except I tend over cooked the meat just a little.
Cost:  It usually lands around 45 dollars including the stir fry vegetables.
Ease of Making: It is harder for me because I over cook it and also have to stir-fry vegetables at the same time.

stir fry

As mentioned above the stir fry is fairly easy to make once you have done it a few times. I love stir fry but to make it fresh is a pain in the butt. It is better though. It is just time consuming because you have to cut all the vegetables ahead of time so if you are in a rush just run to Walmart and make the frozen kind! I can’t tell you what I put in my stir-fry because it changes every time but I’ll include the link of a good stir fry below! As always… Enjoy!

Here is the link to a stir fry recipe: http://www.mccormick.com/Recipes/Salads-Sides/Stir-Fry-Vegetables

Also for those of you who love Chinese food but do not want to make it yourself, here is a list of places you could go in state college to find some good food!

Uncle Chen’s Chinese

Big Bowl Noodle (I love this place and go at least once a month.)

Lychee

China Dragon

Hunan Wok

Candy Bar Fudge


exps1425_TH2029C39C


Whenever my boyfriend and I first started dating I really wanted him to like me so I thought the best way to his heart was through his stomach. I know women say that is a great way to win a man over but I was a little skeptical. Anyways on maybe our second or third date I decided I wanted to tackle a more difficult fudge. I had made fudge before. My mom has this delicious recipe that is really easy for peanut butter fudge but I had already mastered that so I thought why not. This recipe I think is pretty good and if you love snickers then I think you will love this! Plus my boyfriend has stuck around for three years so maybe the secret is in the fudge! Here is the recipe!

Candy Bar Fudge
1/2 c butter
1/3 c unsweetened cocoa powder
1/4 c packed brown sugar
1/4 c milk
3 1/2 c confectioners’ sugar
1 tsp. vanilla extract
30 individual wrapped Carmel’s, unwrapped
1 tbsp water
2 c peanuts
1/2 c semi-sweet chocolate chips
1/2 c milk chocolate chips
Directions
Grease 8×8″ square baking pan.
In microwaveable safe bowl combine butter, cocoa powder, brown sugar and milk. Melt in microwave till bubbly. Add powdered sugar and vanilla extract. Stir and pour into baking pan to let set. Melt Carmel’s in water and then add peanuts. Pour Carmel peanut mixture on top of sugar mixture in pan. Last melt chocolate chips and top fudge with it. Put in fridge to cool for two hours.

cuisinartcake2__21585_zoom

Have your pan ready!

My biggest suggestion with fudge is have a pan that you plan to put it in ready before you even do anything else. I know recipes usually say to grease your pan ahead of time but I rarely listen to that instruction (as most of my readers know I like to be a little unconventional) but with this seriously do it. Once you take the fudge off of its heat source it will start to set and once it sets, that is the shape it will stay in. It may taste good but it will look horrible and with food presentation is everything. The reason I say that is if you think about it you are never going to try a food that looks gross. You will try a food that looks delicious and even if it is gross it looks better than if no one touched you dish at all.

People tend to get nervous about fudge and think it is too difficult for beginners! Here is a really helpful link that gives you great tips on how to make fudge.. and don’t worry! It isn’t that hard!

Helpful link: http://www.ricardocuisine.com/articles/food-chemistry/400-for-successful-fudge-every-time

The other tip I have with fudge is don’t leave it in a hot car when you go on a hike in the summer time. As you can probably guess that is what we did and it ended up melting everywhere and was not salvageable. So keep it in the fridge! As always… Enjoy!!

Links:

http://www.tasteofhome.com/recipes/candy-bar-fudge

http://cookinstuff.com/products/9×13%252dInch-Non%252dStick-Baking-Pan-by-Cuisinart.html

Libby’s Hash Browns

 img_9556


The next recipe I am going to share with you is golden (literally). In all seriousness though this recipe is so easy to make but people love it. Like it will be the first thing gone, love it. It is easy to understand why once you see the ingredients. It is called Libby’s Hash Browns. They are very rich and buttery. I know all of you are wondering what the back story is to this recipe and of course, I have one! My mom works for the Catholic Diocese which is confusing because we are not Catholic. Regardless she does, and she became very close with the previous bishop of the diocese. Even after he retired they kept in touch. I knew him fairly well, but mostly loved going to his house because he had this adorable scotty dog that was so well behaved and trained. He passed away two years ago this spring, and my mom was very upset. This man had been her mentor and a dear friend. This recipe, Libby’s Hash Browns, was given to us by Bishop Bosco and so whenever I make it I think of him, his pipe tobacco smell and his awesome dog. I know he is smiling down on me every time I share it with others! So here is the recipe.


Libby’s Hash Browns

Ingredients:

1 lb. bag frozen hash brown potatoes (thawed)

2 cans cream of mushroom soup

1 8 oz. sour cream

1 small chopped onion

1 16 oz. shredded cheese

½ stick melted butter

Topping:

2 ½ c. crushed corn flakes

1 stick melted butter


Directions:

Put thawed potatoes in a large baking pan. Mix together the soup, sour cream, onion and shredded cheese. Then mix the cheese mixture and the hash brown mixture in the baking pan. Pour melted butter over all of it. Bake this for about 45 minutes at 350 degrees covered. Mix together the topping ingredients and pour over potatoes. Bake for 15 more minutes uncovered.

This is such an east recipe especially for college kids who may need to bring a dish to an event and don’t have any cooking supplies in their dorms. It is nice because you can buy and use all of the ingredients and not worry about them going to waste. This is also great for college students because you literally open stuff up and put it in a pan and it is cheesy and delicious.

I always take pride in dishes that are the first to go at a party or event that I make. I have gotten a lot of great recipes for potluck dishes from my Taste of Home: The New Potluck (pictured below) recipe book. Here is a link if you want to check it out on Amazon!

51yQbtLd6dL._SX258_BO1,204,203,200_

Link to Amazon: http://www.amazon.com/Taste-Home-The-New-Potluck/dp/0898214580

My biggest advice to you when making this is to thaw the potatoes ahead of time. It makes it easier to mix it with the cheese and stuff. It doesn’t matter if you don’t it will melt in the oven and you can stir it whenever you take it out to put the topping on it. Also if you are taking it somewhere make sure you get in line first if you want to taste it because it will be gone in a second. As always… Enjoy!

Link to picture:

http://www.amazon.com/Taste-Home-The-New-Potluck/dp/0898214580

http://www.campbellskitchen.com/recipes/jill’s-hash-brown-casserole-27095

Chicken Wontons

060


I have been posting a lot of sweet (as in filled with sugary goodness) recipes lately because that is what I enjoy making most but, even more than I enjoy baking, I enjoy making people happy with what I cook. The recipe I want to share with my readers this week is a recipe that my Aunt Marj, a person I have mentioned a ton in my blogs, gave me. However it doesn’t really remind me of her whenever I make it. Instead it reminds me of my brothers because they always demand that I make it for them every Christmas. The reason that we make them around Christmas is because for Christmas every member of my family gets to pick a dish that they want served at our Christmas dinner. I always demand stuffing and my mom always wants some sort of roasted vegetable. Without fail Isaac, my older brother, will request chicken wontons. Chicken wonton sounds Chinese in my opinion but I am fairly certain that this recipe is an American adaptation of a wonton. Here is the recipe!

Chicken Wontons

Ingredients:

1 ½ lb. boneless skinless chicken breasts

1 c. ranch dressing (or sour cream)

¼ tsp. salt

¼ tsp. pepper

2 c. Monterrey Jack Cheese, shredded

2 tsp. chili powder

1 tsp. paprika

1 package (24 count) wonton wrappers

1c. red or green bell peppered, finely chopped

Salsa, sour cream, or guacamole for topping


all-natural-won-ton-wraps_0

These are the wonton wrappers I use. They can be found at pretty much every grocery store.


Directions:

Place chicken in a single layer in a sauce pan. Add water till chicken is covered. Bring the water to a boil, reduce heat to simmer and poach chicken about 20 minutes. Drain and cool slightly, then shred with a fork.

Mix shredded chicken with salt pepper and ranch. Set aside.

Combine cheese chili powered and paprika and set aside.

Spray mini muffin tins with cooking spray and place one wonton wrapper in each muffin tin. Bake for 5 minutes at 350 degrees until lightly brown. Remove from oven and cool.

Spoon a generous tablespoon of chicken filling into each wonton cup and then top with cheese mixture and bell peppers. Bake for 10 minutes at 350 or until heated and cheese is melted.

Serve with salsa, sour cream, or guacamole.

The first time I made this recipe I had a hard time shredding the chicken. It is a tedious process but if you do it right it will make your wontons that much better. Below is a link that may help any reader who is struggling.

http://www.wikihow.com/Shred-Chicken

In addition to shredding the chicken it is hard to get the right balance between not cooking these enough and burning them. A suggestion that I have would be to cook the wrappers for approximately 3 minutes and then taking them out putting the chicken and pepper and cook for like 5 minutes and then add the cheese after 5 minutes in the oven because the cheese will cook faster than everything else.

These are very time consuming in my opinion especially for a hors d’oeuvres but people really seem to love them. They are unique and impressive looking as well! As always, enjoy!!

Links to Pictures:

http://stickafork.net/2011/08/wonton-chicken-tacos/

http://www.nasoya.com/products/asian-style-wraps/won-ton-wraps


Christmas.. a Little Late

download (1)

This recipe is coming a little late because Christmas was over a month ago but I really wanted to share this because I am not lying whenever I say this is the best Christmas cookie you will ever taste. I think to most it probably tastes like an average sugar cookie covered in delicious frosting and topped with sprinkles or heath pieces or whatever delicious decoration is on top of the icing, but to my family they are magic. Every year we make these cookies as a family. What makes them taste so good is the tradition and the thought that we all made them together and decorated them with care. My brothers have both kind of grown out of this tradition, although they still do it for my mom’s sake. I however treasure this more than anything else we do on Christmas. For the 45 minutes my family is all sitting around a table. No yelling or fighting just decorating with icing. This is one of my grandmother’s recipes yet another reason why it is so special.


Rolled Butter Cookies

Ingredients

1 c. butter

1 ½ c. confectioners’ sugar

1 tsp vanilla

1 egg

2 ½ c. flour

1 tsp baking soda

1 tsp cream of tartar

¼ tsp. salt

Directions

Cream together butter and sugar. Add vanilla and egg. Beat well. Add dry ingredients and mix. Chill for 2 hours or overnight. Roll dough into ¼” or 1/8” slabs and cut into shapes using cookie cutters. Bake cookies at 350 degrees for minutes.

Frosting

1/3 c. butter

4 c. confectioners’ sugar

1 ½ tsp. vanilla

2 T milk

Directions

Cream butter. Beat in half the sugar. Add vanilla. Gradually add the remaining sugar and enough milk to make of spreading consistency.

Here is a video on how to roll out your dough!


Advice: My best advice is to make sure you watch your cookies in the oven. As I have mentioned before in the blog you need to be interactive with your food. You cannot just set the timer and walk away. Different ovens cook differently. My oven at home gets very hot very fast and I am constantly burning things. One thing you cannot burn is sugar cookies because everyone will be able to see it no matter how much frosting you put on it.

After we make the frosting we set up the table so that everyone has a piece of parchment paper to decorate on and then we have bowls filled with sprinkles and chocolate chips and coconut and heath pieces and all different kinds of delicious things to make your cookie even sweeter than it already is! We also die the icing different colors to help with the aesthetic appeal.

I usually double the recipe whenever I make this because we give some to neighbors and also everyone in my family loves to devour these cookies. Another tip is that if you have a picky eater leave a few plain. My dad likes his better that way!

As always.. Enjoy!


Links:

http://www.emme-magazine.com/2013/12/04/host-a-christmas-cookie-exchange-party/


Cranberry Orange Bundt Cake


3ca296a29f36e4d8196c4c5f47a17ad4


One thing that I love is sweets for breakfast. If you know me personally you know that I absolutely love sweets. Some people think I am addicted to candy. That is neither here nor there though. For my post today I want to talk about a breakfast bundt cake that had my grandma, one of the best cooks I know, raving. Bundt cakes are great because they are usually very easy but look beautiful (AKA it looks like you did a ton of work for it and people will be really impressed with your skills). For those of you who are not familiar with bunt pans there is a picture of one below.

download

bundt pan


The recipe I want to share with everyone is one I found off Pintrest and is great for the holiday season. It is a cranberry orange bundt cake. I have never had fresh cranberries in a baked good but they proved to be both sweet and moist which was a perfect combination with the zest of the orange and the moisture of the cake itself.

Cranberry Orange Cake

Ingredients

  • 1 1/2 cups flour
  • 2 teaspoons baking powder
  • 1/4 teaspoon salt
  • 1 cup sour cream
  • 1 cup sugar
  • 3 large eggs
  • zest of one orange – about 1 tablespoon
  • juice of an orange
  • 1/2 cup butter
  • 2 tablespoons sugar
  • 1 1/2 cups fresh cranberries


  • For the Icing:
  • 1 cup powdered sugar
  • 2 – 3 tablespoons water, milk or orange juice

Instructions

  1. Preheat oven to 350 degrees. Spray a bundt pan with cooking spray. Sprinkle the 2 tablespoons of sugar on the bottom of the pan. Sprinkle 1/4 cup of the cranberries on the bottom of the pan. Set aside.
  2. Cream together butter and sugar until sugar turn a lemon color, about 4 – 5 minutes. Add eggs one at a time and mix in until incorporated.
  3. Add the orange juice and zest. Add the sour cream.
  4. When incorporated add the flour, salt and baking powder. When this is all mixed together stir in the remaining 1 1/4 cups cranberries.
  5. Bake for 50 – 55 minutes until a tester comes out clean. Let pan set for 5 minutes after you take the cake out of the oven. Turn over cake unto a wire rack to cool. Mix up your glaze ingredients and spread on top and sides of cake

For those of you have have not used a bundt pan here is a link to help your first time go smoothly: http://housewares.about.com/od/bakewareservingware/a/bundtbasics.htm


IMG_1103 (2)

Cake I made


I was very happy with the way this cake turned out. A couple tips for my readers though would be one, spray that bundt pan like your life depends on it. This is very important because whenever you flip the pan over the thing that everyone sees is what is touching the pan and if it sticks at all it is going to ruin your beautiful cake. The second advice would be to not over do it with the icing. I didn’t ice my cake at all whenever I served it and it was sweet enough by itself.

I served this thanksgiving morning because it was light and seasonal. As always.. Enjoy!!

Links:

Recipe from (http://thatsmyhome.com/sweetspot/cranberry-orange-cake/)