Wouldn’t you love to know what just happened in the GIF above? When I first came across the competitive scene of Super Smash Brothers Melee I wanted to absorb as much information as i could, and through observing and some research I’ve become quite familiar with the topic, and I fell in love with it. If you are curios as I once was please read on! On this blog I’ll be going in depth into the workings of this game and why I love it so much.
Now this first post is going to be a longer one, and it might be a little boring, but it’s a necessary evil. For today’s post I’ll go into the controls and basic movements in the game, as we must start with the basics. In my next post I will explain the uses and differences between each control, but for now I will try to stick to only explaining the controls themselves, not their uses. I will be highlighting the important terminology that you may not know in red for easy location. So with that, let’s get into it!
How The Game Works
Super Smash Bros is very different from your standard fighting game. While most fighting games are like boxing, where you must wear your opponent down (usually measured by health bars), Super Smash bros is more like sumo wrestling, where you have to push your opponents off a stage to be victorious.
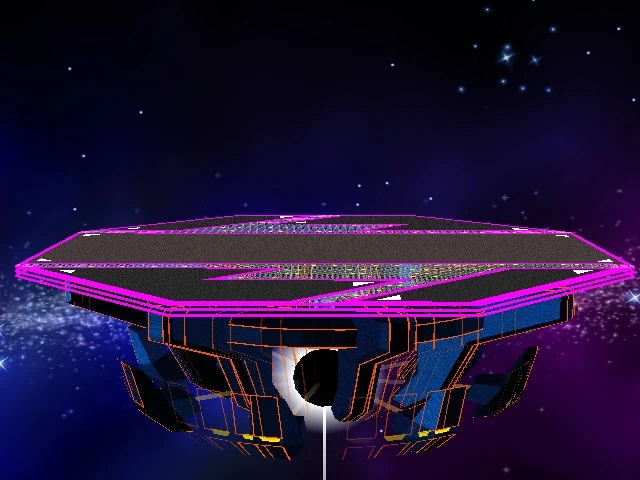
Above is a stage from super smash bros melee. As you can see, it’s limited space is what is key to this fighting game. Instead of health, each attack gives you opponent more percent to their meter. This percent doesn’t cap at 100%, but rather can technically reach 999%.
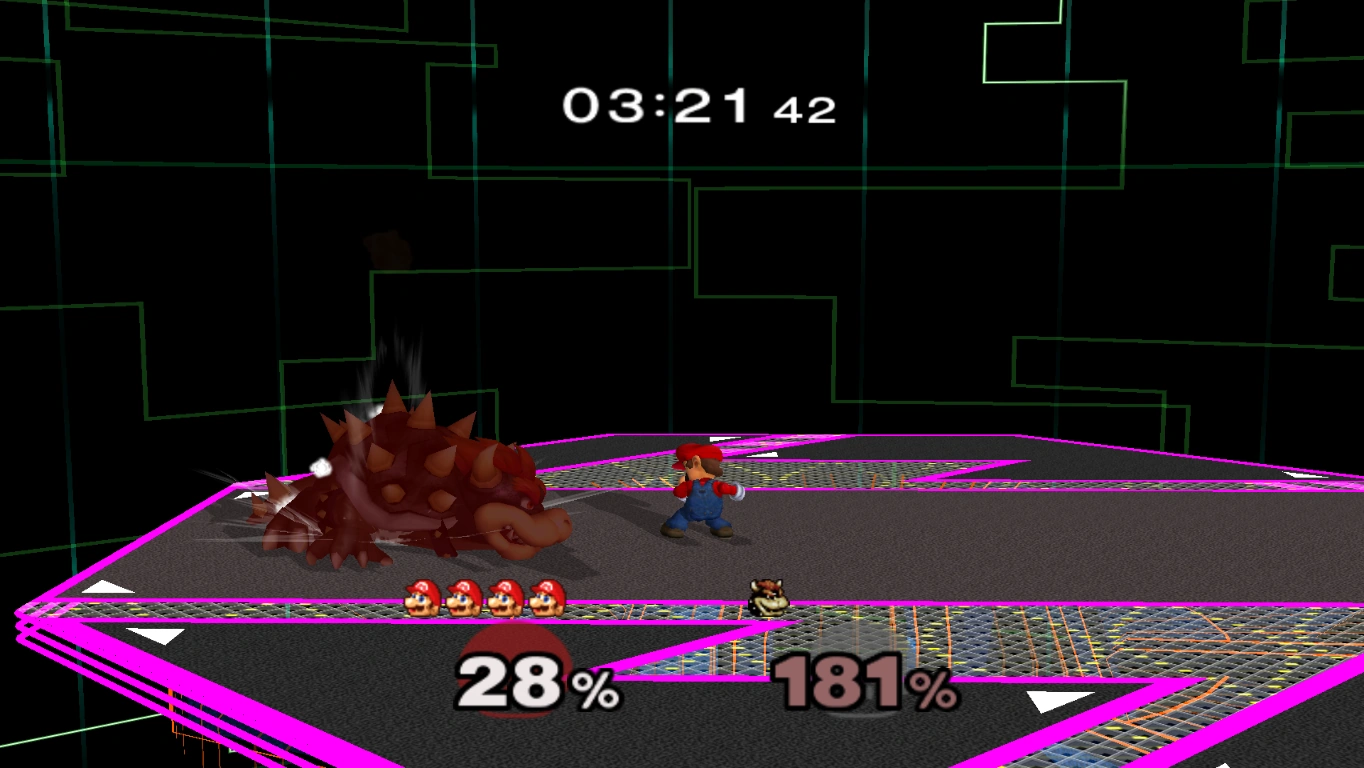
As you can see, Bowser has 181% while Mario is sitting at 28 %. As your percent gets higher, each attack you’re hit by sends you farther back. With more knock-back and limited jumps more knock-back means it’s harder to get back on the stage. Moreover there are blast zones slightly off screen in every direction, including upwards. Touch one of them and you immediately lose a stock, or one of your lives. This is what you see happening to Princess Peach in the first GIF on this page.
That’s pretty much how the game works, so now let’s move onto the controls.
The Controller
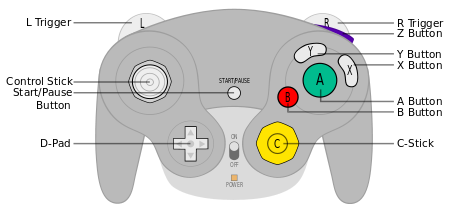
Above is a standard GameCube controller minus the lighter shaded portion. This part is found in Wavebird controllers and doesn’t affect functionality as far as controls go. This is the universal terminology for all buttons, the only addition I have being that the terms “analog stick”, “control stick”, and “joystick” can be used interchangeably, any of the three may show up in future posts. Now let’s get into the controls.
The Control stick
The control stick is used exactly as you might expect: it controls your character. left/right inputs move your character left or right, as one would expect. Up is jump and down is crouch. This is where it gets a bit more complicated. The input is also affected by how fast, long, and far you tilt the control stick.
For instance, if you tilt you control stick up then immediately release, you get a shorter jump than if you were to tilt it upward for a longer period. The smaller jump is called a short hop, while the higher jump is called a full hop. All characters have at least 1 midair jump, meaning they jump once while on the ground and again midair. This is reset after touching the ground, meaning all characters must land before being able to jump in air again. Kirby and Jigglypuff are the only exceptions, each have 5 midair jumps.
The next job of the control stick is dashing, walking, and sprinting. Like the short and full hops each action is dependent on the nature of the input. Dashing is achieved with a quick input left or right, followed by an immediate return of the control stick to neutral position. Running is achieved by not letting the control stick return to neutral position after a dash, meaning all sprints are started with a dash. Walking is achieved by simply moving the control stick slower, avoiding a dash input.
Crouching is the simplest of these movements, it effectively makes your character crouch, used for avoiding higher attacks and also using down tilts, which we will get to with the A button.
The last function of the control stick is directional input, or DI for short. This is mainly used in aerial DI, which is simply the ability to affect the direction your character is falling by moving them left and right. For instance, if your character is falling directly down and you input left on your control stick, your character will begin falling diagonally downward and to the left. you can also input down on the control stick while midair, which will initiate a fastfall. As one would expect, you character falls faster than they normally do. The only difference between a fastfall and DI is once initiated, a fastfall cannot be canceled unless you jump, use a recovery move (which will be explained when we get to the b button), or are hit before reaching the ground.
The A and the C stick
The A and B buttons, along with the C stick, are all of your attacking options in Super Smash Bros Melee. Each have their own uses with their own attacks, starting with the basic jab.
A jab is the most basic attack of any character. You input a jab by simply tapping the A button once. It’s pretty basic but it has a variety of uses, which I sadly won’t be getting into today. There are also jab combos, achieved by pressing the A button multiple times in a row. Captain Falcon has two of these, once with a rhythmic 3 press of the A button, delivering a strong, quick 3 hit combo, and one with a multi-jab combo, achieved by repeatedly pressing the A button in quick succession. Some characters only have one of the two while others have both.
The next use of the A button, along with the control stick, is a tilt. A tilt is achieved by inputting a direction with the control stick then pressing the A button. There are forward tilts, up tilts, and down tilts. Forward tilts can also be angled slightly up or down by angling the control stick slightly up or down. With up tilts you have to be careful with how far you tilt the joystick upward, as you might accidentally input a jump instead. For down tilts you must crouch, as should be expected when tilting the joystick down.
Next we have smash attacks. These attacks are achieved by tilting the joystick in a direction and pressing the A button simultaneously, differentiating the input of tilts from the inputs of smash attacks. There’s actually another way to input smash attacks, the C stick. The only difference with the A button input and the C stick input is that you can charge smash attacks before releasing them by holding the A button, while you can’t do this with the C stick. the C stick does, however, help to prevent mis-inputting tilts. There are forward smashes, up smashes, and down smashes, each with their expected directional input from both the control stick and the C stick.
The last functions of both the A button and C stick is Aerial attacks, usually referred to as Aerials. There are up airs, down airs, forward airs, and back airs, each referred to as uairs, dairs, fairs, and bairs respectively. The input is as one should expect, a directional input in the desired direction of attack on the C stick or the same direction on the joystick plus the A button. You can only use aerials while you are in the air.
The B button
While the A button is for your basic attacks, the B button is for special attacks. These attacks can only be inputted by the B button and are your crazier attacks specific to each character. There are forward specials, up specials, and down specials. The unique one of the group is up specials, as these are normally your character’s recovery move. A recovery move is meant to give you some extra height to get back on stage, but many of them can also be used offensively.
The X and Y buttons
These buttons are just another way to jump. It makes some more precise timing a bit easier, and can make it easier to input left or right while also jumping, but which method of jumping used in each situation is purely personal preference.
The Shoulder buttons
To clarify, this is the L, R, and Z buttons.
The L and R buttons are you defense in super smash bros. There are two pressures you can hold the L and R buttons down. One about half way which is only resisted by a weak spring, and the other pushing all the bay down, which will let out a “click” sound. The partial holding of the L or R button is called a light shield; the harder you hold the button down the more dense the shield becomes, until it makes the “click” sound, when it becomes a power shield. You can also use DI to slightly affect the position of the shield on our character, but be careful, as if you DI too far in any direction, you might input a jump or dodge, which moves me to my next input.
While holding shield if you move the joystick to the left, to the right, or down you will input a dodge. dodging to the left or right is simply referred to as dodging. when you dodge your character moves a precise distance to the left or right (depending on the input) while being temporarily invulnerable. Dodging down is called a spot dodge, where you dodge in place with temporary invulnerability, lasting for a shorter duration than a normal dodge.
The last kind of dodge is an air dodge. This is when you press the L or R button while airborne, and it gives you a few frames of invulnerability while falling.
The last shoulder button, the Z button, is used for grabs. while close to your opponent you can grab them, then you have a few options. You can press the A button to pummel them, or input a direction to throw them. There are back throws, forward throws, up throws, and down throws, each doing slightly different things. You can also do a combination of repeated pummels and then a throw, but you have to be quick or your opponent can struggle out by repeatedly pressing buttons.
The Start button
The start button pauses the game.
The D pad
The directional pad, often shortened to D pad, serves one purpose: taunts. In game there’s only one direction, but that direction is all you need. If you press up on the D pad your character enters into an animation where it taunts the enemy player. Often short with unique sound effects, it serves no other purpose than to anger your opponent. It sounds mean, but when you play the game there’s no better feeling than taunting after landing an amazing combo.
And after all that, if you’re still reading, thank you! This post covers all the basic controls, please let me know if I forgot anything! In the next post I will be covering the uses and differences between the controls and attacks, it should be much shorter and more interesting than this one.
I really like this blog, Josh! Though you were simply stepping your reader through the basics of SSBM, your writing style is engaging and I think this will make an interesting Passion Blog. The only thing I would watch for is some minor spelling errors. Great work!