The Shine

Widely considered the best move in all of Melee as well as being an icon for the game, the shine is the down special of both Fox and Falco in Super Smash Bros. Not only is this move one of the best tools for combo starters and kills, it also has quite a few related techs. So let’s get right into it!


Overview

Formally known as the reflector, the shine was originally meant as a way to reflect projectiles. This property also multiplies both the speed and damage of the projectile by 50%; this might seem very useful but in high level play of melee this is probably the least popular use of the shine. So what makes this move so good?

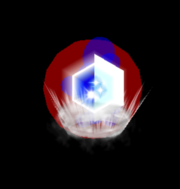
First of all, this move comes out in one frame. This means as soon as the game registers the input, the hitbox comes out immediately. Second, it grants the user a frame of invincibility while the hitbox is out. In the GIF above the red is the hitbox, the yellow on a character means they can be hit, and the blue on a character means they are invincible. This can be more clearly shown in the picture below:

Third is the fact that you can jump out of shine, meaning you can cancel all ending lag by jumping while the shine is still out.


Techs

Jumping out of shine leads to a lot of different techs, including shinegrabbing. To understand shinegrabbing you first have to understand a jump-canceled grab. When a jump is inputted, there is a few frames of delay (usually from 3-8) in which the character starts the jump animation but doesn’t actually leave the ground. In Melee you can input a grab in these frames, meaning if you jump out of shine then input a jump-cancelled grab, you can effectively grab out of shine, executing a shinegrab.

Fourth is something called a multishine. One of the most notorious techniques in all of melee, this is the act of chaining multiple shines together by jump-cancelling a shine into another shine, and can (theoretically) be done indefinitely. I say theoretically as it is incredibly precise and demanding to execute, with fox’s multishine having a 7 frame cycle for the first shine to the second shine, then an 8 frame cycle from then on (roughly 1/12th of a second)) and Falco’s having a 9 frame cycle for the first shine to the second shine, then an 11 frame cycle from then on (roughly 1/17th of a second).

Image result for multishine gif

Frame by frame of fox preforming a doubleshine with inputs

Westballz preforming multishines in a handwarmer before a tournament set

Multishining is generally used for shield pressure, which is the act of attacking an opponents shield to make them act with the intention of following up with a punish. It is also widely used to show off, usually after a stylish kill, due to its notoriously precise input timing.


With all of these advantages it’s no wonder that it’s considered the best move in the game, but it gets better. There are a lot more Fox and Falco specific techs that show what this move is truly made of, and why it has such a huge reputation. Although this post is shorter than my usual posts, if i tried to cover all of these techs at once it would be my longest one by far, so look forward to the specifics next week! Thank you for reading! I’ll leave you with one of my favorite combos of all time from my favorite smash player of all time: Westballz with one of his many crazy long combos against Leffen at Beast 6. You can truly see how Falco’s shine can extend combos as well as end them, more on how that works next week!


Living Life on the Edge

In melee, one of the worst places you can find yourself in is being off stage, so your immediate goal when being knocked off stage is to get back to the ledge while avoiding attacks from your opponent. But then what? There are a multitude of options you have while holding onto the ledge, but your opponent will undoubtedly try to cover most of them. Today I’ll be talking about the options and mindgames involved when you grab ledge.

A basic mechanic when grabbing the ledge is invincibility frames. These are the frames directly following a multitude of actions, including grabbing ledge, in which your character cannot be hit.


Standard Ledge Recoveries

Standard ledge recoveries are the simple six actions you can do while on the ledge. Nothing too complex, however there is an interesting mechanic in which they act slightly different when you are above 100%.

  1. Climb: executed by simply inputting the control stick toward the stage, you character simply pulls them self up onto the stage. Above 100% the animation takes significantly longer, making it generally a bad option as it is easily punishable. Below Is an example of a climbImage result for edge recovery melee gif
  2. Attack: executed by any attack button, your character puts out an attack before getting back on the stage. Above 100% the animation takes longer, however most of the characters do more damage with the attack and the invincibility frames extend to cover the get-up animation.
  3. Roll: by pressing either L or R your character rolls onto the stage. Above 100% this animation takes much more time, but the roll is slightly longer.
  4. Jump: by inputting a jump, your character jumps from the ledge and you can DI either direction. Above 100% the animation is longer, but much less than that of other get-up animations. Jumping from the ledge is often called the tournament winner in the melee community, as it’s usually such a bad option it wins the tournament for the other player.
  5. Let go: executed by inputting the control stick away from the ledge, you character simply drops from the ledge. This works the same at all percents. Often can be paired with an aerial to try to attack players standing above the ledge onstage.
  6. Let go + fastfall: executed by inputting down on the control stick, your character lets go of the ledge then immediately begins to fastfall. This also works the same at all percents.

These are the six basic options from the ledge. However, after letting go of the ledge you have more options to try to get back on stage.


Ledgedash

By letting go of the ledge, imeediately jumping, then wavedashing onto the stage you can preform a ledgedash. If you’re unfamiliar with what a wavedash is, I cover it at the end of my second post.

Image result for ledgedash gif

Here Leffen (the Fox player) first jumps from the ledge and DI’s away to bait Mew2king (the Marth player) into trying to attack, then uses this window to ledgedash onstage.

If executed perfectly and immediately, a ledgedash can be done while still in invincibility frames with 15 frames of invincibility left to spare. This means it is possible to get back onstage and input an attack if you’re quick enough.

This is mainly used to recover from the ledge, but can be risky as if you miss the wavedash your character goes into freefall and you loose your stock.


Ledge Stalling or Planking

Ledge Stalling, or planking, is the act of regrabbing the ledge to maintain constant invincibility. There are many ways to do this, such as a let go fastfall into a jump to regrab, as well as the use of special moves like fox’s up special. Here are some examples:

Image result for ledge stalling melee gif

Here Captain Falcon first drops from the ledge, jumps to the stage, then immediately inputs a wavedash back to get back to the ledge. This is an effective stall as he keeps his invincibility frames.

Related image

Here Falco uses his up special out of a let go from the ledge to stall, as he regrabs ledge soon after the up special animation starts.

Image result for ledge stalling melee gif

This is a simple let-go jump regrab slowed down. This is the simplest edge stall.

Edge stalls are mainly used for mind games; with a quick ledge stall (as seen in the GIF with Leffen and Mew2king above) you can bait actions out of your opponent, giving you windows of opportunity to recover.


With that ends my fourth post. I hope you enjoyed it! If you have any questions, corrections, or additions feel free to leave a comment. Thank you for reading!

Moon-walking, Sticky-walking, and Charlie-walking

Finally after all of that background knowledge we get into the good stuff: techs. Posts from here on out will be much shorter, but much more in depth. Those first two posts were as long as they were so I could move on to the topics I like to talk about. I’ll only cover one to three techs per post, and in this one I’ll be talking about my favorite movement tech, moonwalking, and it’s variations.


Moonwalking

Image result for moonwalking melee gif

Captain Falcon moonwalking into a jump then a bair

So moonwalking is achieved by inputting a dash in one direction, then immediately moving the control stick in the opposite direction without letting the control stick return to neutral position. However, you also want to avoid inputting straight down as you will lose momentum with a crouch. The most practiced way of doing this is by inputting the dash, then immediately moving the control stick in a semi-elliptical motion around to the other side. You can also string multiple moonwalks together, as shown below.

Image result for moonwalking melee gif

Captain Falcon preforms an extended moonwalk to grab the ledge

Technically it is also possible to preform a moonwalk by simply moving the control stick very quickly in the other direction after the initial dash, but it would need to be done so quickly that the game doesn’t register the control stick in neutral position, which is nearly impossible without some tool-assisted play.

All 25 characters can moonwalk, but most require an extra step in the execution. That is, 14 of the characters must be walking in the opposite direction in which the initial dash is inputted. Captain Falcon gains the most from this tech due to him having the longest dash distance in the game, so I’ll be focusing mainly on applications for Falcon players, however they can still be used by all characters.

The first application is mix-ups and mind games. It can be used to catch your opponent off guard. For example, you can bait out attacks and reactions from your opponent with a moonwalk, and quickly follow up with a punish. Another example is with a grab. Moonwalking allows a character to effectively grab enemies form the direction opposite to which they are facing. This can lead to more mix-ups and is showcased perfectly below.

Image result for moonwalking melee gif

Here link punishes fox’s get-up roll with a moonwalk grab

The second application is mainly Falcon specific, and it applies to edge guarding, which as it sounds is the action of preventing your opponent from grabbing onto the ledge. In melee, only one character can hold onto a ledge at a time; if another character tries to grab an occupied ledge they will simply fall past it, presumably to their demise. This action is called a ledge-hog for obvious reasons. Anyway, if Captain falcon moonwalks moving toward the ledge, then jumps off stage to intercept a recovering opponent, he gets extra backwards momentum than he would with a turnaround jump. This means he can utilize his bair to intercept aerial enemies way better than before.

The last application is arguably the most widely used: to stunt on you opponent. That is, to preform techskill to taunt your opponent, or simply gloat over a kill.


Sticky walking

There’s a lot going on in the GIF above, but there’s multiple points where Westballz, the red Falco, preforms a sticky walk. The sticky walk is an extension of the moonwalk where you simply input another semi-elliptical movement of the control stick back into the original dash direction. What results is a slow return to a normal paced dash from a moonwalk, and it looks pretty cool.

Charlie Walking
Really the best way to understand is to see it in action:
Image result for charliewalking melee
A Charlie walk is done by first executing a sticky walk, then initiating a turnaround animation by inputting the direction opposite to which the character is facing. You can string multiple charlie walks together by dashing in the opposite direction on the frame the turnaround animation ends, then preforming another sticky walk. This tech was discovered in 2006 by Fuzziness, whose real name is Charles, which is where the name came from.

Thank you for reading! I hope this post was a bit more interesting than the last two, and it’ll only get better from here!