
The lab has 2 podium computers that researchers can use to administer experiments. The SchoolVue classroom management software is installed on both podium computers to help manage the session.
Starting the SchoolVue program
First, choose Podium 1 or Podium 2 to setup your experiment. You may run your experiment on both simultaneously. Then log in the podium computer(s) with your Penn State Access Account credentials. Make sure that the client computers are on or in standby mode (the power button will be flashing green) and start the program called “CrossTec SchoolVue” from either Podium (you cannot run it simultaneously from both podium computers).

The program will scan for all the client computers in the lab (up to 31) and display the available clients on the screen. The display of the clients on the console mimics the physical layout of the lab. The client names shown in the program console follow the nomenclature S1-LEMMA-nn where LEMA-nn is the client name (which is also displayed on the client monitors).
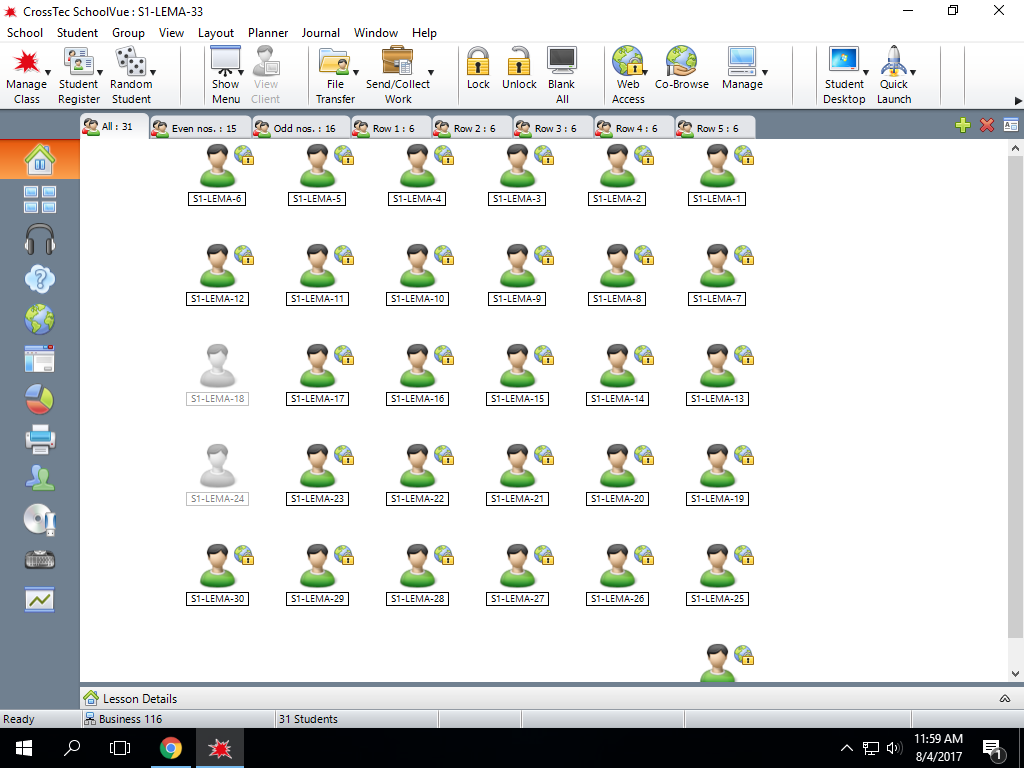
If some of the clients are not connected and need to be powered on select the clients and click on the “Manage” button on the toolbar. Then click on the “Power On” option. If needed, manually wake up the computers that do not respond by pressing any key on their keyboards (ESC, for example).
Groups
Some default groups have been pre-configured (the tabs available on the SchoolVue console) to organize the clients. You may use these groups to selectively work with clients and load specific software for each group (e.g., experimenters who use z-Tree may wish to load different treatments for even and odd numbered clients, or start a different channel for each row).
You can create custom groups for your session by clicking on the green ‘+’ button to the right of the tabs or by clicking on New option in the Group menu. You will then be asked for a name for the group and the clients that should be added to the group. You can also select the clients you want to group, right click and choose Add to Group and then select New. To add client(s) to an existing group, select the client(s), right click and choose Add to Group. Then select the group you want to add the clients to. If you choose to create custom groups for your session, we request that you delete these custom groups at the end of your session to restore the initial state for other researchers. You can delete a group by selecting the group (click on the group header tab) and click on the delete button (red cross icon) or select the Delete option from the Group menu.
We also request that you don’t make any changes to the layout or group membership of the pre-configured groups (including ‘All’) at any time.
Client login
It is possible for the researcher to log in to the clients from the podium computers. This feature is especially helpful if you wish to test your experiment beforehand. To login to a client or a group of clients, select the client(s), right click and select the Login option. Enter your PSU Access Account credentials and dce.psu.edu in the domain field.
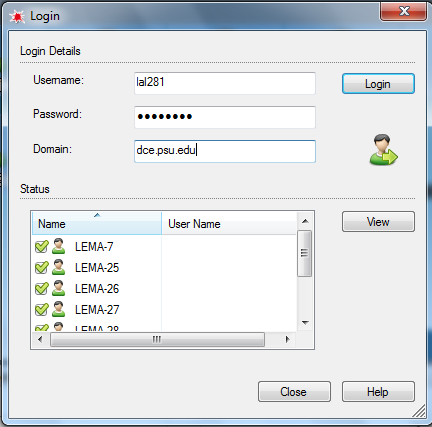
Click the “Login” button twice (do a 2 second delay between clicks). You will see your user name appear under the User Name column next the the Name column in the Login window. Leave the login window up until all the clients have logged in. If some machines did not login, click login again or log them in manually.
Please DO NOT log in to the client computers with your access id for a session. This creates a security risk and is in violation of Penn State policy (reference). Please ask subjects to log in with their access ids. Note that you can launch applications on the clients even when no one is logged in. Once launched, these applications will be available to subjects when they log in. Please see the section on Launching Applications below for details.
You can use the Login screen shown above to see the name of the user(s) currently logged on at each client. Please be sure to logoff all clients after your session. You can log the clients off via the SchoolVue interface by selecting the clients, right clicking and choosing Logout from the options. Alternatively, select the Logout option from the Manage menu.
File distribution
If your experiment requires specific files to be copied to the clients, you can do so by using the file transfer or the file distribution functionality of SchoolVue. File transfer enables the transfer of files from the podium computer to a single client while file distribution allows the transfer of files to multiple clients.
To distribute files make sure that they are accessible on the local podium computer. Then click on the drop down arrow next to the File Transfer option on the toolbar and select File Distribution. The resulting window will show all connected clients on the bottom pane. Select or deselect clients as needed. Then set the destination for the files being distributed using the Set Destination button on the toolbar if needed. Files are copied to the same destination on the clients as their destination on the local computer so you may not need to explicitly specify a destination. Browse to the file(s) that you want to distribute on the local computer (using the top two panes) and select Copy from the toolbar to distribute the file to the selected clients.

Launching applications
Experimenters often need to launch specific applications on the clients before the start of their session. For example, if using z-Tree a researcher may want to load z-leaf on the clients and ensure that they are able to connect to the z-tree instance.
To launch a specific application on a group of clients, select the clients, right click and choose Launch Application from the options. You will see a window that lists several commonly used applications such as browsers and z-leaf applications. Select an application from this list or add a new application by clicking on Add and browsing to the application that you want to launch. Alternatively, you can use the Quick Launch button from the toolbar to launch an application.
Please make sure that the “Execute only if the client is logged on” option is checked off so that you can launch applications that are available to the subjects when they log in.
This option will allow you to launch applications on the clients before subjects arrive and log in to the clients. This way you can ‘prepare’ the clients ahead of your session without having to login to the clients yourself. If you decide to test the application by logging in to a few clients with your Access account, please logoff and relaunch the applications on these clients for the subjects.

Internet access
A researcher conducting a web-enabled experiment may want to launch a browser window and browse to a specific URL beforehand.
When SchoolVue is started it turns off internet access on the clients. To review the steps for enabling internet access and navigating to a URL on the clients, please refer to the section on running web-enabled experiments.
Viewing clients
The SchoolVue program allows you to view the clients from the podium computer. The default view (Normal View) shows an icon with the name of the client listed underneath.

You can switch to the Monitor view by selecting Monitor View from the mode option in the View menu. This view shows a thumbnail of the clients providing a view of the client monitors.

To perform activities on a client while at the podium computer, please double click on the client or select the client and click on the View Client button on the toolbar. You can change the view mode by using the View Mode button on the toolbar. The default mode is Share where the users at both the podium computer and the client can use the mouse and the keyboard. To stop viewing the client simply close the viewing window.
Rebooting clients
If you experience any difficulty with connecting to or logging on/off certain clients, please reboot the clients. You can do so remotely by selecting the client(s), right clicking and selecting the Reboot option.
Next Page: Previous Page: