With this tutorial, I am going to show you how to make your own color palette. If you want to use the premade color palettes you can read my BASIS tutorial with this link.
Now, let us start with the easy way to do this. There is a website that let you have other people’s color palettes and works using that palette called Lospec. Another website that lets you create your own fully custom colors is OpenGameArt. I have my color palette in this link so you may know what colors I use (even though it’s just a rainbow palette with two extra colors). If you using Lospec, click the download button and they will give you the option of which bits to use; I use the option “PNG image (32x bit)” and save the image they provide. Open that image inside of Aseprite and the tutorial will begin.

So, now you have your image inside of Aseprite. What you have to do is to decide where your sprite icon size location and keep it that way in all your work.

The way how I order the palette is that I tend to keep the dark tones on the left side to be similar for the Hue/Saturation slider.

Now here is the hard part of doing this. What you have to do is to register ALL of the colors to palette from the image. Fortunately, Aseprite has coded in a way that does that all for you like they did here in this image. However, sometimes the palette image has two exact colors in two different colors. Aseprite will register it as one color instead of two like they did in the image. The way to fight this problem is to count the rows and aisles your palette has and put that amount inside your palette.
![]()
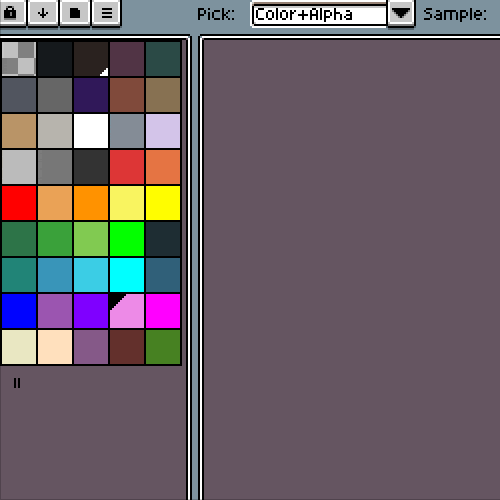
![]() Aseprite will only register 256 colors when you make a palette. They will also tell you how many colors in the palette. Pre-existing colors inside your palette will change to new colors that are found from the image or change positions while still have the same exact colors because it will already register those colors when opening the file.
Aseprite will only register 256 colors when you make a palette. They will also tell you how many colors in the palette. Pre-existing colors inside your palette will change to new colors that are found from the image or change positions while still have the same exact colors because it will already register those colors when opening the file.
Now consider the palette is in a disarray, the way to organize it is the most tedious part of this tutorial.
- Start by using the color picker tool. When you have the color picker tool to select a color from the image, it will automatically find its location inside the palette.
- Depending on the rows and aisles inside your palette you may need to change the amount of space in your palette. You have the ability to extend or shrink your palette like so:
- After you counted your rows and aisles, now its time to put the colors in! To do this, you have to start with the bottom right corner, no matter if you are vertical or horizontal, and color pick it to find it inside the palette.
- Once you found that color in the palette ( the color ALWAYS be highlighted with a top-right triangle on it), you are going to move it on the bottom-right as the same location it has in the image has it. If you start on the top, the color palettes will move accordingly – this is the only method I can assume to prevent yourself from an even more messy palette.

- Eventually, you’ll come to a color duplicate inside your palette. In order to fix this problem, you’ll have to click on the next black color palette and get the color manually. Color pick that duplicated color and go to the color wheel and copy (CTR+C) the HEX code for it.

- Once you have the HEX code for the specific color, go to the next block that is black, click on it, and paste the HEX code on there. REMEMBER TO UNLOCK THE PALETTE EDITOR IN ORDER TO CHANGE COLORS!!!
 Tip: You may also add more palettes to the original image and possibly not affect the palette. However, the colors may be already registered to the palette in many different locations, hence why it didn’t register any new colors.
 And you’re done! Congratulations!
You’ve successfully created your own color palette. They will be more tutorials to come but having the basics is always great.
See you next time!
Tony