

Canvas
PSU Abington’s LMS provides faculty and students a central location for all course content and materials. Courses are organized by module to provide students a seamless online, hybrid, face-to-face, or mixed-mode experience. In Canvas, students can submit assignments, participate in discussions, take quizzes, and access a variety of tools and resources. Faculty can maintain a gradebook, provide feedback on assignments, and organize their course materials.
This page includes resources that may involve integrating Zoom or Kaltura into your Canvas course. You will need to activate Zoom or Kaltura in your course prior to reviewing these resources. Please review the following links to complete these steps.
Check out the playlist below to see the latest training on Canvas from our Instructional Designers!
Access our written help topics by scrolling down or using the buttons below.
empty
How to Create Discussions
- From the course Navigation menu, choose Discussion.
- Click “+Discussion” at the top right-hand corner of the screen.
- Enter your discussion topic title at the top of the screen.
- Below the “Topic Title” box, add your discussion directions. There are several options for adding content: type, copy & paste, upload a file, insert a video or link.
Options
- Recommended: Click Allow threaded replies
- Neat feature: Allow liking
- Your choice: Users must post before seeing replies
- Your choice: Graded
Group Discussion
- Choose this option is if you want to assign certain students to discuss the topic in groups.
Finally, make sure to Save & Publish the discussion so that students can see it.
How to Create Quizzes
- From the course Navigation menu, choose Quizzes.
- Click on the blue button called “+Quiz” at the top right-hand corner of the screen.
- Under the Details tab, name the quiz.
- Below the quiz name, you can add Quiz Instructions.
Configuring the Quiz
Underneath Quiz Instructions, there are several options for configuring the quiz.
- Quiz Type
- Assignment Group
- Options
- Assign
Remember to Save the quiz and Publish when you want students to see it.
Adding Questions to the Quiz
Canvas Options
Enter each question individually:
1. If your quiz or exam is short or consists of open-ended questions, you can add each question individually by clicking on “+New Question.”
2. Choose the question type you want (multiple choice, fill in the blank, True/False, matching, essay question, etc.)
3. Enter the question under Question.
4. Depending on the question type, you may have to fill in possible answer choices.
5. After entering each question, remember to hit Save.
Importing Course Templates
The Abington Canvas Course Template has been redesigned to create an organized, intentional, and effective workflow for courses being remotely facilitated. Clicking the link will take you to the Canvas template in a view that will be similar to how students see the course. The template should always be imported into an empty master course or to your sandbox so that you can familiarize yourself with its features without affecting any existing course content.
When importing from Canvas Commons, you can import the entire template or select parts to import. You can also import the template directly, or download it to your computer and import it at a later time.
Downloading the Template
- Visit the Canvas Commons page to access the template.
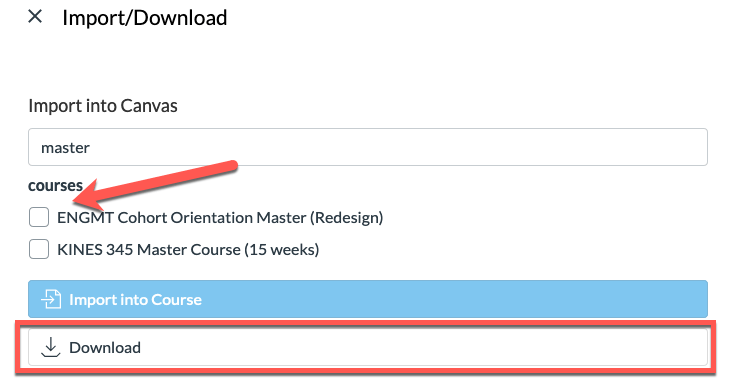
- Select the Import/Download button on the right side of the page.

- Select one of the following options to transfer content:
- Check the box for the master/sandbox course you want to import the template into, then choose Import into Course.
- Choose download to export the entire course as a .imscc file to your local computer.

- The content will import into your selected course, or be downloaded into your computer’s downloads folder.
Uploading a Template
- From a master/sandbox course, select the Settings tab from the left-hand menu.
- From the right menu, select Import Course Content.
- From the dropdown, choose Canvas Course Export Package.

- Click Choose File, then locate the previously downloaded .imscc file from your local computer and click Open.
- Select whether you want to import the entire course [1], or only selected content[2], then select Import.

- If you have chosen to select specific content, you will need to select the content to import from the View Current Jobs menu [2].

How to Create Modules
In Canvas, there are many ways to display your content to students. One method is to create modules, which allows you to create multiple pages and guide the students through the content rather than having them go to multiple areas to receive the readings, assignments, and all information for class this week. In this guide, we will show one way to deliver your content to students.
Add a Module
1. From the Course Navigation, click “Modules”.

2. Click “+Modules” in the top right corner.

3. Add a name for the module.
4. Select a lock date and prerequisites if applicable.
5. Once your settings are complete, click “Add Module” to finish. You will now see an empty module, and you are ready to begin adding content.

Adding Content to a Module
6. To add content to the module, find the module and click the “+” button to the right of the module title.

7. Select an item type you would like to add from the drop-down menu. Once an item type is chosen, a list of items that exist will appear to choose from. You will also have an opportunity to create a new item in any of the options.
8. Once you have chosen an item to add to the module, click “Add Item”.

9. Remember to publish both the module and the items in order for students to view.

empty
Enabling Differentiated Due Dates
In the date fields of an assignment or quiz, click the +Add button to add your preferred date(s) for a student. Type the students’ name in the Assigned to field and then fill out the following options:
- Due [1]: Set the date and time that the assignment is due. The due date will already be populated for you if you created an assignment shell, but you can change it if necessary.
- Available From [2]: Set the date and time when the assignment will become available.
- Until [3]: Set the date and time when the assignment will no longer be available.
Notes:
- When you add a new due date for one or more students, the original assigned to will change to everyone else.
- To allow a student access to an assignment past the assignment’s initial Until date, you must set a different Until date for the individual student.
- Beneath the Due Date and Availability Date fields, Canvas will display the time zone date and time according to context. If you manage courses in a time zone other than your local time zone and create or edit a due date for an assignment, the course and local times are displayed for reference.
To add another student with a different due date and availability dates, click the +Add button.
Configuring Assignments for Online Submissions
Assignments in Canvas can be created to allow student submissions online via Canvas.
To convert existing paper assignments to online submission:
- Click Assignments on the left navigation menu.
- Under Submission Type, select Online in the dropdown.
- Check the box for File Uploads.
- Click Save (and Publish).
Hosting a Zoom Meeting in Canvas
- Once you have enabled Zoom into your Canvas Course and Scheduled a meeting, you are ready to host your meeting.
- Sign in to your Canvas course.
- Click on Zoom from the navigation bar.
- You should be routed to Upcoming Meetings and see the meeting you previously scheduled.
- Click on Start to the left of the meeting.
- Zoom will be prompted to start.
- Join either using computer audio (microphone) or via telephone audio (if you do not have a mic).
- You will see a black screen with three icons in the middle and a toolbar at the bottom.
- Your microphone is not muted, but your video is.
- You can choose to share your screen, start video (activate your camera so students can see you). Note: Share Screen has a whiteboard option you can choose to use instead of sharing your screen. Your mouse will act as your writing tool.
- As students log into the meeting, you will see the number next to Manage participants increase.
- Students can chat with you using the chat tool.
- Students can raise their hands, ask questions, or reply yes or no by clicking on the Participants tool. You will be able to see how they respond.
- When you are ready to end the meeting, click on the red End Meeting option in the lower right-hand corner of the Zoom screen. Doing this will end the meeting for all attendees.
- Your lecture will be recorded (as long as you configured your Zoom account) to be automatically uploaded to your Canvas course. You and your students can find these recordings by clicking on Zoom in the Canvas course then clicking on Cloud Recordings.