Evergreen Seed Propagation-

American Holly (Ilex opaca)

american-holly

image from: https://www.arborday.org/trees/treeguide/TreeDetail.cfm?ItemID=1071

Introduction:

The American Holly or Ilex opaca is considered a symbol of Christmas cheer. The American Holly is an evergreen so it has lasting beauty year round. It is also considered an ornamental tree which means that it adds visual interest and beauty to the landscape. It is best known for its use in Christmas wreaths. The year round tree provides cover and food for birds and has more than 1000 cultivars developed today. There are roughly 20 American holly species, 120 Asian species, and 200 English varieties. The American Holly has been around since the days of Pilgrims. it had been used by Native Americans to create various wood products and the berries were often used as buttons or for barter. It is believed that George Washington loved the American Holly and planted many around the White House.The popularity  has continued as it was adopted as the Delaware state tree.

berry

image from: http://www.fcps.edu/islandcreekes/ecology/american_holly.htm

The Ilex opaca is grows best in hardiness zones 5-9. This shrub grows best in full sunlight or partial shade. More than 4 hours of direct sunlight are best. Acidic, well drained, loamy soils provide the best habitat for growth. The American Holly prefers normal moisture, but can withstand flood and drought conditions.  They are relatively easy to grow and can thrive in temperatures as low as 15 below zero. American hollies can adapt to less than ideal conditions.

A mature plant is 40-50 feet tall and 18-40 feet wide, but they grow slowly, at a rate of 12-24 inches per year. The leaves have a leathery texture and are 2-4 inches in length. They stay green all year long and have sharp tips. While they often grow in a pyramidal shape, they can be trimmed to create an attractive hedge. The greenish or cream flowers produce a pleasant aroma and give way to orange-red, berry-like fruit that is somewhat toxic to humans, but loved by a variety of songbirds. Hollies are either male or female. Female hollies produce large amounts of berries, but require a male holly in the vicinity to pollinate it.

Propagation Methods:

There are three ways to propagate hollies.

The first is by grafting. The best way to graft a holly is to use the T-budding method. This grafts the desired buds onto a developed rootstock. Grafting is often used in holly production because many varieties have been developed by producers and do not grow true to seed, so the only way to keep these varieties in production. The downside to grafting is the possibility of failure of the graft union and that it takes time and understanding to be completed.

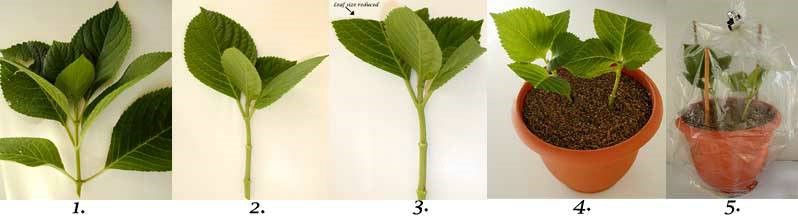
The second is by cuttings. The cuttings must come from the canes of new growth. The cuttings should be taken when the plant is dormant. However, as with most hardwood cuttings, rooting hormone is necessary. Hardwood cuttings are harder and fail more often than other cutting types. This why they are often used less.

The last is by seeds. Seeds are an easy and cheap way to propagate hollies, but limit the varieties produced and can be time consuming.

Steps to Seed Propagation:

  1. Obtaining the Seed: The seeds should be taken from healthy trees. The best time to collect seeds is in the late fall. The berries typically grow from September to November. It is important to remove the berries before they begin to dry and shrivel, but not before the seeds have a chance to fully develop. To collect the seed the skin should be removed. This can be accomplished by smashing the berry. The seed should then be washed to remove the pulpy insides of the berry. The guts of the berry often have chemicals that prohibit germination. To test viability the seeds can be placed in water. The viable seeds will be heavier and sink in water. Typically in nature, the berry would simply fall to the ground and sit over winter and the cold combined with rain would activate enzymes to eat those chemicals that prohibit germination. Rinsing the seed in cold water mimics this process and prepares the seed for germination.
  2. Storage of the Seed: Once the seed is removed from the berry, it needs to be cleaned and stored properly. This means that the seed should be free of berry particles and placed in a contained at 4 degrees C. The container needs to be moist and should contain peat moss.  Storage with proper temperature and adequate moisture levels will extend the seed viability for possibly years. If the seed is not going to be stored, it can be planted right away.
  3. Stratification of the Seed: Stratification is the necessary process to help seeds overcome their dormancy. Stratification helps simulate natural winter conditions. A box with drainage holes can be filled with about 1 to 2 inches of sand and the seeds placed on top. The box should then be burried just below the soil level in a shaded area. Another option is to fill a weather resistant flat with soiless potting medium and place the seeds on top. The seeds should then be covered with a layer about an inch thick of soiless medium in a level manner. The flats can simply be sat outside over winter and you should see some germination by spring. If not the seeds can be left out for a second winter. Seed propagation can take time. There is also no guarantee that the seeds will be the same variety as the parent plant.
  4. Planting the Holly Seed: Seed germination is a very slow process. The American Holly can take up to a year fully germinate. Seeds should be planted in the springtime after an overwintering has occurred. The seeds should be covered with no more than a half inch of soil when planted. The seedling will do best in shady conditions for the first 2 years. It is important that the seedlings are kept free of weeds and grass growth during this time. Once the American Holly has reached 2 years of age, it can be transplanted. Transplanting should occur in the late fall as the tree is going dormant or early spring right before the new growth begins to grow.

holly seedholly scar

Images from: http://www.hgtv.com/design/outdoor-design/landscaping-and-hardscaping/propagating-holly

Conclusion:

American Holly trees are best known for their role in Christmas decor for the holiday season. The tree growth is meant to be harvested around this time, so this is when the bright berries are present and the leaves remain green. There are many ways to propagate the beautiful berry bushes, but by far the most common is by seeds. However, seeds have many limitations when it comes to producing desirable varieties. Other methods such as cuttings offer a better guess at what type of traits will show up in the seedlings. Either way the American Holly has played an important role in the past and continues to be a beautiful accent to winter landscapes either as large hedges or in wreathes and swags for holiday decor.

Resources:

Directions for Holly Propagation Using Grafting. (n.d.). Retrieved November 19, 2015, from http://homeguides.sfgate.com/directions-holly-propagation-using-grafting-87675.html

Hartmann, H. (2011). Techniques of Propagation by Cuttings. In Hartmann & Kester’s Plant Propagation: Principles and Practices (8th ed.). Upper Saddle River, NJ: Prentice Hall/Pearson.

Home Home. (n.d.). Retrieved November 19, 2015, from https://www.arborday.org/trees/treeguide/TreeDetail.cfm?ItemID=1071

Propagating Holly – How To Grow Holly From Cuttings. (2009, May 1). Retrieved November 19, 2015, from http://www.gardeningknowhow.com/ornamental/shrubs/holly/holly-cuttings.htm

Propagating Holly. (n.d.). Retrieved November 19, 2015, from http://www.hgtv.com/design/outdoor-design/landscaping-and-hardscaping/propagating-holly

Deciduous Tree Grafting

Pear Tree Propagation:

peartrees

Image from:  http://www.pearrecipes.co.uk/how-to-grow-a-pear-tree-from-a-pip/

General Information:

The Pyrus or Pear Tree dates back to prehistoric times and there are currently more than 3,000 varieties. There are only three types of pears grown in the United States including European, Oriental Hybrids, and Asian pears. European pears are known for their taste and soft texture, but are susceptible to fire blight. Oriental hybrids offer a large range of tastes and textures and can be good for canning. Asian pears are the most resistant to fire blight and generally have a hard texture similar to an apple. The most common pear cultivar is the European Bartlett, but it is not usually planted in the U.S because of the susceptibility to fire blight. Those that are more common for planting in the United States are Magness Pear, Blake’s Pride,  Shenandoah, Potomac, Orient, Kieffer, Shinko, and the Korean Giant.

Pyrus trees grow at least 30 feet high and 20 feet wide. Those grafted onto dwarf rootstocks are limited to 15 feet high and 10 feet wide. Most trees will be oval in shape. Pear tree fruit has a distinct shape, but most Asian varieties tend to look more like apples. The fruit has a gritty feel to it  because of the stone cells in the flesh. Most Pyrus trees grow in the hardiness zones 4-9 and they need full sunlight. Partial sunlight will result in a poor harvest.

pear_tree

Image from: http://www.pearrecipes.co.uk/how-to-grow-a-pear-tree-from-a-pip/

Propagation Techniques:

Sexual Propagation (Seeds):

Seedlings are not identical to their parents, so every seed is unique. This type of propagation is inexpensive, quick, easy to perform, and produces a large number of plants. The rooting systems produced by seeds tend to be symmetrical and downward which is a benefit to growers. Seeds are generally removed from the fruit of the desired rootstock and planted after stratification. The problem with seeds in the genetic variability and that some varieties do not produce seed or only produce small quantities of viable seed.


Cuttings

Hard wood and soft wood cuttings success rates vary between 30-90%. The lack of

dependability is one reason why cuttings are not utilized as often. Hard wood cuttings are generally collected from current year’s shoots during the fall and immersed in auxin. Softwood cuttings are generally collected during early summer and immersed in auxin at high levels. These cuttings will be placed in a greenhouse and misted occasionally to harden them off for fall. Both types of cuttings require humid storage environments for roots to form. Early harvesting typically requires shoots to grow in the nursery for one year before becoming large enough to transplant.

Micro-propagation:

The replicate is a clone of the tree put into tissue culture which allows growers to keep the genes of their best trees when creating new orchards. This method is effective and quick,  but has high labor and equipment costs which is why its used by few for propagation of pears. Researchers are generally the only ones to use this, but it is thought that this method will become more common in the future. Seedling tops, young shoots or suckers are gathered from a mature pear tree. This plant material will then be sterilized and transferred to a nutrient rich medium with sugars and plant hormones. It is important that the plant material contains an auxiliary bud. Long day periods of light allows the bud to produce new shoots. After shoots begin to form, the culture is exposed to darkness followed by short-day periods of light to allow for proper growth. After a while, the plants will be ready to come out of tissue culture or to be sub-cultured.

Grafting:

Grafting is the most common method of Pyrus propagation. Grafting allows growers to quickly swap out different bud wood, but keep the full grown rootstocks, so that they do not have to wait 30 years for the trees to fully mature before receiving bountiful harvest.

The materials needed are the scion wood which is the wood that  contains the bud, the rootstock which houses the well developed roots, a fine-toothed saw, pruning shears, grafting knife, grafting wax, and string.

Step 1: Selecting the Scion- It is important to select bud wood that produces good fruit and is free of diseases or pathogens. It should meet the requirements that the individual growers is looking for regarding flowering, fruiting, and form.

Step 2: Gathering the Scion- The scion needs to be removed after the tree has gone dormant which is typically late fall or early winter. The cuttings should be small twigs of new growth, They should be no wider than a pencil and about 8-12 inches long. If they need to be stored, it must be done in an air tight plastic bag with high moisture and placed in a refrigerator. Scion wood is typically stored until spring when the grafting can occur outdoors.

Step 3: Selecting the root stock-  You are looking to select a hardy and disease resistant plant to be the rootstock. The seedling should be one to two feet tall and have ample roots.

Step 4: Remove scion from storage- After it is a safe time to begin working with plants outside typically after the concern of frost is behind us, the scion wood should be removed from storage.

Step 5: Selecting the graft type- Either a cleft or an inverted t graft can be done.

A cleft graft involves cutting both side of the scion wood towards the base to form a tapered wedge. The rootstock then receives a slice down the center of it. The cut should only be as deep as the exposed area on the scion wood. A screwdriver can be used to hold the cleft wider until the scion is securely pushed in. Care needs to be taken to prevent breaking either portion of the graft. String can be used to tie the graft union together tighter if the scion seems to fit looser than it should. It is important to ensure that the two pieces have permanent contact with no air spaces in between them. After the union has been made, grafting wax should be applied and cover the entire length and width of the graft to prevent desiccation and drying out. It may also be important to apply was to the exposed tips of the scion to protect them as well. Attaching a plank to the tree to support it will it heals and protect it from the wind and animals is essential.


cleft_graft_

Image from: http://etc.usf.edu/clipart/23600/23677/cleft_graft_23677.htm

An inverted t graft uses only buds from the scion wood and places the buds into the root stock. To remove the bud, a small knife is used to gently shave off the twig from the top down. It is important to not touch the green side of the bud to prevent contamination. The bud should be removed by holding the outside bud left from when the leaves were removed. An inverted or upside down t should be made into the rootstock. It works best when the cut is made between buds, not by removing the bud of the rootstock. Once the cut has been made, the scion bud should be gently worked into the t cut until it rests beneath the tree bark. The buds can be grafted anywhere on the scion as long as it is roughly 6 inches above the soil. Once the bud is in place, it should be wrapped with parafilm or electrical tape to hold it in place. It is important to wrap around the bud. The bud can only grow through one layer, so if it gets covered it must only be once.

tbud

Image from: generalhorticulture.tamu.edu

Step 6: Caring for the Grafted Tree- It is important to care for the grafted tree similarly to caring for a seedling. After 2-3 weeks, you can unwrap the graft union and check to see if it has taken . With the cleft graft the scion will begin to produce green buds. With the t-bud, the bud will be green if it has taken and brown if it had failed. The buds should be left unwrapped. A cut needs to be made 2 inches above the bud about 3/4 of the way around. This portion of the scion will be removed and the bud will be allowed to grow as the main trunk. Do not remove the old trunk until the bud is about 4 inches in length.

Conclusion:

While there are many methods to propagate a Pyrus tree, the most common is grafting. Pyrus trees can be grafted using multiple grafting and budding techniques. Grafting is the most common method because it is less expensive and allows the grower to quickly and effectively change the cultivar of pears growing in their orchard without starting from scratch with a seed or seedling.


Resources:

Hartmann, H. (2011). Techniques of Propagation by Cuttings. In Hartmann & Kester’s Plant Propagation: Principles and Practices (8th ed.). Upper Saddle River, NJ: Prentice Hall/Pearson.
How to Graft Pear Trees. (n.d.). Retrieved November 10, 2015, from http://www.gardenguides.com/77092-graft-pear-trees.html  
How to Graft a Pear Tree. (n.d.). Retrieved November 10, 2015, from http://www.gardenandflowers.com/how_6399386_graft-pear-tree.html
Pear Propagation. (n.d.). Retrieved November 10, 2015, from http://fruitandnuteducation.ucdavis.edu/education/fruitnutproduction/Pear/Pear_Propagation/
Pear Tree. (n.d.). Retrieved November 10, 2015, from http://caseytrees.org/tree-species/pear-tree/

Herbaceous Plant Tissue Culture- Hosta

OneDom Textures-Hosta Pack01-Display-T000146-512 v2

https://marketplace.secondlife.com/p/ONEDOM-12-Hosta-Textures-Variety-Pack-1-512×512/1612240?id=1612240&slug=ONEDOM-12-Hosta-Textures-Variety-Pack-1-512×512

Introduction:
The Plantain Lily, Hosta is a shade tolerant perennial that is used for its’ foliage more than its’ flowers. Hostas originated from Japan, China and Korea, but were introduced in Europe in the late 1700s and the United States in the mid-1800s. There are low maintenance and drought resistant plants. Hostas grow best in rich, organic soil that is well-drained and slightly acidic. Organic material will often need to be added to soil to add in growth. While Hostas are tolerant to shade, it can be limiting to growth, so the best conditions to grow a Hosta with exposure to morning sun and afternoon shade. In general, white or golden plants can tolerate more light than the blue leafed varieties.
The foliage tends to have an eye-catching appearance that many love to use in flower beds. Hostas vary greatly in size, shape, color and texture. The plants can either have variegated or solid leaf colors that vary from blue, green, white or gold. The flowers on Hostas are spikes of lavender or white and resemble small lily flowers. Different cultivars are being bred in hopes of producing larger, more desired flowers.
Propagation Methods:
There has been a large increase in the demand for Hostas and the number of cultivars available. To meet this need certain propagation methods are utilized more than others.
Seeds
Hostas can be propagated by seeds, but it is severely limited to producing plants from seeds that result from selected crosses made by hybridizers. Uncontrolled propagation tends to lead to poor cultivar production or no production. Seeds can be placed directly into the ground, stored in cool, dry environment for a short time, or a slightly longer time in a refrigerator. Seeds should be broadcast onto a fine textured medium that is moist and about 60-75 degrees F for good germination to occur. Seeds tend to take the longest of all propagation techniques and since seeds tend to not be viable, other methods such as division and tissue culture are utilized more frequently.
Division
This is the most common method of propagation for Hostas. Plants are generally dug up and divided in the spring when shoots are typically dormant. The greatest division occurs in the third spring of growth. Division requires care when separating plants to prevent the removal of terminal shoots and dormant buds. Division can be done at other times of the year, but additional work is done before planting. Hostas divided in the late fall or winter should have the leaves cut back and be placed in the shade. Summer division should result in full removal of leaves. Younger plants can be easily pulled apart, whereas older plants are harder and may require knives and pruners to separate. Large vigorous plants should be used to increase the number of division and provide heartier plants. The downside is that division requires a larger number of plants and established plants to be successful.

Tissue Culture Propagation:
Tissue culture is utilized because of the slow production of plants by division. Without tissue culture methods, hostas would not be a part of most landscapes today.
Success in tissue culture is directly related to the sterility of the plant material, tools and media. It is important to ensure that all materials are clean and sanitized before and during use. All tools should be sterilized and placed inside the laminar flow hood. The work surface under the hood should be sterilized with disinfectant.

Medium Preparation-
Medium must be prepared in advance to ensure proper gelling. The medium will contain macro and micronutrients, vitamins, and growth hormones often auxin and cytokinin. The medium is mixed and autoclaved for roughly 15 minutes to kill off any bacteria or pathogens. The mixture will then be poured into sterile dishes where it will gel up. The dishes should be placed under the laminar flow hood.
Budimage from: http://www.hostamill.be/ENG/ENGCare/ENGHCTissueCulture.htm

Preparation of Explant-
The explant will be selected and removed from the host plant. The explant should be a bud with a piece of the crown still attached (see above image). The bud should be taken after the lower flowers have bloomed and the leaves has begun to unfurl. The material will be placed in a 10% Clorox solution to disinfest the material. All jewelry should be removed and hands should be washed thoroughly up to elbows before putting on gloves. The bleach solution should be stirred to ensure the explant is fully submerged in the solution. After the plant material has soaked in the Clorox for 15 minutes, it is removed and dipped in each of the three sterile water boxes to ensure removal of Clorox from the plant. The plants should not be left in the solution for more than 15 minutes or the bleach will cause excessive damage to the plant material and render it useless. After the plant had been removed and rinsed, it can be placed in an empty, sterile petri dish. Any bleach damaged material should be cut off and discarded at this time.
Plant-Tissue-Culture-Media-Preparation-440576_imageImage from: http://www.hotfrog.in/business/Central-Drug-House-Pvt-Ltd-CDH/Plant-Tissue-Culture-Media-Preparation-440576

Placing Explant in Medium-
Once the explant has been disinfested and the damaged material has been removed it can now be placed in the medium. Using forceps that have been sterilized in the bacticinerator, remove the explant from the petri dish and place the crown portion of the explant into the medium in the dish. Be sure not to press the explant through the medium, but to ensure that it is in good contact with the medium. Once the explant is placed in the dish, the lid should be placed on and wrapped with parafilm to reduce pathways for pathogens and bacteria to enter the culture.

Incubation-
Once the explants are placed in the media and properly sealed, they should be placed under lights for an incubation period. The temperature should be around 25 degrees C.

After Propagation-

Cultures should be monitored to check for contamination. Growth of different colored bacteria in the culture dish makes contamination easy to spot. Fully contaminated specimens need to be disseminated and disposed of. Cultures that are not fully contaminated can be separated and transferred to new, clean growing material. The germination container should be resealed and placed in the incubator.

Hosta-TC-01

image from: http://www.plantsgalore.com/care/hostas/Hosta-propagation-TC.htm

Movement to Greenhouse-
After the plantlets have developed good roots and shoots, they need to be removed from the growing medium (see above image). The roots should be rinsed with care to remove excess medium and prevent damage to the plantlets. The plants will be divided one last time and placed in a container of potting media. This is known as the ex-vitro phase of tissue culture. Plants should be placed in a high-humidity greenhouse. After the plants are acclimated to the greenhouse environment, slowly decrease the humidity levels to gets them hardened off and ready for sale.

Conclusion:
Hostas offer a wide variety of plant styles for each unique taste. The beautiful foliage makes them desirable for those who want color in the flower beds and the lily-like flowers only add to the beauty. While tissue culture has side effects and can be expensive, it is still the preferred method for quickly propagating Hostas for use in flower beds. Without tissue culture, Hostas would be much harder to come by and they certainly would not have spread as quickly as they did.
Resources:
Dunwell, W. (n.d.). Hosta Propagation. Retrieved October 18, 2015, from http://www2.ca.uky.edu/HLA/Dunwell/HSTPRP.html
Hartmann, H. (2011). Techniques of Propagation by Cuttings. In Hartmann & Kester’s Plant Propagation: Principles and Practices (8th ed.). Upper Saddle River, NJ: Prentice Hall/Pearson.
Hosta Multiplication Kit. (n.d.). Retrieved October 18, 2015, from http://www.phytotechlab.com/pdf/HostaMultiplicationKit.pdf
Ohio State University Extension Fact Sheet. (n.d.). Retrieved October 18, 2015, from http://ohioline.osu.edu/hyg-fact/1000/1239.html
Propagation: Multiplying Hostas by Tissue Culture – Plant Insect, Disease and Environmental Problem Information from PlantsGalore.Com. (n.d.). Retrieved October 18, 2015, from http://www.plantsgalore.com/care/hostas/Hosta-propagation-TC.htm

Deciduous Shrub Cuttings- Hydrangea

hydrangeaimage from: <http://hydrangeamania.com/id6.html>

Introduction
Hydrangea is a common deciduous shrub that produces large heads of clustered flowers. It is a highly desired cut flower for use in floral arrangements. There are numerous types of hydrangeas, but the most common is the Hydrangea macrophylla which consists of the mopheads and lacecaps. These hydrangea have thick, crisp leaves with toothed edges. Other types are the PeeGee, which grow into small trees and the Oakleaf which has foliage that reddens in the fall. Hydrangeas typically flower from summer to fall and prosper in zones 4-9.
Flower color depends largely on the pH of the soil and not the variety of the plant. An acidic soil with a pH level of 4-5.5 will have higher aluminum content leading to a blue colored flower, but a neutral or slightly alkaline soil will result in a pink colored flower. Adding aluminum sulfate to the soil will increase the acidity and produce blue flowers and adding lime will create an alkaline soil and pink flowers. The flowers can vary from blue to purple to pink or any combination of those colors. Optimal soil conditions for hydrangeas are a moist soil with proper drainage that is rich in nutrients.

Cutting Propagation
Stock Plant Considerations:
The stock plant should be actively growing under optimal nutrient and environmental conditions to ensure the best rooting of cuttings. Cuttings should be taken from a stock plant that is free from disease and pathogens. Any disease in parent material will infect and kill cuttings. Tools should be properly sanitized between stock plants to prevent any transfer of disease or pathogens.
Selecting a cutting
The first step is to identify a proper cutting. The ideal cutting will be a stem with no flower that is new growth. New growth will be a lighter color. Colder climates force hydrangeas to die back every year, so all growth will be new growth in this case. The time to take a cutting would be fall as the plant is going dormant, but still has leaves. The cutting should be taken in the morning when the plants are the most turgid because they will have the highest water and nutrient levels at that time. Cutting material with a small degree of flexibility is desired, but not real tender material because it will desiccate faster. Ideal material would be able to bend, but will break when bent sharply.
Steps:
website

Image from: http://hydrangeashydrangeas.com/propagation.html
1. After a proper stem for cutting has been identified, a 4-6” cutting is taken just below a leaf node which is where the leaves grow out from the stem. The cutting should have at least 2 nodes on it. (see picture #1)
2. All but the top set of leaves should be stripped from the cutting. (see picture #2)
3. Cut the remaining leaves crosswise, not lengthwise to about half their original size. This is done to decrease the surface area and use of energy when the cutting will be trying to develop new roots. (see picture #3)
4. Dip the cutting into auxin, a rooting hormone. Most common application is 1000 ppm IBA or NAA. This step is entirely optional because the cutting will root without the hormone. However, utilizing the rooting hormone will result in quicker root development.
5. Place the cuttings into the damp, sterile material of your choice. Vermiculite, potting soil or sand can be used.
6. Cover the pot with a plastic bag. Be sure to use stakes to prevent the bag from touching the leaves.
7. Place the cutting in a sheltered location out of direct sunlight. The cuttings need a well-lit area, but the direct sunlight will cook them in the plastic bags.
8. Check the cuttings daily to ensure the soil is damp and there is no signs of disease or pests.

Do not water the cuttings until the soil begins to feel dry to prevent overwatering and rotting.
The cuttings will begin to develop roots within a few weeks. If you can tug on the cutting without removing it from the soil, it has a substantial root system developing. After a few months the cuttings should be rooted and ready to be sold or planted to become future stock plants.
Other Propagation Methods
Seeds:
Hydrangeas can produce beautiful flowers, but rarely produce seeds. This is why seed propagation is not a common way to propagate hydrangea plants. Seed propagation can be easy, but the seedlings do not always display the desired characteristics.
Ground Layering:
Ground layering is a very easy method to propagate hydrangea, but is severely limited by the number of stock plants. A branch or several branches close to the ground are selected. About 5-6 inches of leaves are removed to create an area to bury. The cleared area is scored on the side touching the ground and at least one leaf node is placed in 2” trench and covered with soil. The roots will sprout from the leaf node. The branch stays attached to the parent plant until roots have properly formed. A brick or similar object are placed on the buried area to prevent the stem from standing back up.
The roots will form quickly, but the plant may experience shock when detached from the parent plant and will require additional care and attention. One possible solution to this problem would be to keep the cutting buried for few weeks after it is detached from the mother plant. The limitations of this type of propagation are the main reason cuttings are used more often.
Pot Layering:
Pot layering is similar to ground layering, but instead of burying the cleared area in the ground it is placed in a small trench in a pot. The pot is cut down both side to allow the stem to lay across it without damaging it. The plant is then cut from the parent plant as it would be with ground layering, but the shock seems to be decreased. This method may help reduce the stress to the cutting, but is still limited by the number of available plants.
In-vitro Propagation:
There is not much information available on in-vitro propagation for hydrangeas, but there is research being conducted about the effects of sterilizers and hormones on hydrangea tissue. It is hypothesized that tissue culture could be an effective way to create clones of hydrangea similarly to cuttings.
Conclusion
The hydrangea is a beautiful shrub with large flowers perfect for use in floral arrangements. There are numerous ways to propagate hydrangea, and while none of them are wrong the easiest way is through cuttings. Cuttings require less care than layering techniques and allow for more plants to be propagated from one plant. Seeds produce plants with varying characteristics, but cuttings produce clones of the parent plants which ensure the continuation of desired characteristics. Stem cuttings are by far the easiest and most reliable way to propagate hydrangea plants, but all methods will create viable seedlings.

References
Abou Dahab, T. (n.d.). In vitro Propagation of Hydrangea macrophylla Thunb. Retrieved October 8, 2015, from http://www.acgssr.org/BioTechnology/V101January2007/Full_Paper/

Hartmann, H. (2011). Techniques of Propagation by Cuttings. In Hartmann & Kester’s Plant Propagation: Principles and Practices (8th ed.). Upper Saddle River, NJ: Prentice Hall/Pearson.

Hydrangea. (n.d.). Retrieved October 8, 2015, from http://www.bhg.com/gardening/plant-dictionary/shrub/hydrangea/

Manipulating Hydrangea Flower Color – Hydrangea Bouquet. (n.d.). Retrieved October 8, 2015, from http://flowersbulbs.com/ql_hydrangea_color.htm

Propagation of Hydrangeas. (n.d.). Retrieved October 8, 2015. http://hydrangeashydrangeas.com/propagation.html

Propagating Hydrangeas: How To Root Cuttings From Hydrangea. (2009, June 11). Retrieved October 8, 2015. http://www.gardeningknowhow.com/ornamental/shrubs/hydrangea/hydrangea-propagation.htm