Mastering Fonts
Now that we have established the basic tools needed for calligraphy, it’s time to move into the components of the art itself. In this post, I will be talking about different fonts and how I decided which to use.
The first thing I do when picking a calligraphy font, as strange as it might sound, is letting the words speak to me. I usually make calligraphy out of song lyrics, so I try to interpret the emotion of the song to the font. For example, if a song or words are more intense or harsh, I tend to use fonts with straight lines and edges. If a song is sad or soft, I usually go for a more curvy, cursive like font. If I’m not writing song lyrics, I will just go to Google Images, type “calligraphy alphabet”, and use one of those alphabets as reference.

"Calligraphy Alphabet" from Google Images

This is the reference I use most often
Especially for beginners, it is important to use references when writing. This ensures that the letters look of a consistent font. Otherwise, the art may look scattered and incoherent. References can also be very useful when trying to memorize different font types. I, for one, didn’t know how to write all the letters of basic calligraphy fonts, but after using a reference alphabet, I know memorized it! However, I still sometimes will go back and have a reference in front of my when writing.
Another key to mastering fonts is practice. That cliche “practice makes perfect” really does apply when it comes to art, especially calligraphy. There are traceable print out sheets that can be used to practice. Also, because it is rather discrete, if you’re bored in class (as we all are at some point), you can write out the calligraphy alphabet in your notebook. The bottom line is PRACTICE, PRACTICE, PRACTICE.
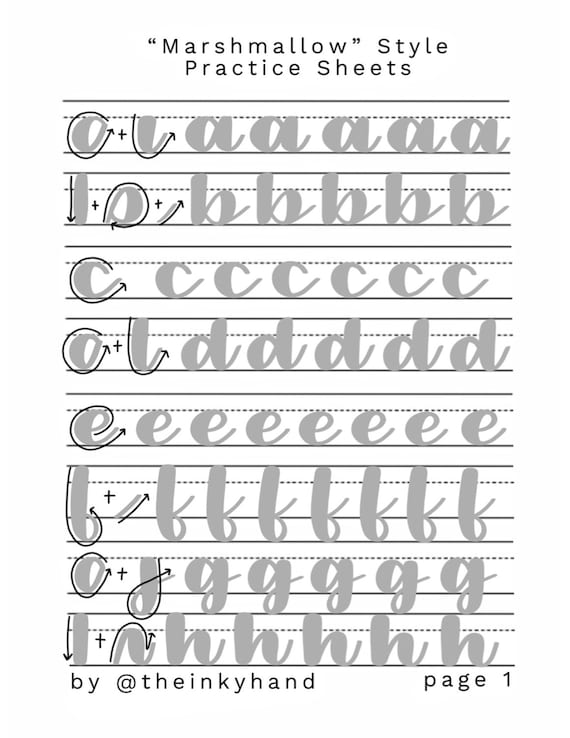
Example calligraphy practice sheet
Other way to perfect calligraphy fonts is writing out guide lines and making rough sketches of the letters before going over them with a more permanent writing utensil. By this, I mean make lines using a ruler across the paper at the height you want the letters to be. This will give you a point of reference for the size of the letters, so they will remain consistent. Writing out the letters in pencil will also prevent mistakes, so you don’t have to start all over if you mess up. When I first began doing calligraphy, I would sketch out ever letter then trace it with marker or pen. I am sure this saved me from redoing many works of calligraphy. Even though it’ll take longer, it will help you improve in the long run.
After mastering the fundamentals of fonts, feel free to take artistic liberties with them! For example, what I tend to do instead of keeping a constant font size is make words I want to emphasize larger or in a different font. I will also make my strokes a little different than reference letters if I do not particularly like how a certain letter is written.
Using different fonts is one of my favorite parts of calligraphy! I hope to memorize many different fonts and maybe even come up with a font style of my own!
Calligraphy Basics: Other Enhancement Tools
I am particularly excited about this post because, for the first time, I will be posting pictures of some of my own calligraphy!
First, I will start by talking about my new found favorite part of calligraphy: embossing. Embossing is used to give texture and shine to the calligraphy. Embossing powder is made of powdered plastic and, when heated, the plastic melts to create a continuous line. There are several different types of embossing powder. These range from original to ultra thick, though they all basically have the same effect. However, in order to use embossing powder, you will need a few other supplied. The first of these supplies is embossing pens. These pens hold the embossing powder to the paper, but, in my own experience, the embossing powder can easily be removed from the marker line if there is a mistake. Embossing pens usually come in either black or clear. I have yet to see a colored embossing pen, but they may be out there! Another tool needed for embossing is a heat gun. A heat gun, as the name suggests, heats the embossing. This melts the powder and gives it its shiny finish. A heat gun seem pretty similar to a blow dryer, but in use, a heat gun has a weaker air flow which keeps the embossing powder from being blown off the text. Using embossing in calligraphy may be a little expensive, though. Heat guns usually cost around $25. For my embossing set, I got a set of two markers and three powders which together cost another $25.
Valentine's Day Embossing
Other tools I like to use is, surprisingly, markers. I am not talking about high end, professional artist grade markers. I use Crayola brand, easy wash markers. Another surprise is that I don’t use them to write with. I instead use them to make backgrounds for my calligraphy. These markers can be used to write those. Their slightly firm but also flexible tip makes them good for beginners who are looking to learn calligraphy. They also can easily watered down to make a tie dye effect on paper. I will demonstrate the technique for doing so in a later post. They can also be used to add designs around the calligraphy such as hearts, flowers, or simple swirls. The best part about these markers is that they are cheap! A ten pack of Crayola markers costs only $2.49 at Target, yet have the quality to enhance artwork.
Paint is also another valuable background making tool. It can be used to make a painting to put behind your calligraphy. There is also a technique that I have developed myself that is similar to the technique used for the markers to make a background that can add an interesting element to the calligraphy. This will also be described further in a later post.
Background using paint
Glitter can also be used to enhance calligraphy. It can be used as a background, to just enhance a background, or even to make the actual words of the calligraphy. Everyone is probably familiar with glitter, so I feel that I don’t need to elaborate much further.

Glitter glue calligraphy
This concludes my discussion of tools used for calligraphy. Further posts will discuss techniques and fonts!
Calligraphy Basics: Paper
Yes, that’s right, this whole post will be dedicated to paper. I know it may be pretty boring, but it is as important to calligraphy as any other part of it. Different types of paper can affect the art and the longevity of the artwork.
First, let start with an important part of calligraphy, the types paper, because if you don’t have the right paper, what are you going to do calligraphy on! There are several types of paper, some of which work well for calligraphy and others that do not. The most common type of paper (and the one I and most people use most frequently) is copy paper. This is the type of paper is used to print as well as to write on. and is smooth and thin. Art paper, which is probably the best option for calligraphy, is thick and more textured than copy paper. This type of paper is also good for backgrounds because it can hold paint and watery substances more readily. The only down fall of art paper is that it is more expensive. Another higher quality paper is cardstock. This type of paper is very stiff, yet smooth and thin. The durability of the paper is good for different projects such as making cards. Construction paper is similar to cardstock but it is not stiff. Ink will soak readily into this paper and may even soak through, so it is a good idea to have something protecting the writing surface when using this type of paper.
I mentioned paper thickness and surfaces of paper, but I feel I need to expand on that a little bit. Thickness of paper is described by the weight of the paper, meaning heavier paper is thicker than lighter paper. Thicker paper can have it advantages. It is handle more erasing, which is beneficial especially for beginners, and liquid-y substances including ink and watercolor that can be used for backgrounds. There are also different types of paper surfaces. With rough paper, the texture is visible and can be easily felt. This type of paper is good for dry and powdery substances, such as embossing powder or glitter, because the texture is better for holding the powder. There is also cold pressed paper. This paper is made the same way as rough paper, except it is smoother because it is pressed more than rough paper. Cold pressed paper is also good for holding powdery pigments, but does not hold them quite as well as rough paper. This paper is good for watercolor used for backgrounds of calligraphy and for other drawings. The smoothest type of paper is hot pressed paper. Hot pressed paper has a harder surface, so it won’t absorb substances quite as well, but is still good at holding ink. Different material used to make paper can affect how long it will last. Recycled paper is made of bigger pieces of pulp, so it will not last very long and will eventually begin to decay. There are also acid free papers that will not be as susceptible to the browning that occurs when paper is exposed to air for long periods of time.
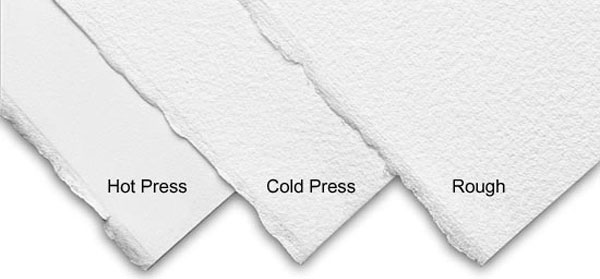
Types of paper surfaces
Even though this post was rather dull, paper is important to good calligraphy. Next post, and a post I am particularly excited about, I will be discussing supplies for enhancing works of calligraphy!