As a student at Penn State, its practically impossible to not get caught up in the school spirit. Whether you’re going to a sporting event, social gathering, or just class, its always a good time to sport Nittany Lion attire. And there is no better canvas than your very own nails to express to the world that you bleed blue and white.
As cool as it would be to paint the Lion’s head on every nail, it would be a tedious process requiring an immense amount of patience and time – something a lot of college students don’t have. A simple yet effective design for portraying one’s undying loyalty to Penn State is the paw print. Symbolic of the Nittany Lion, its the next best thing to the actual PSU logo. And of course, this is one of the easiest and quickest nail art techniques to achieve.
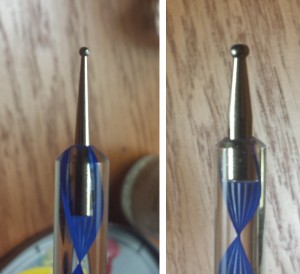
You’ll need a navy blue nail polish, a white nail polish, and a dotting tool of some sort. Actual dotting tools work best if you have them. I purchased a set of five double-ended dotting tools off of Amazon for a little over a dollar, each tool having different sized points at both ends to allow for a variety of dot sizes. Dotting tools may also be available in the makeup section of your local department store seeing as how nail art’s popularity is growing and more tools are becoming available anywhere nail polish is sold.
Don’t worry if you don’t having a dotting tool, there is an almost equally effective alternative that you are guaranteed to already have – a bobby pin. The bobby pin just needs to have a rounded end in order to achieve a perfect dot. A toothpick might also be good for smaller dots, but I don’t prefer this as a dotting tool.
Once you have your nails painted your choice of base color, create a small pool of the polish you are going to use for your design. Creating a pool to dip from is a lot easier than using the brush to apply polish to your dotter.
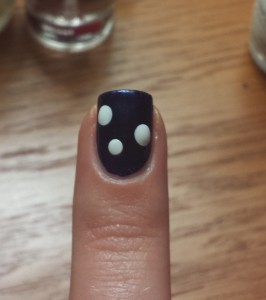
First take the larger end of your dotting tool, dip it into the pool of polish, and press down three big dots on your nail, staggering them so they aren’t right next to each other. If you’re using a bobby pin, apply a liberal amount of polish on the end to ensure your dots will be as big as possible. Vary the sizes of the three dots to add interest.
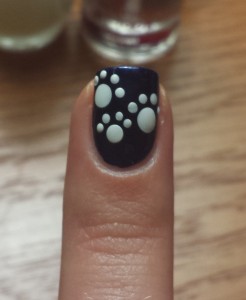
Next, take the smaller end of your dotter and lightly dip it in the polish. Apply four dots around each big dot in an arch shape to form the paw prints. Follow the same method with a bobby pin. Make sure to leave plenty of room between each paw print so the dots don’t blend into some larger ambiguous shape.
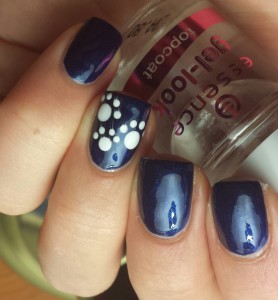
In a few minutes you’ll have little paw prints all over your nails! Just about everyone can create this design, no artistic skill needed. Its amazing how a few well placed dots can add spirit and visual interest to a boring manicure. So grab a dotting tool and show your Penn State pride!


This is a great idea! I really like how you did more than one paw print on the nail. It makes it more unique than the other Penn State themed nails I’ve seen. I also applaud you on your blog theme as a whole. It’s clear that you put a lot of time into your posts, since you need to paint your nails differently each week. The photographs of the nails all look great, and I know that requires extra time to take and upload the pictures. I will definitely be referring back to your blog if I ever decide to be creative with my nails!