Category Archives: Tech Tips

Tech Tip: Zoom apps now available

By: Ryan Johnson

Zoom app screenshot

Although there has been no official announcement from Penn State IT, Zoom apps has started to appear on our Zoom Applications.

Zoom Apps were released last year as a new type of in-product integration of popular web apps into Zoom. Currently over 50 apps are available in the Zoom Marketplace, however it appears only two have “officially” been added in the Penn State License, Timer and Virtual Backgrounds. Currently, it appears that you need to request for approval from the zoom admins any additional apps available in the Zoom Marketplace.

To get started with Zoom apps, follow the instructions below:

  1. Make sure you have the most recent version of Zoom available in Big Fix Self-Service. (While the most recent version is not needed, you need to be running a fairly recent version)
  2. Open Zoom and click the Apps tab (see above) in the desktop client.
  3. Click Discover to see the available Zoom Apps and add.

Zoom application screenshot for tech tip

To learn more about the new Timer App, please read the following marketplace description.

To learn more about the new Virtual Backgrounds App, please read the following marketplace description.

Tech Tip: What anti-virus can I run on my personal computer?

By: Ryan Johnson

Installing an anti-virus software program provides an additional line of defense against cyberattacks. Review below your options for your personal PC or Mac.

There are several FREE anti-virus software options available:

The good thing is Microsoft Defender should be set to run automatically.  You can verify this but doing the following:

Turn Windows Security real-time protection on or off

  • Select the Start button, then select Settings > Update & Security > Windows Security > Virus & threat protection.
  • In the current version of Windows 10: Under Virus & threat protection settings, select Manage settings, and then switch the Real-time protection setting to On or Off.
  • In previous versions of Windows 10: Select Virus & threat protection settings, and then switch the Real-time protection setting to On or Off.


Tech Tip: Present and collaborate with Solstice

By: Ryan Johnson

Solstice logo graphic

Did you know there are almost 100 Solstice pods installed across the University Libraries at PSU?

Solstice enables users to simultaneously share content to a room display using their laptops and mobile devices.  Any number of users can instantly connect, share and control content, improving wireless presentations, promoting classroom collaboration, and increasing meeting efficiency.  Share desktops with audio, application windows, videos, images and mirror mobile device screens to the display.  Sources are automatically tiled onto the screen for side-by-side viewing or can be positioned and scaled into any custom layout.

How to Connect:

  • Make sure that you are connected to the psu wireless network.  The PSU-Guest Wi-Fi will not work for Solstice.
  • First-time Users:  Open a browser on your device and type in the IP address that you see on the Solstice display in the room.  Follow the on-screen prompts to download the app for your device.
  • Returning Users:  Open the Solstice app on your device, and either connect to a Solstice display from the directory, or type in the IP address of a Solstice Pod.
  • When prompted, input the screen key shown on the Solstice Display.

To Learn more about Solstice, including all the locations at the University Libraries, please check out the Solstice Staff site page on the intranet.

Tech Tip: Reopen a closed tab in Google Chrome easily

By Ryan Johnson

Google Chrome is always adding new features to its browser.

A recent update (Available in Self Service to download) allows you to quickly reopen a tab you may have accidentally closed.

Google Chrome screenshot for tech tip

To reopen a tab, simply follow the steps below:

  1. Right-click on an empty space of your Chrome tab strip.
  2. Click Reopen closed tab.

You can also use a keyboard shortcut: Ctrl + Shift + T

Tech Tip: Tax season – avoid phishing emails

By: Ryan Johnson

avoiding tax season phishing scams graphic

Tax season is prime season for Cybercriminals.  If the IRS is going to contact you, they’ll initiate contact with a paper letter in the mail. The IRS will only call you in rare circumstances. Scam emails targeting consumers are not only from people pretending to be the IRS, but also from scammers impersonating TurboTax and other tax preparation companies. Never open an email supposedly from the IRS. And if you do, never download any attachments, or click on any links.

Here are some tips to prevent tax-related scams:

Check the True Sender
If you receive a suspicious email, check for more specific details about the sender of a message, including the sender’s email address. Often, emails from scammers use an address that’s just slightly different than a valid one. Always check whether the domain next to the sender’s address really maps to the sending company. Attackers often use typo squatting like TurboTax spelled like ‘turb0tax’ or ‘tarbotax’ to send fraudulent messages.

File Early to Avoid Scammers
File taxes today to prevent scams and keep an eye out for your return. Many of these scams rely on you not having filed your tax return yet, so if you get an email asking to file your taxes after you’ve done so, you can be sure it’s a hoax.

Report Any Suspicious Emails
Suspicious emails can be forwarded directly to phishing@psu.edu.  To view Phishing Security Alerts at Penn State, please visit the Penn State Security Website.

Don’t Click on Tax Emails
Refrain from clicking on emails that purport to contain sensitive information. If you see an email advertising news from TurboTax or another tax program, or from the IRS, go directly to the website to check your account. Remember, these entities will generally not ask for sensitive information like a Social Security number via email.

To read more about recent Tax Scams and Consumer Alerts from the IRS, please visit the IRS Consumer Alerts website.

Tech Tip: What you need to know about captions — training session Feb. 9

By: Ryan Johnson

Want to learn more about How to Enable or Create Captions in services such as Zoom, Kaltura, Teams or PowerPoint?

Please join me on Wednesday, Feb. 9th at 10 a.m. to learn more about Captions!

During this hour session, we will review what captions are, Penn State policy,  and what the difference is between captions, subtitles, and transcripts and why they are important for accessibility.

You will learn how to enable, create, and add captions to such services as Zoom, Kaltura, Microsoft Teams, PowerPoint, and Google Services.

Objectives

  • How to Enable Closed Captions in Zoom
  • Order, Enable and Edit and Captions in Kaltura
  • Using Captions in Google and Microsoft Products
  • Learn About Accessibility Resources Available at Penn State

The session will occur at https://psu.zoom.us/my/ultraining and will be recorded. You can also visit a NEW training page on the staff site on captions.


Tech Tip: Distribution lists (groups) – Who manages them and who are the members?

By: Ryan Johnson

Following up to a recent tech tip How to find out what email lists and listservs I’m on or manage, let’s talk more about Distribution lists.

Distribution lists (sometimes called distribution groups) are the solution for Outlook Web App users to communicate and collaborate with colleagues by creating a mailing list within the Office 365 outlook application.

Note: Distribution lists are NOT managed by Strat-Tech and to join a distribution list you would want to contact the owner.

The easiest way to know if a list is an Office 365 Distribution list is if the email is using the naming of @psu.edu instead of @lists.psu.edu.  @lists.psu.edu would signify a Penn State listserv or user managed group(UMG).

If you know the name of a library email list you want to join or know more about, simply add the name in the To: field in Outlook.  If it’s a distribution list, the name will appear or if you don’t know the entire name you can search as well.

In the example below, see how ul-ulibs appears but the name has @lists.psu.edu, this is NOT a distribution list, this is a listserv managed by Strat-Tech.  However, distribution lists do appear in the search, and the names are followed by @psu.edu.  These lists can be researched to see what manages them and who are the members by selecting the list:

After finding a distribution lists you want to join or find more information out about, you can let the name autocomplete and then expand the list:

To open the properties of the distribution list click on the name, a new window will appear with two tabs.  About and Members.

In this example I will click on the ul-ulibs-travel-request distribution list.

Note: if you click on the plus sign and not the name, the members of the list will appear only). 

travel listserv screenshot for tech tip (2)

If you select the Members tab, a list of owners along with the members will appear.  To join a list, simply request on of the owners to add you.

Tech Tip: Meeting recaps with Microsoft Teams

By: Ryan Johnson

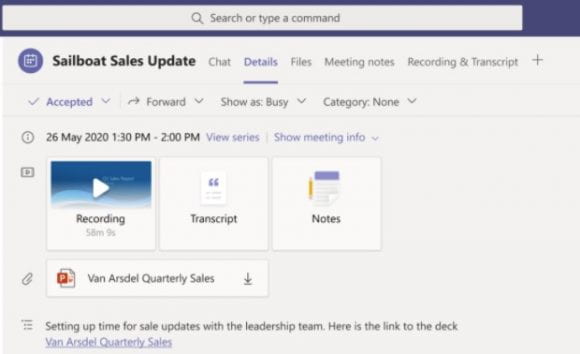
Teams meeting recap screenshot for tech tip

Microsoft Teams recently introduced a new Meeting recap feature, allowing participants to get a quick overview of important information after the meeting is over.

After a meeting ends, you can find a summary of it in the chat group that’s automatically created for the meeting. In the left sidebar of the Teams app, click the Chat icon. In the second column, look for the title of the finished meeting and click it.

The recap window includes the chat text, notes taken, and files shared during the meeting, as well as a video recording and transcription if they were created. If you’re the organizer of the meeting, an attendance report will also be included; it can be downloaded as a .csv file.

However, there are some limitations to consider as well. Microsoft says that this update will not be enabled on channel meetings. Furthermore, meeting participants will need to turn on the meeting recordings and transcripts to include them in the recaps, with support available for English transcription only.

Tech Tip: How can I see what email lists and listservs I’m on or manage?

With the retirement of the University Library Listserv application a few years ago, it may be difficult to know what email lists and listservs you are a member of or may have created or manage yourself. Below is the process you should try to follow:

The first thing you can do is to check the Library Listservs page on the staff site.  This page lists all the lists currently managed by Library Strategic Technologies.  For any questions or changes to these Listservs, please fill out a helpdesk request. Please note, members of the lists are not available on the web page itself.

Next, you can check the Penn State Listserv page, which is managed centrally by Penn State IT. Click on Subscriber’s Corner to see your list subscriptions.  Please note the Library Listservs don’t appear here.

If you don’t see your email list as a listserv, the next place to check would be Penn State Account’s page accounts.psu.edu.

User Managed Groups (UMG’s) are another platform for email lists.  A UMG is a list of people created and managed by one or more students, faculty, or staff members to facilitate one or more of the following:

  • Communication and collaboration with the individuals in the group,
  • Granting or restricting access to files, folders, websites, or other resources, and/or
  • Granting or restricting permissions related to those resources.

Select User Managed Groups icon on the accounts home page.  You can now view All My Groups or Groups I manage.


Finally, the email list you are looking for might be a Microsoft 365 Distribution list.  Distribution lists are accessible by clicking on your Settings icon in Outlook on the web.

Click on the search box under settings and type Distribution and click Distribution lists when it appears.

Tech Tip: How to create a contact in Jabber

By: Ryan Johnson

To add a contact to Cisco Jabber, do the following:

  1. Within Cisco Jabber, click File > New > Contact
  2. Enter a person’s name or ULID in the box.
    • As you start typing, matches will appear.
    • If Cisco Jabber returns more than one match with the same name, you can verify you are adding the correct person by right-clicking on the contact name. Then click View profile. The person’s details will be displayed to you including “his or her job title, phone number, and email address.”
  3. Once you have found someone you want to add as a contact, double-click the person’s name.
  4. Select the group to which you want to add the contact or create a new group for the contact.
  5. Click Add.

You have now added a contact to Cisco Jabber. Repeat these steps to add additional contacts.

Tech Tip: Add recipients to your safe senders list

By: Ryan Johnson

Library Strategic Technologies has received a few tickets regarding some users having Library Listserv email (such as ulibs) going to users junk folder in Outlook.

One way to help prevent this issue is to add recipients to your safe senders list.

Please follow the instructions below based on whether you use the Outlook Desktop App or Web Version:

If using the Outlook Desktop App:

To add people to your Safe Senders List, do the following:

  1. On the Home tab, click Junk, and then click Junk E-mail Options.
  2. On the Safe Senders tab, You can add email contacts by clicking on the add button.

safe senders list, blog post screenshot

If you are using Outlook on the Web, navigate to your Outlook settings -> Mail -> Junk Email

outlook screenshot

Then in the Safe Sender and domains section, click Add and add the email address.

Tech Tip: Forwarding Outlook email messages as an attachment

By: Ryan Johnson

How do I forward email messages as an attachment?

A common reason to forward messages as an attachment is to report suspected phishing email.  Forwarding as an attachment preserves helpful diagnostic information, which is lost when simply forwarding the email.

Outlook on the Web 

  • Click the + New message button to create a new message.
  • Find the message that you want to send as an attachment, click on it, and drag it over to the message body of the new message.
  • Enter relevant information in the ToSubject, and Body of the message.
  • Click Send.

Outlook Desktop Client (Windows)

  • In the Message List, select the message you wish to forward.
  • Press the CtrlAlt, and F keys, simultaneously.  A new message will open with an attached message.
  • Enter relevant information in the ToSubject, and Body of the message.
  • Click Send.

Outlook Desktop Client (Mac)

  • In the Message List, select the message you wish to forward.
  • Right click on the message (Press and hold the “Control” button while clicking).  A menu will open.
  • Click on Forward Special.
  • Select, As Attachment.  A new message will open with an attached message.
  • Enter relevant information in the ToSubject, and Body of the message.
  • Click Send.


Tech Tip: How can I protect myself from phishing?

By: Ryan Johnson

Phishing can cause serious financial damage, especially if you surrender your personal information to an attacker.

Remember: Penn State will NEVER ask you for your password, Social Security number, or other sensitive information via email.

BE WARY

Plenty of phishing attempts may have spelling, grammatical, or other glaring errors that can tip you off it’s a phish, but just as many don’t. Some of the most sophisticated phishing attempts will appear to come from people you trust.

Be wary of emails that ask you to open a file, click on a link, or enter information into a form. Be especially careful of emails that ask you to enter your Penn State Account information. Remember: you wouldn’t give a stranger the keys to your apartment. When you give up your Penn State Account information, you’re doing the same thing to your digital space.

If you are a student seeking employment, be aware there are a multitude of job scams out there.  Learn more about job scams by viewing tips from Career Services and Student Affairs.

CONFIRM BEFORE YOU CLICK

Use caution and trust your instincts. If an email seems suspicious, call the sender or email them directly. If you click on a phishing email “just to check” if it’s really from a friend, coworker, or classmate, it may already be too late. Even clicking on that link can infect your system with malware or other malicious code.

When in doubt, report it. You can always email phishing@psu.edu if you have concerns about a possible phishing email.

DETAILS MATTER

Sometimes, but not always, a cyber attacker will try to use information that they know about your organization to create a more authentic message. Read it carefully and think about the style and tone. Does it match how the sender’s usual writing style? Does it use terms that your organization does not? For example, Penn State doesn’t refer to your Penn State user ID as your “PSU user name.”

Tech Tip: Zoom — Adding gender and identity pronouns to your name

By: Ryan Johnson

Starting Nov. 10, Zoom users are now able to add pronouns to their display names and choose when to share them during a meeting or webinar.

To take advantage of the new pronoun feature, users must be using at least Zoom version 5.7.0.  To check what version you are currently running, please visit the zoom staff site page which has step-by-step instructions.

As a reminder, Zoom can be updated on University Library machines by using Big Fix Self-Service.

To learn more, check out the following Penn State knowledge base articles:

Change My Chosen (Preferred) Name (Zoom, O365 apps, PSU Email, Kaltura)

Tech Tip: Having issues logging into Adobe Creative Cloud recently? Try this!

By: Ryan Johnson

"activation error" creative cloud screenshot

Penn State IT has been receiving reports of Adobe Creative Cloud becoming “unlicensed”.   Most users can clear this error by following the steps below:

  1. Open your Adobe Creative Cloud app. 
  2. In the upper right corner, click your profile icon and choose “Sign Out”. 
  3. Now, sign back in. 
  4. Open Adobe Acrobat. You will be prompted to sign in, instead of getting the activation error. 
  5. Sign in.  
  6. Open any pdf file to verify your access has been restored. 

For more detailed information on how to sign out and back in with screenshots, please review the new staff site page on how to log out and back into Adobe Creative Cloud.

Tech Tip: Add ALT-text to images in Outlook emails

By: Ryan Johnson

Accessibility is not only important for documents you create but also for your daily emails.
Did you know you can add ALT Text to an image very easily to an email in Outlook?

When using Outlook on the Web, simply right-click on the image and select Add Alternate Text.

Next, enter your ALT Text in the window that appears. When creating ALT text, it’s important to remember that it should describe the image. It should NOT include information about copyright or any extra information that would be relevant to a seeing audience.

ALT-text Outlook screenshot

If you are using the Outlook Desktop Client, simply right-click on the image and select Edit ALT-Text and add your text in the window that appears.

For more information on how to make your Outlook email more accessible to people with Disabilities, please read the following article from Microsoft.  To learn more about Alt-Text, please visit the Penn State accessibility Website.

Tech Tip: All Zoom users must be running version 5.5 or higher by Nov. 1

By: Ryan Johnson

Zoom and Penn State just announced all Zoom users must be running version 5.5 or higher by Nov.1st.  After Nov. 1st, users will not be able to join a zoom meeting until they upgrade.

To check what version you are currently running, please follow the instructions below or visit the zoom staff site page:

Windows and Mac computers

  1. Within the Zoom app, select your profile icon on the top-right of the screen.
  2. Select Help, then About Zoom.

Zoom update screenshot

iOS and Android devices

  1. Within the Zoom app, select Settings on the bottom of the screen.

Updating Zoom (if necessary)

If your device is NOT on version 5.5 or higher, please follow the instructions below to update Zoom:

  • For University Library Machines – Please use Big Fix Self-Service to update Zoom.
  • For Corona laptops and Personal Computers feel free to download and install the newest version here:

https://rebrand.ly/psulibrarieszoom

  • iOS and Android Devices can update Zoom via their respective App Store.

Finally, please remember to sign out of your machines at least ONCE A WEEK to ensure updates are applied to your machines and to ensure proper operation of your computer.

If you have any questions or need assistance, please feel free to contact the Libraries Helpdesk.

Tech Tip: Duo Mobile app to get new look Oct 11

By: Ryan Johnson

Duo Mobile app screenshot for tech tip

Duo Mobile, the app used by Penn State for two-factor authentication, will soon release version 4.0.0 for iOS and Android devices. The new version will be rolled out to the Apple App Store for iOS devices and the Google Play Store for Android devices starting Oct. 11.

The new version brings changes to the current interface that include:

  • Updated positioning of the “approve”/“deny” buttons for Duo Push so that “approve” is on the right, a more natural location.
  • Improved accessibility of the app, including the addition of a landscape view, variable font sizes, and improved color contrast.
  • A more intuitive enrollment process.
  • A simpler interface with features that make managing accounts easier, including the ability to add an account nickname within the app.

The core functionality of the app is not changing. Users will still be able to receive a Duo Push, generate passcodes, add or remove accounts, and do anything else the current version of the app does.

Upon release, Duo will no longer provide troubleshooting support or bug fixes for any 3.x.x version of the app, though these versions will continue to work normally after the release of version 4.0.0.

Penn State students, employees and other affiliates who use the Duo Mobile app are encouraged to visit Duo’s YouTube channel to watch a brief video regarding the changes. Additional information is available on Duo’s website.