The Art of a Proper Pinwheel

It is now springtime! (That was said in a singsong voice; please, make note of that.) What does spring mean? Flowers and warm breezes. What do flowers mean? My ultimate happiness. Ah, but what so warm breezes mean? PINWHEELS. Today we are going to make this ever so classy, slightly pointless, but always fun toy. Get excited!

What you shall need to make art:

  • paper
  • decoration materials (pens, paint, tissue paper, glue, etc.)
  • something to let it spin on (pencis, long thing, etc.) (maybe)
  • a push pin (or a tack, if that’s what you call it)
  • scissors
  • wind (maybe)
  • springtime music (country music, if that’s what you’re into?)

Step 1: The Paper Preparation

Buy or steal find paper wherever you can! I chose some thick paper because it’s study. Once you have your sheet, make it square. I find the best method for this to be folding one of the corners up to the edge of the paper, making a triangle.

Then, tear off the little flap-part at the top. AND VOILA! You now have a square piece of paper.

(Side Note: Before this next bit, fold the paper the other way as well. So that each opposing corner meets. You want an “X” fold in the center of your square paper.)

Step 2: The Paper Pretty-ification

You can do whatever you want to decorate! I went for a semi-paper mache styled approach. First, I put glue on the paper.

 Second, spread it into a thin layer.

Third, rip of a piece of tissue paper. Then, press it down on the glue you just spread.

Look at how lovely it is!

Step 3: The Paper Pinwheel-ification

Now this is the tricky part. Remember how you folded the paper into a triangle both ways before? Good because that’s going to be important now!

Cut the creases on the four corners of the paper halfway to the center point.

When you’re done, it’s going to look like the image below.

Now fold every other flap into the center, pressing it into the pushpin in order to keep it down.

(Side Note: It is best to have the pushpin facing the opposite way than I have in these few demonstration pictures. You will see what I mean, when you see the final images at the end of this blog.)

Finally, press the pinwheel into a pencil (or other sort of long thing) for pinning or into a wall for a fabulous form of decoration!

Step 4: The Successes and Failures of All Pinwheels

Now, folks, I don’t know about you, but these things never seem to work properly for me… I could not for the life of me figure out how to get it to spin!

So, after some frustration, I turned this paper mache masterpiece into some wall art. I think it looks rather dapper sitting there on my board…

End Note: It’s been a pleasure to craft with you! I hope you’ve enjoyed this blog and all its content (puns and cheesiness included). You’ve been a FABULOUS audience! Now, as a final note of this end note, avoid paper cuts at ALL costs. You know the drill!

The Art of Sardonic Snow-Globes

As a precursor to this entire blog post, I would simply like to not that sometimes my crafts turn out to be such craftastrophes that it almost seems as though they themselves are mocking me…

All mocking aside, this is a PERFECT gift for the holidays. It makes for a great seasonal ornament and a fun craft to do when you just get that crafting urge! Oh, wait, am I the only one who gets that? Hmm…

These the items you may want to put on your Christmas list:

  • Hot Glue Gun (with hot glue sticks)
  • Not Super Glue (trust me)
  • Jar(s) (of your desired size)
  • Duct Tape
  • Water
  • Spoon
  • Decorative Ornament Things (as the beautiful centerpiece of your snow-globe – MUST be able to handle water without falling apart)
  • Glycerin (in liquid form – at least enough for 2 to 3 teaspoons per cup of water)
  • Glitter (and/or professional fake snow – it’s up to you and your bravery)
  • Optional: White Spray Paint
Okay, now brace yourself, folks – this could end badly.
Step 1: The Spray Job
This gives that great snowy fog/steam/haze look as well as a more professional look to your otherwise somewhat plain snow-globe. Just duct tape as depicted below! Only cover the parts that you do not want the snowy fog to reach. Also, be sure to cover the cap of the jar you are using! You don’t want paint on it because the remaning jar-look is actually appealing. It has a homey quality. Still keep the jar lid on – you don’t want to spray paint without it because you will get spray paint inside the snow-globe which dos not look appealing – trust me!

Find somewhere safe to spray; it makes a very permanent mess! Keep a decent distance from your container as you spray – you don’t want it to be too thick…

You’re aiming for a nice light frosting. See where the paint meets the duct tape below? There is that perfect spot where it fades just before it reaches the duct tape? That’s what you want! The only way to get this is by not spraying directly at the tape line; you just want the excess spray from spraying the bottom (or top) of the container.

Step 2: The Ornamental Placement

This is up to your discretion! You bought your ornaments and decorations, so it is up to you how you display them! I only have three words of advice – 1) glue the ornaments to the lid of the container (making that your base), 2) keep a decent amount of distance between your ornaments and the edges of the lid, and 3) Use hot glue – not super glue! I’d say about half an inch (or maybe a tinge less than that). Super glue does not work well with hot glue; they are NOT friends. Ornaments glued to the bottom seem to not want to stay – ever. And, if you put decorations too close to the edge of the lid, they either decide that they want to break or that they want to not fit. Either way, not a good time!

Step 3: The Liquidification of the Insides

Fill the container mostly to the top with water ( a little less than shown here)! Mind that you still have to put your ornamented base and some more liquid bit in here!

Add a tablespoon of sparkle (it makes the medicine go down) – or snow! If you feel you need more then you may be right – ADD IT! Then proceed to stir it all up very thoroughly.

Now add your glycerin (often found in pharmacies and supermarkets/grocery stores)! This is going to prevent the “snow” from falling too quickly. (Mind you, glycerin is apparently baby-laxative. Please, try to ignore this fact as you purchase it in the store – it can make things awkward… for everyone.)

Step 4: The Snowy Snow-Globe Beauty of a Job Well Done

The snowman snow-globe turned out perfectly! Enjoy making your beautiful masterpiece; I hope it will go to someone special and close to your heart. Good luck and happy holidays, folks!

End Note: This was my bigest craftastrophe yet. Glitter was everywhere, there was a leak in my container, the train broke (leaving train bits floating around) and wouldn’t stick to the lid, the train looked better at the base and refused to stay, I both superglued and hot-glued my fingers together, I cut my hand on that God-forsaken train, etc. etc. BE CAREFUL!

Just, please, make sure that you have something laid down to keep all of your mess in order, and don’t hurt yourself!

Keep it clean – keep it fancy!

The Art of Melted Crayon Masterpieces

Tis the Christmas season, and you know what that means – gift giving! Have you begun your search yet? That vast adventure into the uncharted lands of Toys “R” Us and Macy’s? If you ask me, those gifts are SO overdone! Instead, give them something that they can keep forever – something that you crafted with your heart (not your wallet). Why not give them a lovely new piece of artwork? Maybe something to do with everyone’s childhood memories, evoke a bit of nostalgia? Oh, folks, I’ve got it! How a bout a little do-it-yourself Crayola crayon masterpiece? Yeah, that’s what I thought too – such a fabulous idea!

What you need to make this gift gorgeous:

  • A Canvas (size is up to you)
  • A Lot of Crayons (make sure you get enough for the size canvas you have)
  • A Hot Glue Gun (danger warning – I hurt myself again – BE SAFE, KIDS)
  • Hot Glue Sticks (don’t be an idiot, the hot glue gun won’t magically work without them)
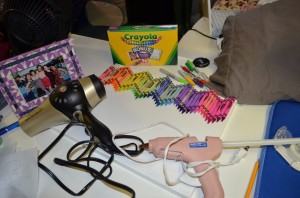
  • A Hair-Dryer (or blow-dryer or whatever else you call it)
  • Something to Cover the Surface You Are Working On (I was not that smart when I did this – it was an utter craftastrophe all over my friend’s desk… oops)

Step 1: The Crayon Collection

(At this time, you should cover the surface you are working on top of (i.e. desk, table, etc.).)

When picking the crayons you would like to use, I typically give one primary word of advice… CRAYOLA. Generic crayons just don’t seem to the trick, so don’t use them! Colors are up to you. Some people like the classic rainbow effect, while others go for a fifty shades of insert-color-here. I like a little bit of pizzazz to my paintings, so I added some glitter crayons (if you don’t already own them – invest now).

Now, I was lucky. I had two canvases of the same size when I did my craft, so I just taped the crayons I wanted to use to the other canvas and transfered them to the other canvas when I was ready to hot glue. You may not be so fortunate! I recommend measuring out your canvas, then laying a piece of paper that is that size down on a flat surface. Then place the crayons in the order that you want them in and in the design you want them in!

Most people to for the straight across look, but I was feeling a little crazy.

(A Tidbit of a Tip: DO NOT SKIP THIS STEP! If you try to go at this project all improv-style, it will not turn out the way you had hoped! Believe me, I’ve been there – it’s a long, dark, messy road.)

Step 2: The Hot- Hot Glue

After all your crayons are ready to go, you are ready for some hot glue! I recommend keeping all of the Crayola labels face-up on the canvas (so you have to put the hot glue on the directly opposite side of that), but it’s up to you and your ever-boundless creative license!

Carefully place the crayons the way you want them on the canvas that you will be using. (Please, be sure to take the plastic wrap off of the canvas first. – Just double-checking!) Don’t make the strip of hot glue too thick (or too thin) on the back of your crayon. Don’t worry it will stick, I promise!

(A Tidbit of a Tip: Be safe! Don’t accidentally hot glue your hand(s)/body-part(s)/clothing. I know, it happens… My hot glue gun and I have not been on good terms lately.)

Step 3: The Blow-Drying Disaster (but hopefully not)

Hold your canvas standing up before you begin blow-drying. Be sure that no crayons are too loose and falling off. Place it against something so it remains standing up (slightly tilted backward – that way when the crayons drip they drip onto the canvas and not onto the surface you are working on). Then be sure it is secure! Once you’re all clear, you’re ready to take off (no really, that’s what my blow-dryer makes it sound like).

Set your dryer to WARM and LOW. Don’t change these settings (or at least the “low” setting). You may need to change to the high setting (try not to – be patient), but you should definitely start on low heat.

Aim your dryer at the top of the crayons (top of canvas) and hold it in the place. Don’t move the dryer until the crayons are as melted and dripped as you want them to be. After that you can move on to the next section of crayons.

(A Tidbit of a TIp: Don’t move around your dryer! Then the crayons will not melt evenly. Also, aim your dryer DIRECTLY downwards on top of the crayons, which I did not do (oops). Otherwise, the crayon drippings really will spray in all sorts of directions. It’s not as pretty as it may sound, I promise.)

Step 4: The Visual Appeal (and Awe) of a Job Well Done

People will marvel at your craftactulous creativity! Plus, it is fun to make, so you can enjoy making the other two thousand crayoned canvases that your friends, family, and etc. ask you to make after they see this masterpiece! I’m not kidding – that really happens (even if your first one turns out absolutely awful).

Good luck and happy crayoning, folks!

End Note: Really, though – cover your surface and no hot-gluing yourself. I don’t want to be held responsible for any craftastrophes!

The Art of Acorn Squash: Take II

(Bakin’ and Shakin’)

Here is the second installment of our acorn squash adventure! This may be tricky for all you college students, but I have faith in you! Now, Halloween has long past, but don’t let this deter you from making this super simple and delightfully delicious dish. Acorn squash is still in season; plus it makes a fantastic little addition to a homey Thanksgiving dinner. The seeds of the acorn squash also make a great treat! They are the perfect snack for later and/or a fabulous appetizer for your guests. However, we may have had a few bumps along the way of this edible craft-esque segment of An Utter Craftastrophe…

Alright, you ready? Let’s get squashed (and seeded)!

What you will need for this not-so-daunting task:

  • A Squash (acorn squash, specifically) (if buying the squash a bit farther in advance, store it in a cool dark place until use)
  • A Knife (something sharp with sharp ridges – because they cut hard things better)
  • A Spoon
  • Foiled Tin (a.k.a. tin foil – c’mon, folks, I’m trying to fancy things up a bit)
  • A Cookie Baking Sheet (or just a baking tin)
  • Parmigiano Reggiano (the most Italian of the cheeses – making it the best)
  • A Little Salt ‘n Pepper
  • Olive Oil
  • A Full-Size or Toaster Oven (preheated to 425°F, please)
  • Cooking Spray (or, I suppose, you could just use olive oil)
  • Frank Sinatra’s and/or Michael Buble’s Christmas Album(s) (Oh wait, too soon? I DON’T THINK SO.)

Step 1: The Slice, Dice, Scoop, and Rinse (It’s like a dance move or something!)

(Preheat your oven to 425°F… NOW!)

Picking your soon-to-be-baked squash is a challenging task! You want something firm and preferably something hopefully tasty. Pick a firm (dark green skin with some orange – and no soft spots) and decently sized acorn squash (you can make multiple acorn squashes – don’t be afraid); then, please proceed to thoroughly clean and wash your selection.

Chop off the top of your acorn squash(es), as shown in the previous section of “The Art of Acorn Squash.” Use a spoon to scoop out all of the seeds and guts of your squash. Set the seeds aside and throw those guts in the garbage (or double dog dare your siblings to eat them for $1 and laugh as they have trouble swallowing the raw nastiness – then just let your dog have them because she is your very own life-like human garbage disposal). Then, lightly rinse out the inside of your squash! Don’t waste your time and tastebuds flooding the squash like I did… all for that one neat picture… Not worth it! After the rinsing, let it dry a bit.

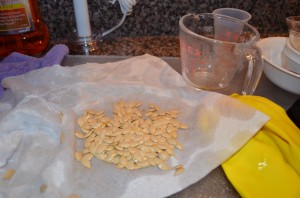
Rinse out the seeds however you see fit! Make sure they are all clean, shiny, and gut free!

Then, dry them out on a towel of some sort. Make sure they are completely dry; otherwise, the soggy seeds will not bake properly.

Step 2: The Half-Baked Scheme

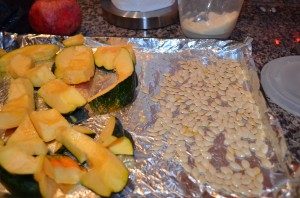
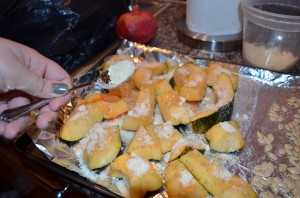
Carefully slice up your acorn squash as you deem acceptable and pretty. Make sure that the squishier yellow-ish/orange-ish side is facing up! Strips often seems to work out best. Before placing any squash or any seeds on any piece of tin foil, spray and spread a bit of cooking spray – or olive oil – so that nothing sticks where it shouldn’t be sticking! Place the acorn squash on one tray (somewhat spread out) and the seeds in a sort of pocket – or ball – of tin foil. Now, the pocket was not displayed here seeing as I didn’t realize that acorn squash seeds popped open when not contained in a covered, enclosed environment. This was something of a craftastrophe within my recipe… Just put all the seeds on a separate sheet of tinfoil; then, ball up the sheet of tinfoil after you put what you want on the seeds.

Drizzle a little olive oil on top of it all. Don’t drown it – drowning anything never works out well!

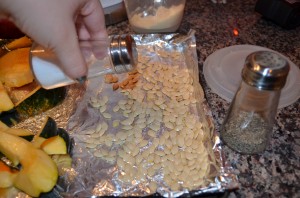
Then a little dash of salt!

Then a little sprinkling of pepper!

Then, take your parmesan cheese and dash a desirable amount over top of your acorn squash strips. Heck, you could even sprinkle some over your seeds, if you’d like! Darn, I wish I had thought of that one sooner…

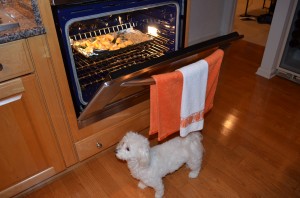
Then throw that thing into your 425°F oven! Don’t let your dog (or other animal or human figure) stand in front of the oven while you do it. Although it makes for a cute picture, it is not a very safe decision…

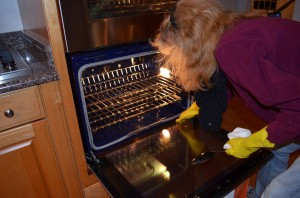
This is a quick picture of my mother helping me clean up my popped-seed mess… Whoops!

Now just let it all roast!

Step 3: The Tasty Joy of a Job Well-Done (Get it? Food humor? Well-done? No? Okay, then…)

The seeds will take about 10 minutes (15 max)! Once they are golden brown, just take them out. They will definitely be done before the squash!

Bake the squash until golden brown,a s well! They should take between 35 and 40 minutes (check them after 20 and then go from there).

Serve it up at Thanksgiving (or any) dinner or just use it as a tasty treat. I promise, this healthy recipe will not disappoint!

End Note: Thank you so much Do It Delicious for the fabulous recipe! Also, folks, please be careful with sharp and hot objects – they can hurt you! Keep a fire extinguisher and/or supervisor and/or paramedics on standby (if you find this humorous then you don’t know me very well…)! Stay safe and eat a lot!

Happy early Thanksgiving, my darlings! Be happy with what you’ve got (i.e. my blog… kidding!)!